Hawaiian Chicken Cauliflower “Fried” Rice

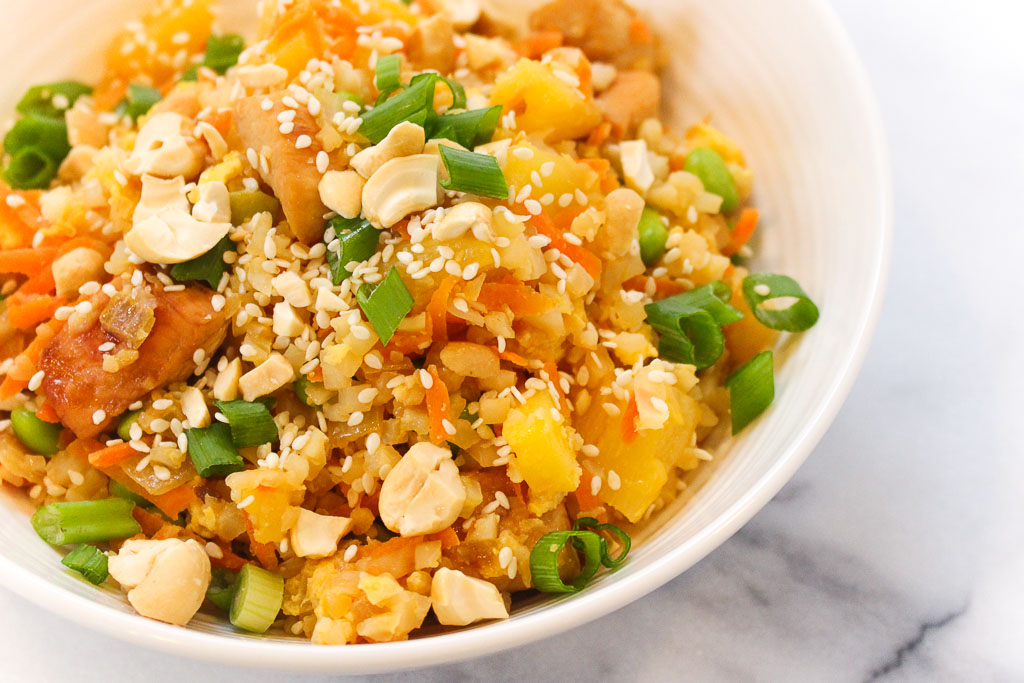
Skip take-out and make your own delicious fried rice, with this healthy twist. Try swapping out rice for cauliflower rice and creating this flavor packed Hawaiian Chicken Cauliflower “Fried” Rice.
Hawaiian Chicken Cauliflower "Fried" Rice via RDelicious Kitchen @rd_kitchenI received a free sample of Kikkoman soy sauce mentioned in this post. By posting this recipe I am entering a recipe contest sponsored by Kikkoman and am eligible to win prizes associated with the contest. I was not compensated for my time.
Have you jumped on board the cauliflower rice trend? This is one trend that I love because it adds more veggies to your meal! Many also opt into this ingredient swap idea because it is a lower carb option.

Your typical fried rice take-out may be packed with excess sodium, but by adding Kikkoman’s Traditionally Brewed Less Sodium Soy Sauce in this recipe can actually help reduce the amount of sodium in this dish.
Hawaiian Chicken Cauliflower "Fried" Rice via RDelicious Kitchen @rd_kitchen
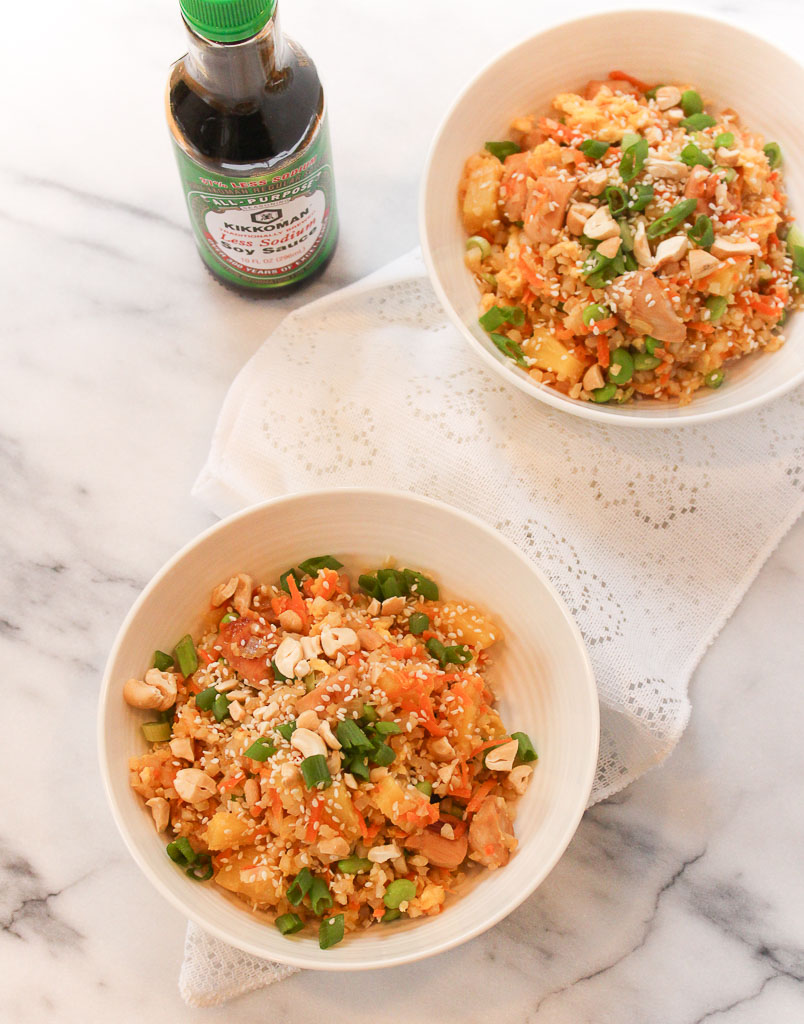
Soy sauce is often associated with being high in sodium, but culinary research indicates it’s an ingredient that can actually help reduce sodium in recipes. How? Soy sauce is rich in umami, a savory taste that helps round out the overall flavor of a dish and enhances the palatability of a wide variety of foods. In fact, a study published in the Journal of Food Science revealed that swapping soy sauce for salt reduces the sodium by up to 50% without decreasing consumer acceptance.

As you’ll see there is no additional source of sodium from any other ingredients in this recipe. By using 1/2 tsp. Kikkoman Soy Sauce in place of 1/2 tsp. table salt, the sodium content of the recipe is cut by 1000 mg.
Hawaiian Chicken Cauliflower "Fried" Rice via RDelicious Kitchen @rd_kitchen
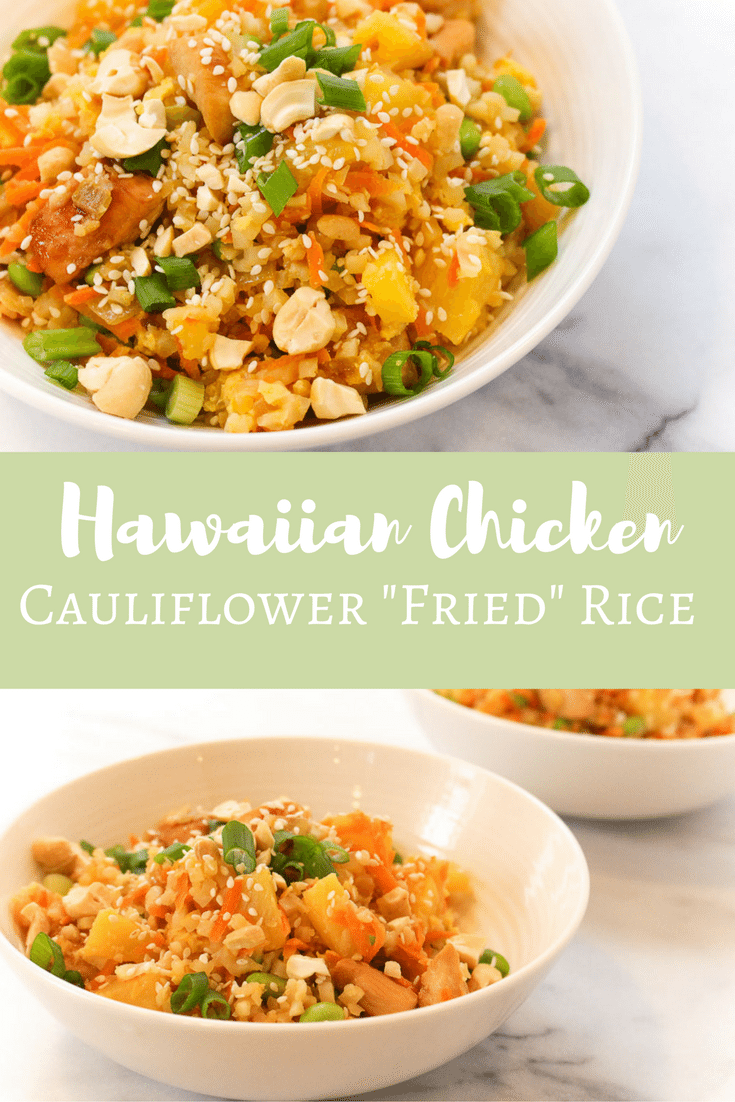
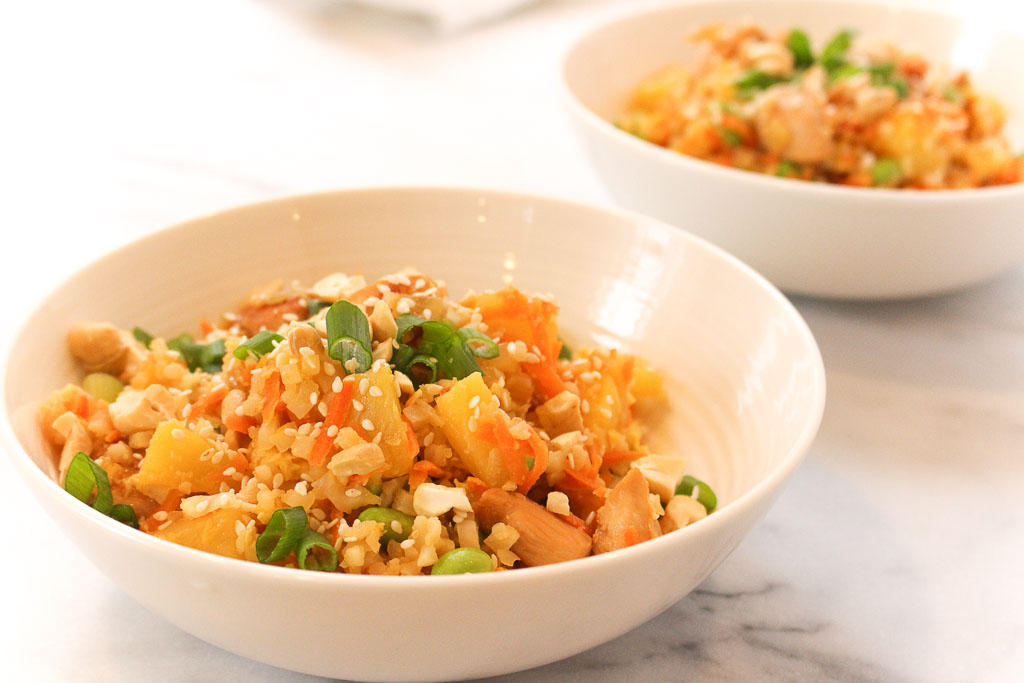
This isn’t just any cauliflower rice. I added a little tropical twist. As I am typing this recipe, I am dreaming of being on a tropical island away from the NJ snow. The addition of pineapple, not only adds that tropical flavor, but also the enzyme found in pineapple, bromelain, digests protein, softening the tissues in meat before cooking it, creating tender pieces of chicken.
Hawaiian Chicken Cauliflower "Fried" Rice via RDelicious Kitchen @rd_kitchenLooking to add more umami flavor to your recipes? Kikkoman offers a variety of less sodium products: Less Sodium Soy Sauce, 50% Less Sodium Gluten-Free Tamari Soy Sauce, Less Sodium Teriyaki Marinade & Sauce, and 50% Less Sodium Gluten-Free Teriyaki Marinade & Sauce.

Print
clock clock iconcutlery cutlery iconflag flag iconfolder folder iconinstagram instagram iconpinterest pinterest iconfacebook facebook iconprint print iconsquares squares iconheart heart iconheart solid heart solid icon
Hawaiian Chicken Cauliflower “Fried” Rice in a white bowl

Hawaiian Chicken Cauliflower “Fried” Rice

  • Author: Julie @ RDelicious Kitchen
  • Yield: 6

Ingredients

Scale
  • 4 skinless chicken breast, cut into cubes
  • 5 cloves garlic, minced and divided
  • 1 (8 oz.) can pineapple chunks, juice reserved
  • 1/4 cup + 3 tablespoons Kikkoman Traditionally Brewed Less Sodium Soy Sauce, divided
  • 3 tablespoons honey, divided
  • 1 (12 oz.) bag riced cauliflower (or 1 medium-sized head of cauliflower riced)
  • 2 carrots, peeled and shredded
  • 2 tablespoons + 1 teaspoon sesame oil, divided
  • 1/2 medium onion, diced
  • 1 cup frozen and shelled edamame, thawed
  • 2 eggs, beaten
  • 6 scallions, sliced
  • 2 tablespoons, cashews, crushed
  • 1 teaspoon sesame seeds

Instructions

  1. In a bowl, combine 3 garlic cloves (minced), 1/4 cup pineapple juice, 1/4 cup soy sauce, and honey. Add the cubed chicken; stir to combine. Let marinade in the refrigerator for at least 1 hour.
  2. Remove chicken from marinade. Discard marinade. Heat 1 tablespoon sesame oil in a large skillet over medium-high heat. Add chicken and cook for about 5 minutes, until internal temperature reaches 165 degrees F. Remove chicken from pan and set aside.
  3. In a small bowl combine remaining pineapple juice, 3 tablespoons soy sauce, 1 tablespoon honey and 1 teaspoon sesame oil; set aside.
  4. Heat 1 tablespoon of sesame oil in the same pan over medium-high heat. Add the onions and carrots. Saute for about 2 minutes; then add garlic; saute for another minute. Add the cauliflower and edamame. Saute until cauliflower is soft (but not mushy).
  5. Turn pan down to low-medium heat. Make a well in the center of the pan and add the eggs. Stir gently in the center until starting to cook, then incorporate into the rest of the veggies. Stir in soy sauce mixture, scallions, pineapple chunks and chicken.
  6. Top with cashews and sesame seeds before serving.

Recipe Card powered byTasty Recipes

RDelicious Kitchen - Julie Harrington Consulting LLC - @rdkitchen
Hawaiian Chicken Cauliflower "Fried" Rice
Don’t forget to check out all the other recipes that are slashing sodium with soy sauce!

Creamy Tomato Soup

A creamy soup without the cream? Check out the secret ingredient that makes this dairy free Creamy Tomato Soup thick and creamy. Creamy Tomato Soup via RDelicious Kitchen @RD_kitchenCan you believe it’s almost 2017!? Where did the year go? The Recipe ReDux club is playing a little party game at the end of 2016: Grabbing your nearest cookbook and ReDux the recipe on page 201, 16, 216 – or any combination of the number ‘2016.’

I opened You Have It Made cookbook by Ellie Krieger to page 126 – creamy tomato soup. I actually won this cookbook at FNCE at the Luvo booth and was able to meet one of favorite chef/RD’s Ellie Krieger. Julie with Ellie Krieger via RDelicious Kitchen via @RD_kitchenThis soup is so simple and packed with flavor. It’s called a “Creamy” Tomato Soup, but guess what? There’s no cream! That’s the magic of Registered Dietitian chefs – we know how to alter recipes with alternative ingredients to pack in more nutritional value while still getting delicious results.
Creamy Tomato Soup via RDelicious Kitchen @RD_kitchenThe magic behind this creamless creamy soup – cashews! Cashews provide the ultimate creaminess when blended into soups. They make this creamy tomato soup so thick and smooth you would never know there isn’t dairy in there.

Creamy Tomato Soup via RDelicious Kitchen @RD_kitchenYou can’t have tomato soup without grilled cheese, am I right? Instead of adding a grilled cheese on the side, I made mini grilled cheese “croutons” with my favorite whole grain bread + Cabot cheddar cheese.
Creamy Tomato Soup via RDelicious Kitchen @RD_kitchen

Print
clock clock iconcutlery cutlery iconflag flag iconfolder folder iconinstagram instagram iconpinterest pinterest iconfacebook facebook iconprint print iconsquares squares iconheart heart iconheart solid heart solid icon
creamy tomato soup with grilled cheese croutons on a white bowl

Creamy Tomato Soup

  • Author: Julie @ RDelicious Kitchen
  • Yield: 6

Ingredients

Scale
  • 2 tablespoons olive oil
  • 2 onions, chopped
  • 2 celery stalks, chopped
  • 1 tablespoon thyme
  • 2 cloves garlic, chopped
  • 1 teaspoon salt
  • 1/2 teaspoon black pepper
  • 2 (28-ounce) cans no-salt-added diced tomatoes
  • 3/4 cup raw cashews
  • 2 tablespoons tomato paste
  • 2 slices whole wheat bread
  • 2 ounces cheddar cheese, thinly sliced
  • 1 teaspoon butter

Instructions

  1. Heat the oil in a large pot over medium heat. Add the onions, celery, thyme, garlic, salt and pepper and cook, stirring occasionally, until softened, about 5 minutes. Stir in the tomatoes with their juice, 1 1/2 cups of water, the cashews, and tomato paste. Bring to a boil, then lower the heat to medium-low and simmer, stirring occasionally, until the soup begins to thicken, about 20 minutes. Allow to cool slightly, for about 15 minutes, then puree in 3 batches until smooth, transferring the puree to a pot or storage container as it is pureed.
  2. To continue, reheat the soup in a pot over medium heat until it comes to a simmer.
  3. As the soup is cooking, spread butter on each slice of bread. Place butter side of bread down in a small pan, layer with cheese, then place the other slice of bread on top (butter side facing up). Cook until golden brown on each side and cheese has melted. Cut into small squares.
  4. Pour soup into bowl and top with mini grilled cheese “croutons”.

Notes

Creamy Tomato Soup recipe by Ellie Krieger’s You Have It Made cookbook.

Recipe Card powered byTasty Recipes

RDelicious Kitchen @RD_Kitchen
Creamy Tomato Soup via RDelicious Kitchen @RD_kitchen

Snickerdoodle Oatmeal

Cozy up to a bowl of Snickerdoodle Oatmeal this holiday season!Snickerdoodle Oatmeal via RDelicious Kitchen @RD_KitchenDuring the winter months, I always crave a warm bowl of oatmeal in the morning. Skip the sugary packets of oats and create a hearty bowl with simple ingredients, that I am sure are probably in your kitchen already.

Surprisingly, I am not the biggest fan of snickerdoodle cookies. I think it’s because I don’t prefer sugar cookies (the base of snickerdoodles). I am more of a chocolate chip cookie kind of gal, but I do love the warm cinnamon sugar combination from snickerdoodles.
Snickerdoodle Oatmeal via RDelicious Kitchen @RD_Kitchen
McCormick recently came out with a new roasted cinnamon. The roasted version has a richer, deeper flavor than traditional cinnamon. If you love cinnamon and want a bigger and bolder flavor, you have to try roasted cinnamon.
The toppings of this oatmeal really make this breakfast a winner! Have you tried the seasonal Larabar snickerdoodle flavor? Plus, swirling in Betsy’s Best cinnamon chia gourmet peanut butter adds that extra pop of flavor.

Print
clock clock iconcutlery cutlery iconflag flag iconfolder folder iconinstagram instagram iconpinterest pinterest iconfacebook facebook iconprint print iconsquares squares iconheart heart iconheart solid heart solid icon
snickerdoodle oatmeal in a white bowl

Snickerdoodle Oatmeal

  • Author: Julie @ RDelicious Kitchen
  • Yield: 1

Ingredients

Scale
  • 1/3 cup rolled oats
  • 1 cup milk
  • 1/2 banana
  • 2 teaspoons cinnamon
  • 1 teaspoon vanilla extract
  • 1 teaspoon maple syrup
  • 1/2 tablespoon chia seeds
  • 1/4 cup vanilla kefir
  • (optional toppings): sliced banana, Betsy’s Best cinnamon chia peanut butter, snickerdoodle larabar

Instructions

  1. Combine rolled oats and milk in a saucepan over medium heat. Slice a banana into thin piece, gently fold into oats. Let cook for 2-3 minutes.
  2. Once oatmeal begins to simmer, stir vigorously to break down the banana slices.
  3. Cook until oats reach desired consistency and liquid is absorbed.
  4. Stir in cinnamon, vanilla extract, maple syrup, chia seeds, and kefir. (the kefir will make your oats super creamy!)
  5. Add desired toppings!

Recipe Card powered byTasty Recipes

RDelicious Kitchen @RD_Kitchen
Snickerdoodle Oatmeal via RDelicious Kitchen @RD_Kitchen

Balsamic Roasted Almonds + Fun Facts about Almonds

This past September I traveled to California for the first time. I was so fortunate that California Almond Board invited me on an amazing trip to the almond orchards in Lodi, California with a group of amazing Registered Dietitians and food bloggers. We learned a wealth of information of all things almonds, including sustainability, growing methods, almond life cycles and nutrition research. Fun Facts About Almonds via RDelicious Kitchen @RD_KitchenDisclosure: I was provided with free travel and accommodations to the California Almond Orchard experience. I was not additionally compensated for my time or to write this post. 
Ever wonder where those almonds that are in your trail mix, granola bars, and cereals are from? The almond lifecycle has many stages before they end up in your kitchen cabinets.
Did you know, there are more than 30 different varieties of almonds? 10 of them comprise the majority of almonds produced in California.Fun Facts About Almonds via RDelicious Kitchen @RD_Kitchen
80% of the world’s almonds are produced in California, and from raw almonds and almond butter to almond flour, almond milk, and almond oil. The Central Valley of California is the perfect spot for almonds to grow due to their mild, wet winters and hot, dry summers.
The Almond Lifecycle:
November – February: Almond trees go through a period of dormancy when the cold weather lets them sit back, relax and store up almond nutrients for next year’s crop.
Late February – early March: Almond tree buds burst into light pink and white blooms in preparation for pollination. Nonpareils are among the first to bloom, while other varieties, such as Carmel and Mission, bloom later.
Many almond trees are not self-pollinating, so bees provide the missing piece of the puzzle. Populations of bees are brought to the orchard to carry pollen and initiate crop development.
March – June: Almonds continue to mature, with the shell hardening and kernel forming. Also at this time, green almonds are harvested for various culinary uses.Fun Facts About Almonds via RDelicious Kitchen @RD_KitchenJuly – early August: Almond hulls begin to split open exposing the almond shell and allowing it to dry. Shortly before harvest, the hulls open completely.
Mid-August through October: Mechanical tree “shakers” harvest the almonds by vigorously shaking them to the ground. The almonds then dry naturally for 8–10 days in the orchard before they are swept into rows and picked up by machine.Fun Facts About Almonds via RDelicious Kitchen @RD_KitchenAfter harvest, almonds go to a huller/sheller where the kernels pass through a roller to remove the hull, shell, and any remaining debris. Next stop: the handler for sizing, where the almond kernels drop into separate bins according to size.
After sizing, almonds are kept in controlled storage conditions to maintain quality until they’re either shipped or further processed into any variety of different almond forms for diverse culinary uses. (source: California Almonds)Fun Facts About Almonds via RDelicious Kitchen @RD_Kitchen
Did you know – Almond trees are grafted on the roots of peach or plum trees for a stronger root base. The almond trees are grown in a nursery, then grafted onto the root of a peach or plum tree to grow to maturity. Through the orchard you are able to see the point where they were grafted since they overlap each other. 
Fun Facts About Almonds via RDelicious Kitchen @RD_KitchenDid you know there are three parts to an almond? The hull, shell, and kernel make up this mighty little nut and all parts are used. The hull is the dry and fuzzy outer later. Hulls are sold as livestock feed, which reduces the amount of water used to grow other feed crops. The shells go to various alternative farming uses such as livestock bedding. The kernel, which most think of when thinking about almonds, is the nutrient-rich almond we eat. Each serving (28 g) contains 6 grams of energy-packed protein, 4 grams of hunger-fighting fiber, 13 grams of “good” unsaturated fat and only 1 gram of saturated fat.

Now that I have you craving almonds, here is a delicious recipe to jazz up your almond snacks. Try these Balsamic Roasted Almonds. Just a few simple ingredients and snack time is jazzed up a little.
Balsamic Roasted Almonds via RDelicious Kitchen @RD_Kitchen

Warning: these almonds are addicting. The whole batch was gone in less than a week. Add them to salads, pair with a piece of fruit, the possibilities are endless. Be on the look out for another recipe soon using these almonds!
Balsamic Roasted Almonds via RDelicious Kitchen @RD_Kitchen

Print
clock clock iconcutlery cutlery iconflag flag iconfolder folder iconinstagram instagram iconpinterest pinterest iconfacebook facebook iconprint print iconsquares squares iconheart heart iconheart solid heart solid icon
balsamic roasted almonds in a white bowl

Balsamic Roasted Almonds + Fun Facts about Almonds

  • Author: Julie @ RDelicious Kitchen
  • Prep Time: 1 hour
  • Cook Time: 8 mins
  • Total Time: 1 hour 8 mins

Ingredients

Scale
  • 1 cup raw almonds
  • 1/2 cup balsamic vinegar
  • 1 teaspoon sea salt
  • 2 tablespoon rosemary, very finely chopped

Instructions

  1. Place almonds in a small bowl. Pour the balsamic vinegar into the bowl, stir to coat the almonds. Let sit for one hour.
  2. Pre-heat the oven to 350˚. Drain the vinegar from the almonds and pat almonds dry. Add sea salt and rosemary to the bowl and stir well to coat the almonds evenly. Spread almonds evenly onto a cookie sheet and bake for 8 minutes (stir the almonds halfway through cooking).
  3. Remove from oven and let cool for 30 minutes. Store almonds in an airtight container.

Recipe Card powered byTasty Recipes

RDelicious Kitchen @RD_Kitchen
Balsamic Roasted Almonds via RDelicious Kitchen @rd_kitchen

Thank you California Almonds for this amazing experience! To learn more about California Almonds check out their website. They have great resources for health professionals!

website // facebook // twitter // instagram

Fun Facts About Almonds via RDelicious Kitchen @RD_Kitchen

Apple Pie Overnight Oats

Pressed for time in the morning, but don’t want to skimp on a nutritious and filling breakfast? Make these Apple Overnight Oats and breakfast will be ready for you as you run out the door!
Apple Pie Overnight Oats via RDelicious Kitchen @rd_kitchenOn these chilly mornings, the snooze button has been becoming my best friend. Overnight oats save my mornings when I leave myself just 20 minutes to get out the door. With just a little prep the night before I know breakfast is ready for me, so I don’t feel guilty for getting those extra 10 (errr 20) minutes of sleep.
Apple Pie Overnight Oats via RDelicious Kitchen @rd_kitchenAfter many mornings of overnight oats, I am always looking for new flavor combos. The base of my overnight oats is typically a plain yogurt or kefir with fruit along with the oats. I often hear that plain yogurt is too tangy and tart. One of my favorite RD tips is to stir in unsweetened applesauce. It adds that sweetness without adding added sugars like flavored yogurts have. Plus, adding a pinch of cinnamon, it adds that perfect sweetness.

Apple Pie Overnight Oats via RDelicious Kitchen @rd_kitchenAdding cooked apples make these overnight oats tastes like dessert. I love apple pie, but I typically only eat the filling of the apples and ditch the crust. The soft apples add that extra element of sweetness from the apples being cooked down.

Print
clock clock iconcutlery cutlery iconflag flag iconfolder folder iconinstagram instagram iconpinterest pinterest iconfacebook facebook iconprint print iconsquares squares iconheart heart iconheart solid heart solid icon
apple pie overnight oats in a mason jar

Apple Pie Overnight Oats

  • Author: Julie @ RDelicious Kitchen
  • Prep Time: 15 mins
  • Total Time: 15 mins
  • Yield: 2

Ingredients

Scale
  • 2 small apples, peeled and chopped
  • 1 teaspoon lemon juice
  • 1 1/2 tablespoons cinnamon, divided
  • 1/2 cup quick oats
  • 1/2 cup unsweetened applesauce
  • 1/2 cup plain yogurt (I used Siggi’s)
  • 2 tablespoons chia seeds
  • 1/4 cup walnuts, chopped

Instructions

  1. In a small pot combine, chopped apples, lemon juice, and 1 tablespoon cinnamon. Heat over low heat until apples soften. Remove from heat and let cool completely.
  2. In a bowl, combine oats, applesauce, yogurt, chia seeds, and remaining cinnamon. Distribute oat mixture evenly between two mason jars. Add walnuts evenly over the oats, then top with the cooked apples.
  3. Seal with a lid and store in the refrigerator overnight.

Recipe Card powered byTasty Recipes

RDelicious Kitchen @RD_Kitchen
Apple Pie Overnight Oats via RDelicious Kitchen @rd_kitchen

Roasted Root Vegetable Power Bowl

A comforting, satisfying plant-based bowl, this Roasted Root Vegetable Power Bowl is the perfect colorful fall dinner to cozy up to on a chilly night. 
Fall is my favorite season! I just love the cool, crisp weather, the beautiful fall foliage, and of course the food!
Roasted Root Vegetable Power Bowl via RDelicious Kitchen @RD_Kitchen
This time of year, I find myself roasting vegetables daily. Roasting is one of my favorite cooking methods for veggies, but there’s something about cracking the windows on a cool fall evening and cozying up with fluffy blankets with a warm comforting meal.
Recipe ReDux members were challenged to create a plant protein power bowl, packed with protein, fiber and color, plant power bowls are trendy and delicious.
Roasted Root Vegetable Power Bowl via RDelicious Kitchen @RD_Kitchen

I decided to use sorghum as my whole grain in this recipe because I was inspired when I met Katie Cavuto, RD at the sorghum booth at FNCE this past weekend. She just released a new cookbook “Whole Cooking and Nutrition” and I was able to sample her sorghum recipe.
Have you ever used sorghum before? When I counsel clients, I encourage them to expand their variety of whole grains in their diet. I often see that their first swap is switching white bread to whole wheat bread or white rice to brown rice, which is great, but I don’t want them to just stop there.
Ancient grains, like sorghum, have more nutrition bang for your buck. Sorghum, which doesn’t have an inedible hull like some other grains, is commonly eaten with all its outer layers, thereby retaining the majority of its nutrients. One serving of sorghum contains 5 grams of fiber and is a good source of iron!
Roasted Root Vegetable Power Bowl via RDelicious Kitchen @RD_Kitchen
I absolutely love how colorful this recipe is. More colors = more nutrients. Another plus is it’s so simple to make. Simply place your veggies on a pan to roast as you prep the remaining ingredients.
If you want a shortcut, you can use Love Beets instead of the mess of peeling beets at home. Love Beets come peeled, steamed and vacuum packed.

Print
clock clock iconcutlery cutlery iconflag flag iconfolder folder iconinstagram instagram iconpinterest pinterest iconfacebook facebook iconprint print iconsquares squares iconheart heart iconheart solid heart solid icon
Roasted Root Vegetable Power Bowl

Roasted Root Vegetable Power Bowl

  • Author: Julie @ RDelicious Kitchen
  • Yield: 4

Ingredients

Scale
  • 2 sweet potatoes, chopped
  • 4 beets, peeled and chopped
  • 4 carrots, peeled
  • 2 tablespoons olive oil, divided
  • 1 bunch Swiss chard, roughly chopped
  • 1 tablespoon garlic powder
  • 1 tablespoon apple cider vinegar
  • 1 cup sorghum
  • 4 cups water
  • 1/4 cup hummus (your favorite flavor!)
  • 1/4 cup goat cheese, crumbled
  • salt and pepper, to taste

Instructions

  1. Preheat the oven to 400 degrees F. Coat a large baking sheet with cooking spray. Toss sweet potatoes and beets with 1 tablespoon olive oil and sprinkle with salt and pepper. Bake for 15 minutes.
  2. Using a peeler, create long strands of carrots. Remove vegetables from oven, add carrots and toss. Bake for an additional 10-15 minutes until vegetables are fork tender. Remove from oven.
  3. In a large bowl, massage Swiss chard leaves with olive oil and apple cider vinegar. Add garlic powder, salt and pepper. Add Swiss chard on a large baking sheet. Roast for 10 minutes until Swiss chard is tender (not crispy).
  4. As vegetables are roasting, cook the sorghum. Add sorghum and water to a pot. Bring to a boil; cook 5 minutes. Turn heat down to low; cover and cook for about 45 minutes or until tender-firm. (for an extra boost of flavor, add a splash of vegetable stock with the water) Season with salt and pepper.
  5. Assemble your bowls, by adding sections of sweet potatoes, beets, carrots, Swiss chard, and sorghum. Add a dollop of hummus and sprinkle with goat cheese. Serve warm.

Recipe Card powered byTasty Recipes

RDelicious Kitchen @RD_Kitchen
Roasted Root Vegetable Power Bowl via RDelicious Kitchen @RD_Kitchen


Sautéed Brussels Sprouts with Apples and Chicken Sausage

I feel like poor Brussels sprouts have always had bad reputation. Don’t turn up your nose to nutritious Brussel sprouts. Cook them in flavorful ways like these Sautéed Brussels Sprouts with Apples and Chicken Sausage.
Sautéed Brussels Sprouts with Apples and Chicken Sausage via RDelicious Kitchen @RD_KitchenGrowing up did your parents tell you to “eat your Brussel sprouts!”? Some still cringe when they hear that. I would guess 9/10 times those people were eating boring, unflavored, under seasoned sprouts.
I find that with many vegetables. Try cooking veggies in a variety of cooking methods and season in different ways. I showcased this idea in a cooking class once, where we cooked cauliflower in 4 different ways: steaming, boiling, roasting, and mashing with a variety of spices and herbs. It was interesting to hear everyone’s views of which method they preferred. Just because you don’t like a vegetable one way, doesn’t mean you won’t like in another way.

Don’t count out Brussels sprouts just yet, until you try this Sautéed Brussels Sprouts with Apples and Chicken Sausage recipe!
Sautéed Brussels Sprouts with Apples and Chicken Sausage via RDelicious Kitchen @RD_KitchenBrussels sprouts are part of the Brassica family of vegetables, which also includes cabbage, broccoli, kale, and collard greens. They are rich in many valuable nutrients. They are an excellent source of vitamin C and vitamin K. They are a very good source of numerous nutrients including folate, vitamin A, manganese, dietary fiber, potassium, vitamin B6 and thiamin (vitamin B1) and a good source of omega-3 fatty acids, iron, phosphorus, protein, magnesium, riboflavin (vitamin B2), vitamin E, calcium, and niacin.
Sautéed Brussels Sprouts with Apples and Chicken Sausage via RDelicious Kitchen @RD_KitchenWhat is your favorite way to enjoy Brussels sprouts?

Print
clock clock iconcutlery cutlery iconflag flag iconfolder folder iconinstagram instagram iconpinterest pinterest iconfacebook facebook iconprint print iconsquares squares iconheart heart iconheart solid heart solid icon
Sautéed Brussels Sprouts with Apples and Chicken Sausage in a white bowl

Sautéed Brussels Sprouts with Apples and Chicken Sausage

  • Author: Julie @ RDelicious Kitchen

Ingredients

Scale
  • 1 1/2 tablespoons olive oil, divided
  • 1 package garlic chicken sausage (6 links)
  • 1 onion, diced
  • 3 cloves garlic, minced
  • 1 pound Brussels sprouts, shaved with a food processor or roughly chopped
  • 2 tablespoons apple cider vinegar
  • 1 honeycrisp apple, julienne
  • salt and pepper, to taste

Instructions

  1. Slice the chicken sausage on a bias (or simply on an angle). In a large pan, heat 1/2 tablespoon olive oil and cook chicken sausage. Remove from pan and set aside.
  2. Add remaining olive oil in the pan and sauté onions and garlic until caramelized. Add shredded Brussels sprouts and cook for an additional 2-3 minutes or until desired doneness. Add apple cider vinegar and cook for an additional minute.
  3. Add apple slices and cook until just warmed through. Add the chicken sausage back in and toss until combined. Season with salt and pepper, to taste.

Recipe Card powered byTasty Recipes

submark
Sautéed Brussels Sprouts with Apples and Chicken Sausage via RDelicious Kitchen @rd_kitchen

Peanut Butter Chocolate Chip (Chickpea) Cookies

Baking in the kitchen brings back so many great memories. Growing up, my favorite recipe I would make with my mom is chocolate chip cookies. Over the years I’ve been tweaking that original recipe and have come up with a few alternatives over the years. My latest creation are these Peanut Butter Chocolate Chip (Chickpea) Cookies.
Peanut Butter Chocolate Chip (Chickpea) Chia Cookies - A healthy twist to a classic - Peanut Butter Chocolate Chip (Chickpea) Cookies Do you have a favorite family recipe? My mom’s classic chocolate chip cookie recipe is a tried and true recipe in our family. The recipe is typed up on (note: from a typewriter) paper is all torn and there are food spills and stains all over it. That’s what makes it so nostalgic.
Peanut Butter Chocolate Chip (Chickpea) Chia Cookies - A healthy twist to a classic - Peanut Butter Chocolate Chip (Chickpea) Cookies These cookies are always made when guests are over for any holiday or celebration. It has become a dessert staple in our house. But they are not the healthiest (hello butter-flavored shortening and sugar!). I’m all for sweets in treats in moderation, but it’s fun to recreate a classic with a healthier twist.

Peanut Butter Chocolate Chip (Chickpea) Chia Cookies - A healthy twist to a classic - Peanut Butter Chocolate Chip (Chickpea) Cookies Beans have been sneaking into more and more baked goods lately because 1) it can help reduce the amount of flour 2) beans can add a boost of protein and fiber. I used chickpeas since they have a very neutral taste and they match the color of chocolate chip cookies best.

Of course, I had to add peanut butter because peanut butter and chocolate is my favorite combo. And just for fun, I added some chia seeds. I really enjoy the added texture it gives to these cookies.
Peanut Butter Chocolate Chip (Chickpea) Chia Cookies - A healthy twist to a classic - Peanut Butter Chocolate Chip (Chickpea) Cookies These cookies are a little more dense than your typical chocolate chip cookies. Whip up a batch of these when you are looking for a little treat midweek.

Print
clock clock iconcutlery cutlery iconflag flag iconfolder folder iconinstagram instagram iconpinterest pinterest iconfacebook facebook iconprint print iconsquares squares iconheart heart iconheart solid heart solid icon
chocolate peanut butter chickpea cookies with a bite on a glass of milk

Peanut Butter Chocolate Chip (Chickpea) Chia Cookies

  • Author: Chef Julie Harrington, RD
  • Prep Time: 15
  • Cook Time: 12
  • Total Time: 27 minutes
  • Yield: 15 1x

Ingredients

Scale
  • 1 (15-ounce) can chickpeas, drained and rinsed
  • 1 cup whole wheat pastry flour
  • 1/4 cup chia seeds
  • 1/2 tsp baking soda
  • 1/4 tsp salt
  • 1/2 cup peanut butter
  • 1/4 cup brown sugar
  • 1/4 cup unsweetened applesauce
  • 1 tbsp vanilla extract
  • 2 eggs
  • 1/2 cup chocolate chips

Instructions

  1. Preheat the oven to 375 degrees. Spray 2 large baking sheets with cooking spray or parchment paper.
  2. In a food processor, puree the chickpeas until smooth, set aside.
  3. In a medium sized bowl, mix together the whole wheat pastry flour, chia seeds, baking soda, and salt. Set aside.
  4. In a large bowl, beat together the peanut butter, brown sugar, and applesauce until smooth. Add in the chickpeas, vanilla extract, and eggs. Beat until smooth.
  5. Slowly mix in the dry ingredients with a spatula until just combined. Mix in the chocolate chips. (Batter will be thick)
  6. Scoop the cookie dough batter (about 2 ounces each) onto the prepared baking sheets about 1 inch apart. Bake 10-12 minutes, until golden brown. Transfer the cookies to a wire rack to completely cool.

Keywords: cookie, chocolate chip cookie, chia seeds, healthy dessert, dessert, chickpeas

Recipe Card powered byTasty Recipes

Chef Julie Harrington, RD - Culinary Nutrition Consultant of chefjulierd.com
Peanut Butter Chocolate Chip (Chickpea) Chia Cookies - A healthy twist to a classic - Peanut Butter Chocolate Chip (Chickpea) Cookies

Black Forest Smoothie Bowl

Imagine the sweet indulgent taste of black forest cake, but a healthier version for breakfast. This Black Forest Smoothie Bowl will feel like an indulgent treat, but healthy for delicious and filling breakfast.
Black Forest Smoothie Bowl via RDelicious Kitchen @rdkitchenDisclosure: I was not compensated for this post, however I did receive free samples of Kura. All opinions are my own and not influenced in any way.
I will be the first to admit, sometimes these pretty looking bowls end up in a tumbler cup as I am rushing out the door. It’s so important to take the time to sit down and enjoy a breakfast. I personally am trying to be more mindful of that myself.
Black Forest Smoothie Bowl via RDelicious Kitchen @rdkitchenI know I’ve talked about this before, but enjoying a smoothie bowl vs. a smoothie drink (even with the same exact ingredients) can help practice mindful eating.

Making a smoothie bowl instead of an on-the-go drink can help practice mindful eating and encourage slower eating. It’s easy to suck down a smoothie in a few big gulps. By enjoying a smoothie bowl with a spoon it can help you slow down, be more aware of what you’re eating and pay attention to whether or not you are actually hungry.

Black Forest Smoothie Bowl via RDelicious Kitchen @rdkitchenI never used to be a fan of protein powders, because majority of them have a lot of weird sounding ingredients and additives in them and even have a weird after taste, but now there are more options out there from real food ingredients. I always promote real food first, but sometimes protein powders can be a great supplement to the meal. Key word = supplement. Protein powders alone shouldn’t replace a full meal. Take this smoothie bowl for example, it contains three food groups with a balanced mixture of carbs, fats, and proteins, coming from it’s wholesome ingredients – fruit, almond milk, yogurt, almond butter, and chia seeds. The protein powder is supplementing the meal to add that extra little boost of protein.
img_1742I was intrigued about Kura with it’s grass-fed dairy protein and probiotic blend. Again, the protein powder is meant to supplement the meal with adding an additional 14g of New Zealand grass-fed dairy protein, which is proven to have higher levels of omega-3s than grain-fed dairy protein. (source)
Have fun with the toppings and add your favorite healthy options!

Print
clock clock iconcutlery cutlery iconflag flag iconfolder folder iconinstagram instagram iconpinterest pinterest iconfacebook facebook iconprint print iconsquares squares iconheart heart iconheart solid heart solid icon

Black Forest Smoothie Bowl

  • Author: Julie @ RDelicious Kitchen
  • Prep Time: 5 mins
  • Total Time: 5 mins
  • Yield: 1

Ingredients

Scale
  • 1/2 cup frozen cherries
  • 1/2 banana
  • 1/2 cup unsweetened almond milk
  • 1/4 cup Siggi’s black cherry yogurt (or plain/vanilla yogurt)
  • 1 tablespoon chia seeds
  • 1 tablespoon cocoa powder
  • 1 scoop chocolate protein powder (I used Kura)
  • 1 tablespoon almond butter
  • 1 cup ice
  • (optional toppings) cherries, banana slices, chia seeds, cocoa nibs, almonds, etc.

Instructions

  1. Simply place all ingredients into a blender. Blend until smooth and creamy.
  2. Pour in a bowl and top with desired toppings.

Recipe Card powered byTasty Recipes

Black Forest Smoothie Bowl via RDelicious Kitchen @rdkitchen
RDelicious Kitchen - Julie Harrington Consulting LLC - @rdkitchen

Baba Ganoush (Roasted Eggplant Dip)

Looking for a new dip for your veggies? Try baba ganoush – a signature Middle Eastern roasted eggplant puree enriched with tahini and seasoned with lemon juice and lots of garlic.
Baba Ganoush (Roasted Eggplant Dip) via RDelicious Kitchen @rdkitchenBaba Ganoush (Roasted Eggplant Dip) via RDelicious Kitchen @rdkitchen

My favorite part of this dip is the smokiness that the dish brings when roasting the eggplant. I additionally roasted the garlic for this dip too. Have you ever roasted garlic before? It adds that same smokiness but also a subtle sweet flavor. Simply add cloves of garlic (you can even do the whole head of garlic at once!) in a little tin foil pouch, drizzle with some olive oil and sprinkle a little salt and pepper. Seal up the foil and roast along with the eggplant. This will also help incorporate the garlic flavor throughout the dip because it is much easier to blend since it is softer when you puree the dip.

Baba Ganoush (Roasted Eggplant Dip) via RDelicious Kitchen @rdkitchenI picked up a bunch of eggplant at my last farmer’s market visit. It’s been sitting in my refrigerator because I just couldn’t decide what to make. I had so many recipe ideas running through my head. #foodbloggerproblems
Baba Ganoush (Roasted Eggplant Dip) via RDelicious Kitchen @rdkitchenMy extended family decided this year to do a big fantasy football draft. It was pretty entertaining. One thing about our family is that we are all very loud. So all of in the room trying to have an organized fantasy draft = chaos. Everyone was just talking over each other, but once we figured everything out, everyone picked their teams. Wish me luck this season!

Baba Ganoush (Roasted Eggplant Dip) via RDelicious Kitchen @rdkitchenBaba ganoush is very similar to hummus, but instead of chickpeas being the base, roasted eggplant is. Don’t skimp on the tahini (ground sesame seeds). It really adds that extra boost of flavor, plus heart healthy unsaturated fats.
Baba Ganoush (Roasted Eggplant Dip) via RDelicious Kitchen @rdkitchen
You can use baba ganoush like in any application where you would use hummus. Spread it on a sandwich instead of mayo. Swirl it in to mashed potatoes or mashed cauliflower to kick it up with some flavor. Or just simply dunk with your favorite veggies or pita chips.

Baba Ganoush (Roasted Eggplant Dip) via RDelicious Kitchen @rdkitchen

Print
clock clock iconcutlery cutlery iconflag flag iconfolder folder iconinstagram instagram iconpinterest pinterest iconfacebook facebook iconprint print iconsquares squares iconheart heart iconheart solid heart solid icon
Baba Ganoush (Roasted Eggplant Dip) in a white bowl

Baba Ganoush (Roasted Eggplant Dip)

  • Author: Julie @ RDelicious Kitchen
  • Prep Time: 15 mins
  • Cook Time: 35 mins
  • Total Time: 50 mins

Ingredients

Scale
  • 2 tablespoons olive oil, divided
  • 1 large eggplant
  • 4 cloves garlic
  • 2 tablespoons tahini
  • 1 lemon, juiced
  • 1 tablespoon parsley
  • salt and pepper, to taste

Instructions

  1. Preheat the oven to (high) broil.
  2. Slice eggplant into 1/4 inch rounds and place on a large baking sheet. Drizzle with 1 tablespoon olive oil and sprinkle with salt and pepper.
  3. On a small piece of tin foil, add the garlic cloves, drizzle over 1/2 tablespoon of olive oil and sprinkle with salt and pepper. Loosely wrap the foil around the garlic. Place the wrapped garlic on the baking sheet with the eggplant.
  4. Broil for 5 minutes, turn eggplant and broil for an additional 5 minutes. Turn broiler off, but do not remove eggplant from the oven. Heat oven to 350 degrees and roast for an additional 25 minutes.
  5. Remove from pan, wrap the rounds in foil to lock in moisture; let sit for about 5 minutes.
  6. Peel away most of the skin of the eggplant and add flesh to a food processor. It should be soft and tender and the skin should come off easy. Add the roasted garlic tahini, lemon juice, remaining 1 tablespoon olive oil, and parsley. Process until smooth and creamy. Season with salt and pepper.
  7. Garnish with additional parsley. Serve with pita chips and veggies.

Recipe Card powered byTasty Recipes

Baba Ganoush (Roasted Eggplant Dip) via RDelicious Kitchen @rdkitchen