The Ultimate PB&J

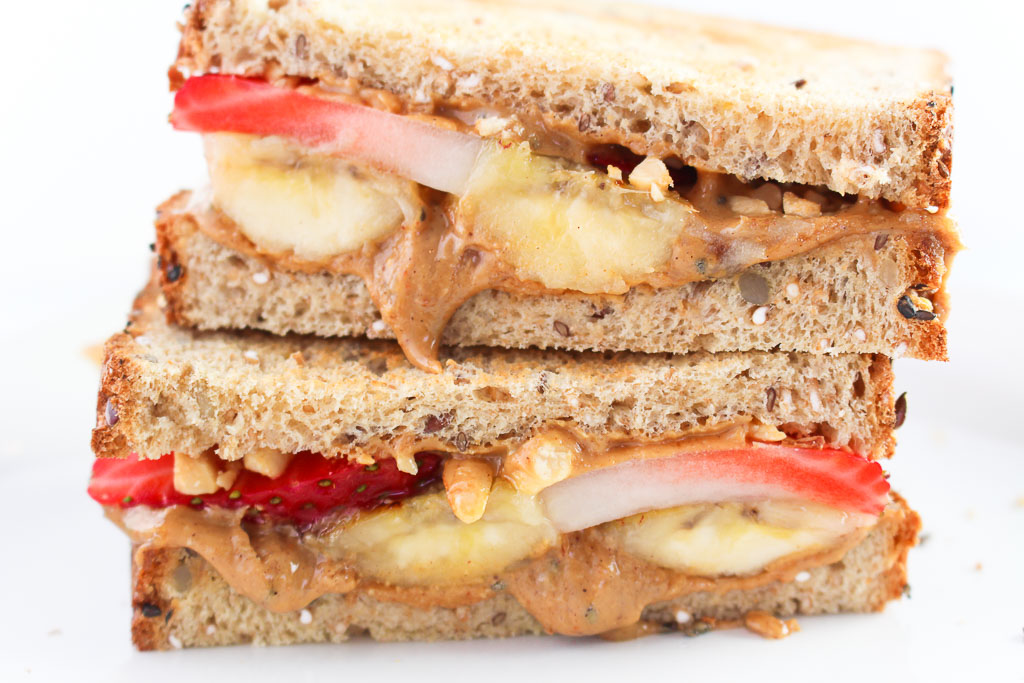
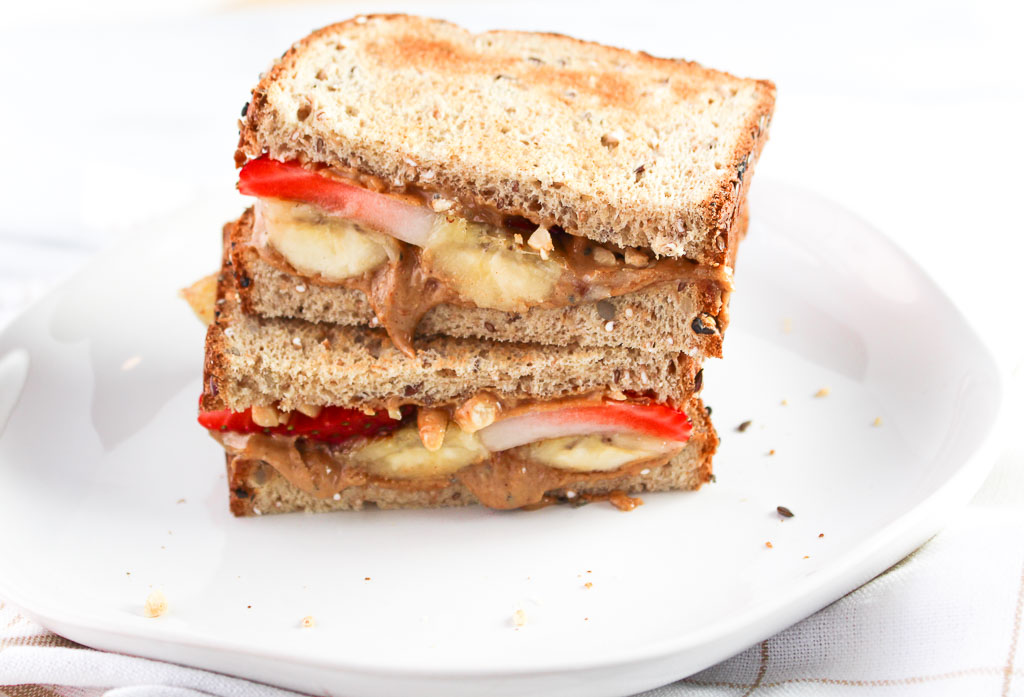
Calling all PB&J lovers – this recipe is for you! Turn a classic into something new and exciting, like this Ultimate PB&J.
The Ultimate PB&J via RDelicious Kitchen @RD_KitchenI lived off PB&J growing up. It is so quick and easy to make, plus portable. This month The Recipe ReDux challenged members to cook with at least 3 ingredients that are actually in your refrigerator or pantry right now. 99% of the time, my kitchen will never be without peanut butter, bananas, bread, and chia seeds. They are staples.
The Ultimate PB&J via RDelicious Kitchen @RD_Kitchen

I was craving a classic PB&J this weekend, but with this challenge, I wasn’t just going to slather peanut butter and jelly on bread and call it a recipe, so I decided to add a little culinary twist to this classic for this RR challenge.

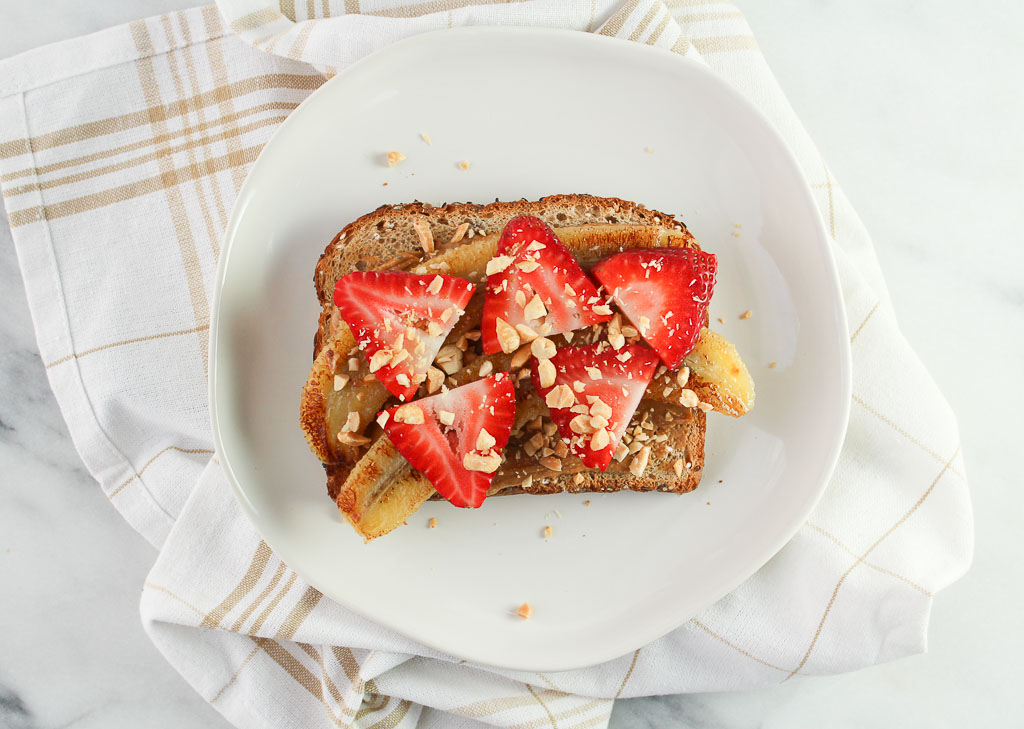
For a good PB&J (or any sandwich), make sure to start with hearty whole grain bread. Next, comes my favorite part, the peanut butter! I ran out of one of my favorites, Betsy’s Best, so I made my own version by mixing natural peanut butter with cinnamon and chia seeds. Then, topped with bruleed bananas, strawberries, and chopped peanuts, I’d say this is definitely gourmet compared your standard PB&J.

Print
clock clock iconcutlery cutlery iconflag flag iconfolder folder iconinstagram instagram iconpinterest pinterest iconfacebook facebook iconprint print iconsquares squares iconheart heart iconheart solid heart solid icon
the ultimate peanut butter and jelly cut in half on a white plate

The Ultimate PB&J

  • Author: Julie @ RDelicious Kitchen
  • Yield: 1

Ingredients

Scale
  • 2 slices whole grain bread, lightly toasted
  • 2 tablespoons natural peanut butter
  • 1 teaspoon cinnamon
  • 1 teaspoon chia seeds
  • 1 teaspoon coconut oil
  • 1 banana, sliced in half lengthwise
  • 2 strawberries, sliced
  • 1 tablespoon peanuts, chopped

Instructions

  1. In a small bowl, stir together the peanut butter, cinnamon, and chia seeds. Set aside.
  2. In a small pan over medium heat, melt the coconut oil. Place bananas in pan and cook until golden brown.
  3. On one slice of bread, spread the peanut butter. Top with the cooked bananas, strawberry slices, and chopped peanuts. Place other slice of bread on top and enjoy!

Recipe Card powered byTasty Recipes

RDelicious Kitchen - Julie Harrington Consulting LLC - @rdkitchen
The Ultimate PB&J via RDelicious Kitchen @RD_Kitchen

The Ultimate PB&J via RDelicious Kitchen @RD_Kitchen

Smoked Salmon and Dill Sheet Pan Frittata

Serve eggs family-style with this Smoked Salmon and Dill Sheet Pan Frittata that will kick your breakfast or brunch up a notch.
Smoked Salmon and Dill Sheet Pan Frittata via Chef Julie Harrington, RD @ChefJulie_RD #smokedsalmon #salmon #breakfast #frittata #eggs #sheetpan #seafoodWay back when one of my first jobs was at a bagel shop. It was one of my favorite jobs. I worked with my friends and got to enjoy endless bagels and coffee. The only downside was getting to work at 5:00 am on a weekend.
Smoked Salmon and Dill Sheet Pan Frittata via Chef Julie Harrington, RD @ChefJulie_RD #smokedsalmon #salmon #breakfast #frittata #eggs #sheetpan #seafoodNow, I love enjoying a leisurely brunch on the weekend. One thing the bagel shop introduced me to was smoked salmon or also known as lox. I still remember this one customer who always ordered – an everything bagel with cream cheese, lox, tomato, red onion, and capers. Of course, I had to try it.

Smoked Salmon and Dill Sheet Pan Frittata via Chef Julie Harrington, RD @ChefJulie_RD #smokedsalmon #salmon #breakfast #frittata #eggs #sheetpan #seafoodThat’s when my smoked salmon love affair began. It is now a staple at my brunches. I love the addition of the smoked salmon in this frittata. Plus, baking it in the sheet pan makes it so easy to serve! Smoked Salmon and Dill Sheet Pan Frittata via Chef Julie Harrington, RD @ChefJulie_RD #smokedsalmon #salmon #breakfast #frittata #eggs #sheetpan #seafoodOften times the term lox and smoked salmon are used interchangeably, but there is a difference. Lox was traditionally only made from the belly of salmon. The salmon is salt-cured or brined but never cooked or even smoked. It has a very smooth silky texture. Smoked salmon is a much more generic term than lox. Smoked salmon can be made from any part of the fish, and it starts with salt curing or brining, just as in lox.

Print
clock clock iconcutlery cutlery iconflag flag iconfolder folder iconinstagram instagram iconpinterest pinterest iconfacebook facebook iconprint print iconsquares squares iconheart heart iconheart solid heart solid icon
piece of Smoked Salmon and Dill Sheet Pan Frittata on a white plate with a gold fork

Smoked Salmon and Dill Sheet Pan Frittata

  • Author: Chef Julie Harrington, RD
  • Prep Time: 10 mins
  • Cook Time: 20 mins
  • Total Time: 30 mins
  • Yield: 8
  • Category: Breakfast
  • Method: Oven-Baked

Ingredients

Scale
  • 12 eggs
  • 5 ounces smoked salmon (lox), chopped
  • 3 scallions, chopped
  • 1/2 cup dill, roughly chopped
  • 1-pint grape tomatoes, sliced in half
  • salt and pepper, to taste

Instructions

  1. Prep:
  2. Preheat the oven to 350 degrees F. Spray a 13×9 inch deep baking dish with cooking spray. Set aside.
  3. Whisk eggs in a large bowl. Season with salt and pepper.
  4. Spread smoked salmon, scallions, dill, and grape tomatoes evenly in the bottom of the baking dish.
  5. Gently pour eggs over the smoked salmon mixture.
  6. Bake in the oven for 20 minutes, until eggs are cooked through and top begins to brown.

Keywords: #smokedsalmon #salmon #breakfast #frittata #eggs #sheetpan #seafood

Recipe Card powered byTasty Recipes

Chef Julie Harrington, RD - Culinary Nutrition Consultant of chefjulierd.com

Smoked Salmon and Dill Sheet Pan Frittata via Chef Julie Harrington, RD @ChefJulie_RD #smokedsalmon #salmon #breakfast #frittata #eggs #sheetpan #seafood

Quick Pickled Onions

A jar of quick pickled onions in your refrigerator gives you last-minute, tangy addition to many dishes.

Quick Pickled Onions via Chef Julie Harrington @ChefJulie_RD #pickledonions #onions #pickling #fermentedfoods #topping #condiment #makeahead

My fiance LOVES red onion. In my opinion a little too much. Now every time he makes tuna salad, I need to supervise because the last time he made it I think there was more red onion then actual tuna. It should have been called a red onion salad.

Quick Pickled Onions via Chef Julie Harrington @ChefJulie_RD #pickledonions #onions #pickling #fermentedfoods #topping #condiment #makeahead

While I do enjoy onions, raw onions are not always my favorite. I sometimes feel like they overpower a dish. Have you ever tried pickled onions instead? I now have been adding these tangy slices into my dishes to get more of a tangy red onion flavor instead that sharp and pungent red onion flavor that can take over the whole dish.


Quick Pickled Onions via Chef Julie Harrington @ChefJulie_RD #pickledonions #onions #pickling #fermentedfoods #topping #condiment #makeahead

There are so many uses for pickled onions. Add to sandwiches, use as a condiment to top tacos or egg salad, or toss them into grain salads. Their tart and tangy flavor and their bright pink color will perk up any dish.

Quick Pickled Onions via Chef Julie Harrington @ChefJulie_RD #pickledonions #onions #pickling #fermentedfoods #topping #condiment #makeahead

As the pickled onions continue to brine in the refrigerator, they will turn to vibrant pink in color. Make sure to store your pickled onions in a glass container (I used a mason jar). Most metals will react with vinegar and plastic will absorb the flavors. Plus, being able to see them is always a little reminder when I open my refrigerator to top my dishes with them.

Print
clock clock iconcutlery cutlery iconflag flag iconfolder folder iconinstagram instagram iconpinterest pinterest iconfacebook facebook iconprint print iconsquares squares iconheart heart iconheart solid heart solid icon
quick pickled onions in a mason jar

Quick Pickled Onions

  • Author: Chef Julie Harrington, RD
  • Prep Time: 2 hours
  • Total Time: 2 hours
  • Yield: 8
  • Category: side dish
  • Method: no cook

Ingredients

Scale
  • 1/2 cup apple cider vinegar
  • 1 tablespoon sugar
  • 1 1/2 teaspoon kosher salt
  • 1 cup water
  • 1 red onion, thinly sliced

Instructions

  1. In a mason jar, combine the apple cider vinegar, sugar, salt, and water. Close the lid and shake until sugar and salt have dissolved. (Or can be whisked in a bowl)
  2. Add the onions to the mason jar, making sure all the onions are submerged. Let sit at room temperature for at least 2 hours. (see notes for the make ahead version)
  3. Drain onions before using.

Notes

MAKE AHEAD: Can be made 2 weeks ahead. Cover and chill.

Keywords: quick pickled onions, pickled onions, onions, condiment, topping

Recipe Card powered byTasty Recipes

Butternut Squash and Kale Pita Pizza

Turn leftovers into something brand new like this Butternut Squash and Kale Pita Pizza.
Butternut Squash & Kale Pita Pizza via RDelicious Kitchen @RD_KitchenDisclosure: By posting this recipe I am entering a recipe contest sponsored by Toufyan Bakeries and am eligible to win prizes associated with the contest. I was not compensated for my time.
This recipe was inspired by leftovers and of course Toufyan Bakeries. Adrian and I like to watch Chopped and anytime I have a refrigerator full of leftovers, I pretend I am on an episode. In this mystery basket, the items that I had to work with was leftover roasted butternut squash, an already baked sweet potato, and kale that was on its last legs.
Butternut Squash & Kale Pita Pizza via RDelicious Kitchen @RD_Kitchen

Butternut Squash & Kale Pita Pizza via RDelicious Kitchen @RD_KitchenI utilize pitas for pizzas often as they are the perfect size for a personal pie. Toufayan Bakeries uses old-world recipes with only top quality, wholesome ingredients. Toufayan Pita is naturally cholesterol free and trans fat-free, so it’s the perfect vessel to load with your favorite toppings!
Butternut Squash & Kale Pita Pizza via RDelicious Kitchen @RD_KitchenI was pleasantly surprised how thick, creamy, and delicious the base of the sweet potato came out, which helped the pita not get soggy when baked. The edges crisped up perfectly in the oven.
I wanted to try something different than mozzarella cheese on top, so I went for fontina. It paired perfectly with this flavor combination since this semi-soft cow’s cheese has a gentle buttery and nutty flavor.
Butternut Squash & Kale Pita Pizza via RDelicious Kitchen @RD_KitchenThe recipe notes that the balsamic glaze drizzled top is optional, but I might change that to mandatory!

Print

clock clock iconcutlery cutlery iconflag flag iconfolder folder iconinstagram instagram iconpinterest pinterest iconfacebook facebook iconprint print iconsquares squares iconheart heart iconheart solid heart solid icon
slice of Butternut Squash and Kale Pita Pizza on a white plate

Butternut Squash and Kale Pita Pizza

  • Author: Julie @ RDelicious Kitchen
  • Yield: 2

Ingredients

Scale
  • 2 whole wheat Toufayan Pita Bread pitas
  • 1 sweet potato, baked skin removed
  • 2 cloves garlic, minced
  • 2 tablespoons low-sodium chicken stock
  • 1 teaspoon black pepper
  • 1 cup butternut squash, cubed and roasted
  • 2 teaspoons olive oil
  • 1 small red onion, sliced
  • 2 cups kale, stems removed, roughly chopped
  • 1/2 cup fontina cheese, shredded
  • (optional) 1 tablespoon balsamic glaze

Instructions

  1. Preheat the oven to 400 degrees F.
  2. Remove the skin from the sweet potato. In a small food processor, puree the sweet potato, garlic, chicken stock, and black pepper. Spread evenly on both of the pitas.
  3. In a large saute pan over low-medium heat, saute onions until caramelized. Just as the onions are about done, add the kale and saute until kale has wilted. Season with salt and pepper.
  4. Assemble your pizzas by spreading the sweet potato mixture at the bottom, adding the caramelized onions and kale, then butternut squash.
  5. Sprinkle with cheese and place in the oven for 2-3 minutes, until cheese has melted and pizza is warmed through.
  6. Let slightly cool and drizzle with balsamic glaze, if using.

Recipe Card powered byTasty Recipes

What have you recreated with your leftovers?
RDelicious Kitchen @RD_Kitchen
Butternut Squash & Kale Pita Pizza via RDelicious Kitchen @RD_Kitchen
To find out more about Toufayan Bakeries, follow them on Facebook and Instagram. Their products are available nationwide.

Spanish-Style Cauliflower Rice

Cauliflower rice can replace rice in any recipe for a low-carb option. Try this Spanish-Style Cauliflower Rice inspired by traditional Spanish flavors. 

cauliflower rice in a white square bowl

My fiance’s family is originally from Spain and over the years of us dating, I’ve really come to learn about Spanish cuisine and now love using certain spices that are common in traditional Spanish dishes. One spice that is commonly used is smoked paprika.

cauliflower rice with almonds

What is smoked paprika?

Smoked paprika is a Spanish cousin to the more widely used sweet Hungarian paprika. It’s made from pimiento peppers that have been dried and smoked over an oak fire, then ground into a fine powder. It has a deep red color and a smoky aroma.

Spanish-Style Cauliflower Rice on a marble slab with almonds

Cauliflower rice has become one of my favorite side dishes because it cooks up so quickly, plus it adds a full serving+ of vegetables to a meal.

Cauliflower is a member of the cruciferous vegetable (or Brassicaceae) family- along with broccoli, cabbage, kale, Brussel sprouts, and some other less common varieties.

Spanish-Style Cauliflower Rice in a white square bowl
Print
clock clock iconcutlery cutlery iconflag flag iconfolder folder iconinstagram instagram iconpinterest pinterest iconfacebook facebook iconprint print iconsquares squares iconheart heart iconheart solid heart solid icon
Spanish-Style Cauliflower Rice in a white square bowl

Spanish-Style Cauliflower Rice

  • Author: Chef Julie Harrington, RD
  • Prep Time: 10
  • Cook Time: 15
  • Total Time: 25 minutes
  • Yield: 6
  • Category: side dish
  • Method: stove top
  • Cuisine: spanish

Ingredients

Scale
  • 2 medium heads cauliflower, cored and riced (see tips in the note section)
  • 1 tablespoon coconut oil
  • 1 onion, finely chopped
  • 3 cloves garlic, minced
  • ¾ teaspoon smoked paprika
  • ¾ teaspoon ground cumin
  • ½ cup low-sodium chicken broth
  • 2 tablespoons tomato paste
  • salt and pepper, to taste
  • ¼ cup raw almonds, chopped
  • ¼ cup parsley, finely chopped

Instructions

  1. Heat coconut oil in a large skillet over medium-high heat. Add the onion and garlic, until the onion begins to turn translucent and is fragrant. Add the cauliflower and cook, stirring occasionally, for about 5 minutes, until cauliflower is tender. (Be sure to not overcook, or cauliflower will become mushy) Add paprika and cumin. Sauté for an additional minute.
  2. In a small bowl, whisk together the chicken broth and tomato paste until smooth. Add to the skillet and stir to incorporate into the cauliflower rice. Cook for 2-3 minutes until liquid has absorbed and evaporated.
  3. Season with salt and pepper. Sprinkle with almonds and parsley.

Notes

recipe adapted from Paleo magazine

To rice the cauliflower:
option 1: Take a box grater and grate the cauliflower into rice in a bowl
option 2: Place cauliflower florets in a food processor pulse until reach desired rice consistency.
option 3: Buy the pre-riced cauliflower, often found fresh in the produce section or frozen at your local grocery store.

Keywords: cauliflower, cauliflower rice, spanish

Recipe Card powered byTasty Recipes

other recipes you may enjoy

Jumbo Skillet Apple Pancake

Serve pancakes family style with this (grain-free) Jumbo Skillet Apple Pancake.
Jumbo Skillet Apple Pancake via Chef Julie Harrington, RD @ChefJulie_RD #pancake #jumbopancake #apple #glutenfree #breakfast #brunchConfession: I am a terrible pancake flipper. I am a waffle maker pro, but when it comes to pancakes, I fall short.

It’s either I am too eager to flip them before they are ready or the flipping process is just a disaster, like how I flipped it right on top on my other pancakes and I just made one giant pancake mound. Culinary school graduate fail.
Jumbo Skillet Apple Pancake via Chef Julie Harrington, RD @ChefJulie_RD #pancake #jumbopancake #apple #glutenfree #breakfast #brunchI was going to attempt to make this recipe into individual pancakes, but instead of the hassle of making a bunch of pancakes, I tried making one giant pancake and let me tell you.. it was the best idea I’ve ever had.
Jumbo Skillet Apple Pancake via Chef Julie Harrington, RD @ChefJulie_RD #pancake #jumbopancake #apple #glutenfree #breakfast #brunchThis giant pancake can now be served family style, so no more waiting for your stack on Sunday morning when everyone else is chowing down. Plus, no more pancake flipping disasters!
I opted to top mine with apple slices this time, but now I am thinking of all the topping options I want to try. This is going to become a staple on my weekends. Bonus, it heats up well too!
Jumbo Skillet Apple Pancake via Chef Julie Harrington, RD @ChefJulie_RD #pancake #jumbopancake #apple #glutenfree #breakfast #brunch

Print

clock clock iconcutlery cutlery iconflag flag iconfolder folder iconinstagram instagram iconpinterest pinterest iconfacebook facebook iconprint print iconsquares squares iconheart heart iconheart solid heart solid icon
Jumbo Skillet Apple Pancake in a baking pan

Jumbo Skillet Apple Pancake

  • Author: Chef Julie Harrington, RD
  • Prep Time: 10
  • Cook Time: 20
  • Total Time: 30 minutes
  • Yield: 6
  • Category: Breakfast
  • Method: Oven-Baked

Description

Serve pancakes family style with this (grain-free) Jumbo Skillet Apple Pancake.


Ingredients

Scale
  • 4 eggs
  • ¾ cup full-fat coconut milk, from the can
  • 1 tablespoon maple syrup
  • 1 teaspoon almond flour
  • 2 tablespoons arrowroot starch (or tapioca starch)
  • 2 teaspoons cinnamon, plus more for garnish
  • ¼ teaspoon baking powder
  • 1/8 teaspoon sea salt
  • 1 tablespoon coconut oil
  • 1 apple (such as a Honeycrisp Pink Lady), peeled, cored, and thinly sliced

Instructions

  1. Place a large cast iron skillet in the oven. Preheat the oven to 450 degrees F, leaving the skillet inside during preheating.
  2. In a large bowl, whisk together the eggs, coconut milk, maple syrup, and vanilla. In a separate bowl, whisk together the almond flour, arrowroot starch, cinnamon, baking powder, and salt. Pour the dry ingredients into the egg mixture and stir until fully combined.
  3. Carefully remove the hot skillet from the oven and add the coconut oil. Swirl it around the pan to coat the bottom and sides. Carefully pour the batter into the skillet. Gently place the apple slices on top. Bake for 15-20 minutes, or until golden brown and slightly puffed.
  4. Serve sprinkled with extra cinnamon and drizzle with maple syrup, if desired.

Notes

adapted from Paleo Magazine

Keywords: #pancake #jumbopancake #apple #glutenfree #breakfast #brunch

Recipe Card powered byTasty Recipes

Chef Julie Harrington, RD - Culinary Nutrition Consultant of chefjulierd.com


Jumbo Skillet Apple Pancake via Chef Julie Harrington, RD @ChefJulie_RD #pancake #jumbopancake #apple #glutenfree #breakfast #brunch

Prickly Pear & Wild Blueberry Smoothie

Start your morning with a simple smoothie with an exotic twist. The mix of prickly pear and wild blueberries adds a burst of flavor while packing in antioxidants to start your morning off right.
Prickly Pear & Wild Blueberry via RDelicious Kitchen @RD_KitchenDisclosure: By posting this recipe I am entering a recipe contest sponsored by the Wild Blueberry Association of North America and I am eligible to win prizes associated with the contest. I was not compensated for my time.
Did you know there are two different kinds of blueberries? The two different varieties are regular, cultivated blueberries and Wild Blueberries. While they may have a few similar qualities, they are quite different.

Wild Blueberries have a more intense flavor than regular blueberries. Wild Blueberry plants grow wild and are genetically diverse with thousands of interlocking plants spreading naturally across fields called barrens. It’s this diversity that gives Wild Blueberries their complex and delicious flavor — an extraordinary mix of tart and sweet.
Prickly Pear & Wild Blueberry via RDelicious Kitchen @RD_KitchenI wanted to highlight Wild Blueberries’ unique flavor profile with another unique fruit – prickly pear! I was recently asked what my strategies were to add plenty of produce into my daily eating habits. My response was, make it fun! Try adding unique and exotic new produce to your regular routine so it never gets boring.
An item like Wild Blueberries, you won’t find in the fresh produce section. You can find Wild Blueberries in the frozen fruit section of your local grocery store; just make sure the package says “Wild”. The Wild Blueberry crop (99% of it) is frozen. These potent little berries are individually quick-frozen (IQF) at harvest, locking in their nutrition and taste.
Prickly Pear & Wild Blueberry via RDelicious Kitchen @RD_KitchenWild Blueberries have twice (2x) the antioxidant capacity of larger, cultivated blueberries. A growing body of research shows the potential health benefits of Wild Blueberries including gut health, diabetes, cancer and brain health.
It’s a no-brainer that I now always have Wild Blueberries stashed in my freezer.
Prickly Pear & Wild Blueberry via RDelicious Kitchen @RD_Kitchen

Print

clock clock iconcutlery cutlery iconflag flag iconfolder folder iconinstagram instagram iconpinterest pinterest iconfacebook facebook iconprint print iconsquares squares iconheart heart iconheart solid heart solid icon

Prickly Pear & Wild Blueberry Smoothie

  • Author: Julie @ RDelicious Kitchen
  • Yield: 2

Ingredients

Scale
  • 1 prickly pear, peeled and diced
  • 1 cup frozen wild blueberries
  • 1/2 cup unsweetened almond milk
  • 1/2 tablespoon flax seeds
  • 1 teaspoon cinnamon
  • 1 banana, peeled
  • Ice (optional)

Instructions

  1. Blend all ingredients together until smooth and creamy.
  2. Serve immediately.

Recipe Card powered byTasty Recipes

RDelicious Kitchen @RD_Kitchen
Prickly Pear & Wild Blueberry via RDelicious Kitchen @RD_Kitchen

Learn more about Wild Blueberries:
Website // Facebook // Instagram // Pinterest // Twitter

Chicken Zoodle Soup

Soups on! Did you know February is Soup Season? I am kicking off Soup Season with this Chicken Zoodle Soup.This post is sponsored by the General Mills Bell Institute of Health and Nutrition on behalf of ProgressoTM and ReganMillerJones, Inc. I received free samples of the soup mentioned and was compensated for my time, but as always, opinions are my own! Thank you for supporting brands that make RDelicious Kitchen possible!
During this time of year, soup becomes almost an everyday staple for me. There is nothing better than cozying up to a warm bowl of soup on a cold winter day. If it is a soup from scratch or from a can or package, my goal is to bump up the veggies.
I get a lot of questions about canned soup from clients. Canned soup is quick & easy. It’s convenience in a can! Whether you’re cooking for one or a family, prep a meal in minutes. There is a whole aisle dedicated to just soup at my local grocery store, so it can be challenging to decide which one would be the best choice.
First, check your ingredient list. ProgressoTM is now serving White Meat Chicken With No Antibiotics. Ever! They do not include any artificial colors or flavors.
Then, check the serving size. You may be surprised, in a can of soup there is usually more than 1 serving per container. In one can of ProgressoTM Light Chicken Noodle Soup there are 2 servings. By adding zoodles, this one can of soup turned into 4 servings, which now cuts the sodium in half per serving.
Have #SoupYourWay by pairing with zoodles, a side salad, or a sandwich.

By adding more veggies, it adds an extra punch of nutrition and flavor, helps stretch your dollar, which in turn will create more servings to also help lower the sodium content.ProgressoTM is out to prove that “vegetables” and “flavors” can co-exist.

Simply pour the hot soup over the zoodles and enjoy. It can’t get much simpler than that!

If you have leftovers, make sure you are cooling down and storing properly. Leftover soup can last in the refrigerator for three days and up to one month in the freezer. Follow these steps to store soups for later use.

  1. Refrigerators and freezers cannot cool soups quickly enough for food safety protocols. Speed up the cooling process by placing the pot of soup in a bath of ice water in the sink. Stir soup to help release the heat.
  2. Label and date large ziplock plastic bags. To help pour soup in the bag, place bag in the bowl and cuff the bag over the edges. Ladle soup into each bag, let out excess air and seal.
  3. Lay bags flat in a single layer in the freezer. When completely frozen, stack bags to save space in the freezer.
  4. Thaw overnight in the refrigerator. Reheat over medium-low heat, stirring occasionally.

Print

clock clock iconcutlery cutlery iconflag flag iconfolder folder iconinstagram instagram iconpinterest pinterest iconfacebook facebook iconprint print iconsquares squares iconheart heart iconheart solid heart solid icon
chicken zoodle soup in a white bowl

Chicken Zoodle Soup

  • Author: Julie @ RDelicious Kitchen
  • Yield: 4

Ingredients

Scale
  • 1 can ProgressoTM Light Chicken Noodle Soup
  • 1 large zucchini, spiralized

Instructions

  1. Heat soup in a small pot over medium-high heat.
  2. Spiralize zucchini and divide between 4 bowls. Pour hot soup over zoodles and serve immediately.

Recipe Card powered byTasty Recipes

RDelicious Kitchen @RD_Kitchen

For more soup news and recipes, be sure to visit the ProgressoTM website, Pinterest, Instagram, and Facebook pages.
And don’t forget to check out Bell Institute of Health and Nutrition, for the latest on nutrition research.

Tropical Green Smoothie

Trying to add more fruits and veggies to your daily eating habits? Add both first thing in the morning with this Tropical Green Smoothie.
Tropical Green Smoothie via RDelicious Kitchen @RD_KitchenIt’s February 1st – how is everyone doing on their New Year’s Resolutions so far? I saw a funny post on instagram that January was just a “practice round”. The problem setting big resolutions or goals, is you have to refine them in the beginning and make small habit forming changes to help you get to your end goal.

Tropical Green Smoothie via RDelicious Kitchen @RD_KitchenOne goal that I have been discussing a lot lately this path month is simply including more fruit and vegetables within meals and snacks. Just simply go back to the basics. Are you really getting in the minimum recommendation of 5 fruits and vegetables a day? If the answer is no, this should be your starting point.
If eating healthier or maintaining a healthy weight is your goal for 2017, start here. Try to add a serving of fruit and/or vegetables at every meal and snack. If you are typically consuming 3 meals and 2 snacks per day (and now you are adding a fruit and/or vegetable to each) – BAM! You just reached the minimum daily recommendation for fruits and vegetables for the day.
Tropical Green Smoothie via RDelicious Kitchen @RD_KitchenSmoothies are a fantastic way to add both fruit and vegetables in one meal! The secret to this smoothie is the frozen avocados. Now, of course, you can freeze them yourself, but now Welch’s prepackages them in the frozen aisle. Now, you won’t have to worry about the other portion of your avocado turning too quickly. The frozen avocado makes this smoothie so creamy, almost like a consistency of a milkshake.

Print

clock clock iconcutlery cutlery iconflag flag iconfolder folder iconinstagram instagram iconpinterest pinterest iconfacebook facebook iconprint print iconsquares squares iconheart heart iconheart solid heart solid icon
green smoothie in a glass with a gray straw

Tropical Green Smoothie

  • Author: Julie @ RDelicious Kitchen
  • Yield: 1

Ingredients

Scale
  • 1/2 banana, frozen
  • 1/4 cup frozen mango
  • 1/4 cup frozen pineapple
  • 1/4 cup frozen avocado (or quarter fresh avocado)
  • 1 cup kale (or spinach)
  • 1 tablespoon chia seeds
  • 1 cup almond milk (or milk of your choice)

Instructions

  1. Place all ingredients into a blender and blend until smooth.
  2. Add water for a thinner consistency or add ice for a thicker consistency.

Recipe Card powered byTasty Recipes

RDelicious Kitchen @RD_Kitchen
Tropical Green Smoothie via RDelicious Kitchen @RD_Kitchen

Southwest Stuffed Peppers

Looking for a budget friendly recipe? You’ve come to the right place. These Southwest Stuffed Peppers will keep your stomach and wallet full coming in at only $1.06 per serving.
Southwest Stuffed Peppers via RDelicious Kitchen @rd_kitchenThe Recipe ReDux challenged members to see how low they can go and make a meal for less than $3 per serving.
Did you know that within the top 3 New Year’s resolutions #3 involved finances?
1. Lose Weight/Eat Healthier
2. Life/Self Improvements
3. Better Financial Decisions
Many are looking to make better financial decisions this year, myself included. I was curious to see how much I was actually spending on groceries per month, so I tracked it for the month to see my typical cost on groceries. Being a food blogger and one who weirdly enjoys grocery shopping, when I see new items they tend to creep into my cart. That being said, my monthly grocery spending was a little higher than I thought it would be.
Southwest Stuffed Peppers via RDelicious Kitchen @rd_kitchenEver since then I’ve been more conscious of my spending when at the grocery store. I loved that this Recipe ReDux theme was this month because I had fun shopping to see how low I can go with the cost per serving. This definitely busts the myth that “healthy eating is expensive”, considering this recipe totals to $1.06 per serving made with healthy and wholesome ingredients.

Southwest Stuffed Peppers via RDelicious Kitchen @rd_kitchenHere’s the breakdown:
Southwest Stuffed Peppers via RDelicious Kitchen @RD_kitchen
Wondering what I will be doing with those half cans of ingredients? I love being creative with extra ingredients that I have in the fridge. I think this will turn into a burrito bowl.

Print

clock clock iconcutlery cutlery iconflag flag iconfolder folder iconinstagram instagram iconpinterest pinterest iconfacebook facebook iconprint print iconsquares squares iconheart heart iconheart solid heart solid icon
Southwest Stuffed Peppers topped with avocado on a white plate

Southwest Stuffed Peppers

  • Author: Julie @ RDelicious Kitchen
  • Yield: 6

Ingredients

Scale
  • 3 red bell peppers
  • 1/4 cup quinoa
  • 1 tablespoon olive oil
  • 1 small onion
  • 1 clove garlic, minced
  • 1/2 (14.5 oz) can black beans, drained and rinsed
  • 1/2 (14.5 oz) can corn, drained and rinsed
  • 1/2 (14.5 oz) can no-salt-added diced tomatoes, drained
  • 1/2 cup cheddar cheese, shredded
  • 1/2 avocado, sliced
  • salt and pepper, to taste

Instructions

  1. Preheat oven to 350 degrees F. Spray a baking sheet with nonstick cooking spray. Slice pepper in half lengthwise, place on baking sheet. Bake for 10 minutes.
  2. Cook quinoa according to package directions.
  3. In a saute pan, heat olive oil over medium-high heat. Add onions, saute until translucent. Add the beans, corn, tomatoes, and cooked quinoa and cook until heated through. Stir in cheese.
  4. Remove peppers from oven and stuff with bean mixture. Bake for an additional 5 minutes.
  5. Remove from oven and top with avocado slices.

Recipe Card powered byTasty Recipes

RDelicious Kitchen @RD_Kitchen
Southwest Stuffed Peppers via RDelicious Kitchen @rd_kitchen
Don’t forget to check out other Recipe ReDux members money-saving recipes!