A big thank you to Sara for being the guest chef of this class sharing all her pizza tips for the home chef! Be sure to grab a copy of her newest cookbook: PIZZA! PIZZA! PIZZA!
This post may contain affiliate links. Read my privacy policy.
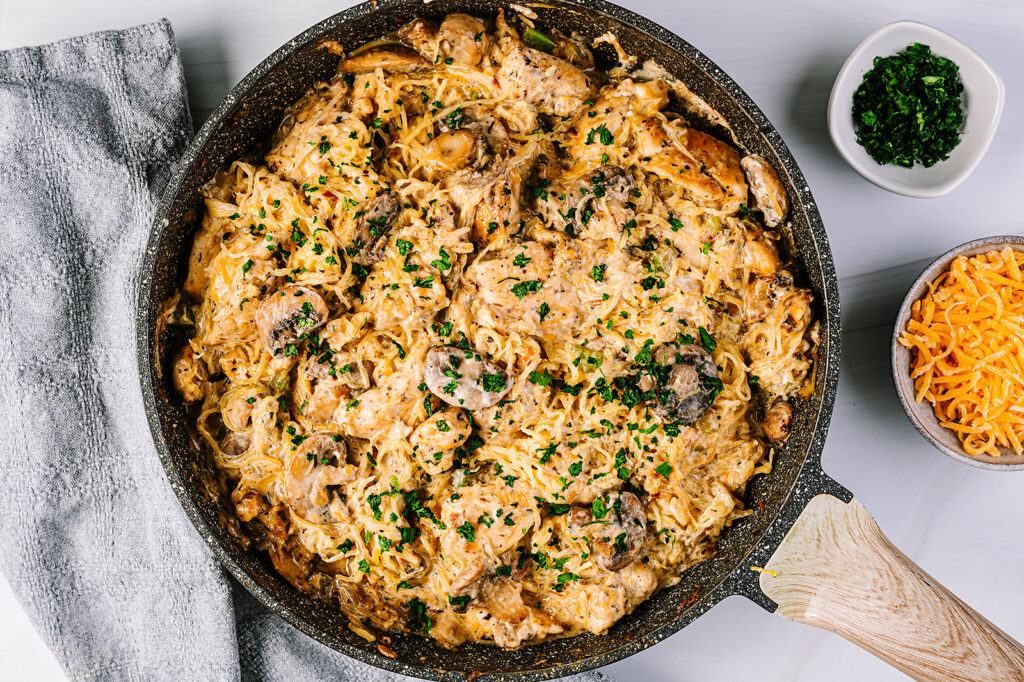
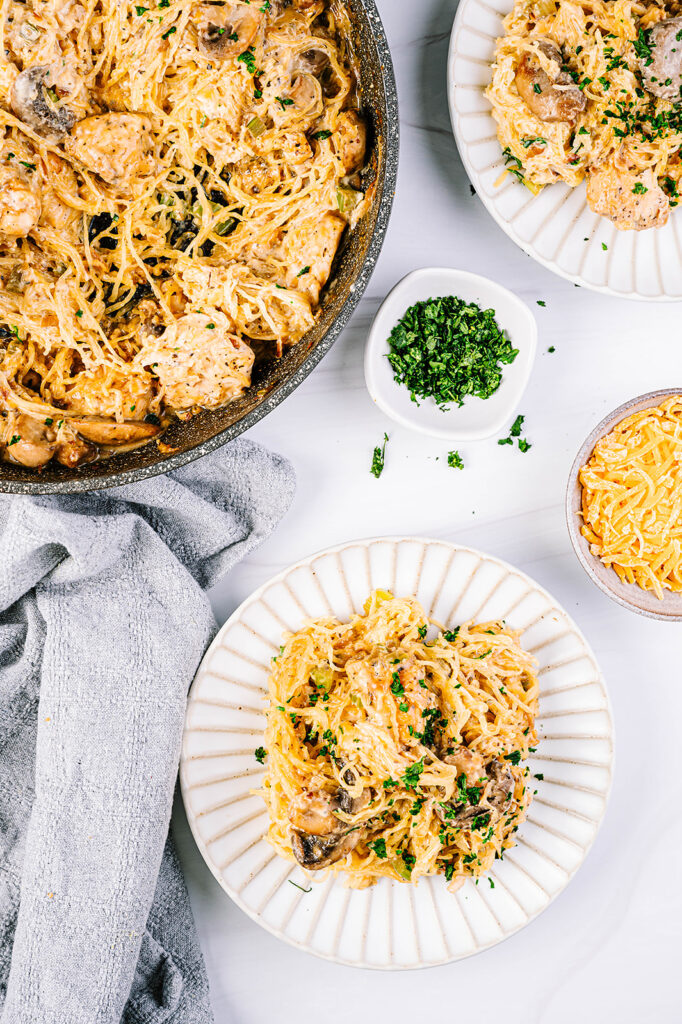
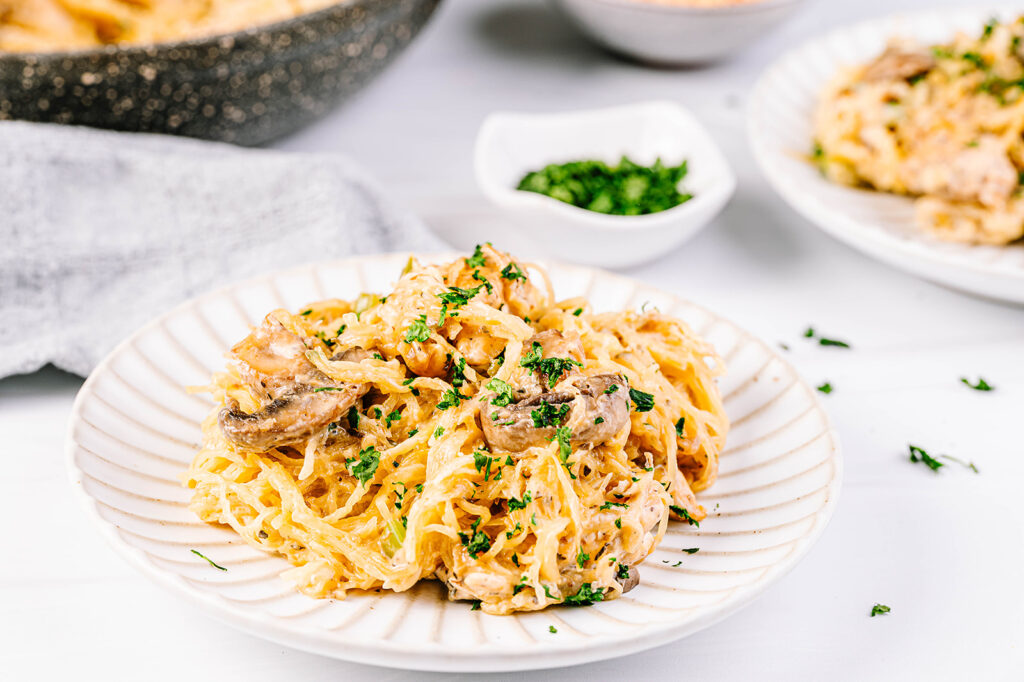
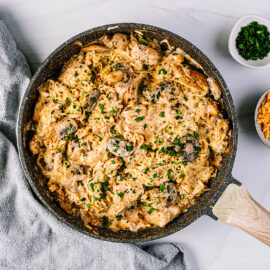
This Creamy Spaghetti Squash Tetrazzini featuring winter squash offers a unique twist to give you lots of nutrition in this creamy, savory dish.
Guest blog post written by Registered Dietitian Ann Kent, creator of the Peas and Hoppy Meal Guides meal planning app.
This Creamy Spaghetti Squash Tetrazzini offers a unique twist on the traditional Italian-American dish to give you lots of nutrition in this creamy, savory dish.
Make sure to pin this recipe to make when you’re ready to cook!
In the middle of winter, what’s better than a creamy, savory Italian dish like chicken tetrazzini? Perhaps one that’s made with a vegetable as the star!
Spaghetti squash is a delicious, versatile winter squash. It’s easy to simply use spaghetti squash in place of pasta, topped with simple marinara or meat sauce. My favorite way to enjoy using it in dishes with lots of flavor, like this Creamy Spaghetti Squash Tetrazzini.
This recipe is hearty enough for a main dish. It contains all the components of the “healthy plate,” so it’s a perfect all-in-one meal! No sides necessary – although I do love to serve this with garlic bread.
Instead of condensed soup, this recipe uses individual ingredients. It’s naturally gluten-free and easy to adjust for dairy-free, vegetarian, or vegan options.
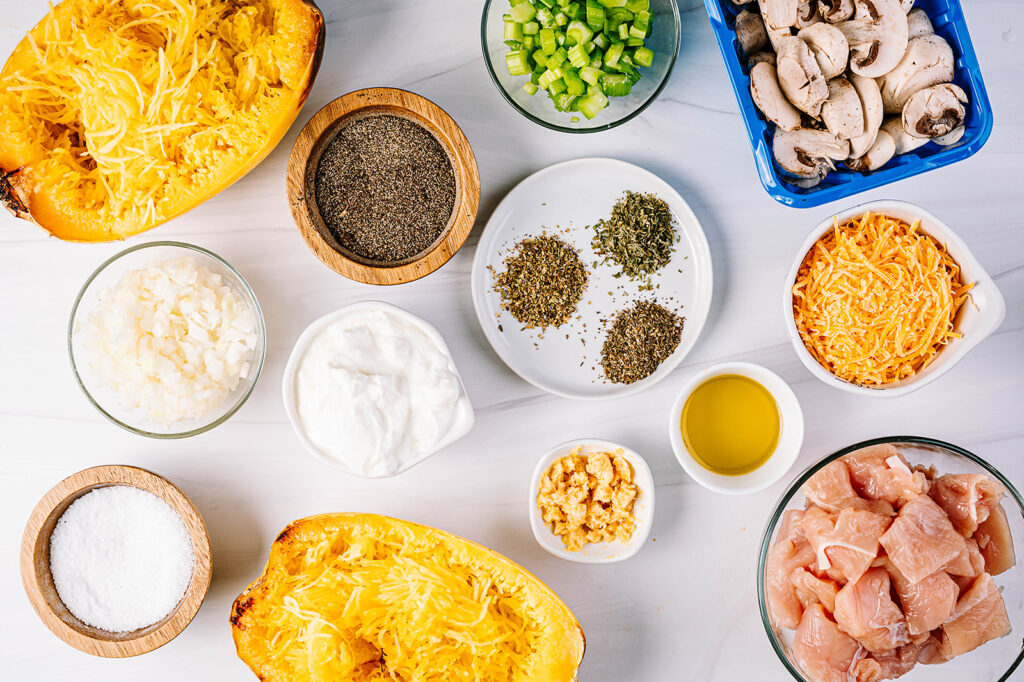
Ingredients for Creamy Spaghetti Squash Tetrazzini
Spaghetti squash – medium size, about 4 lbs
Olive oil, divided – half for the chicken, half for the vegetables
Boneless, skinless chicken breast – cut into cubes
Salt and pepper – to season the chicken
Onion – diced
Garlic – minced; fresh is best, or use pre-minced garlic to save time
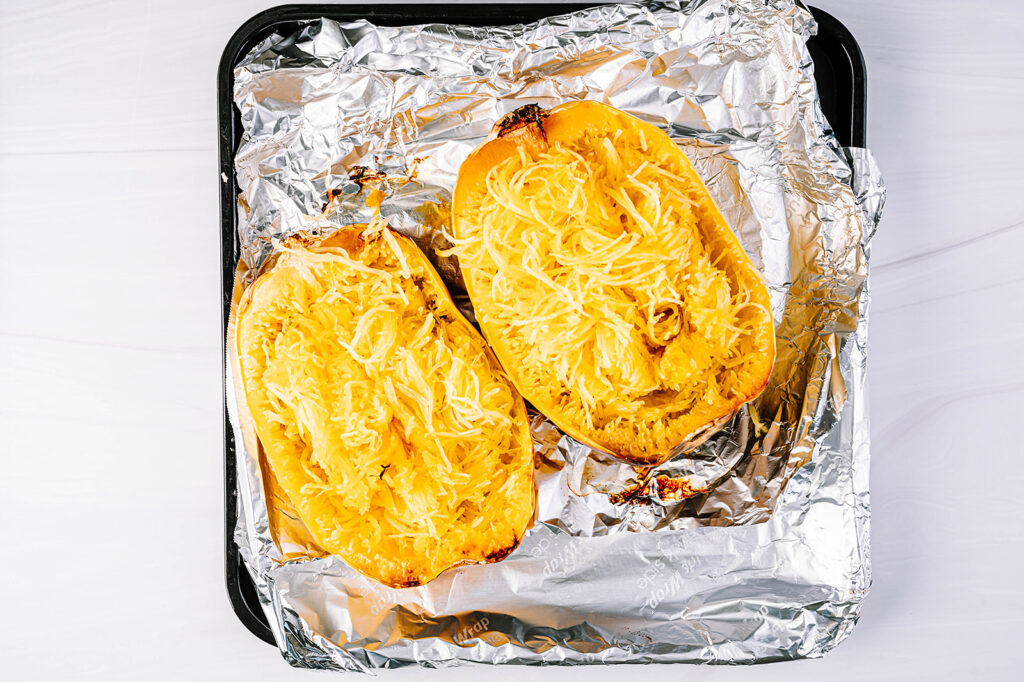
Preheat oven to 400 degrees F. Line a baking sheet with parchment paper. Cut spaghetti squash in half, remove and discard seeds, and place flesh side down on the baking pan. Roast for 30-40 minutes or until fork tender.
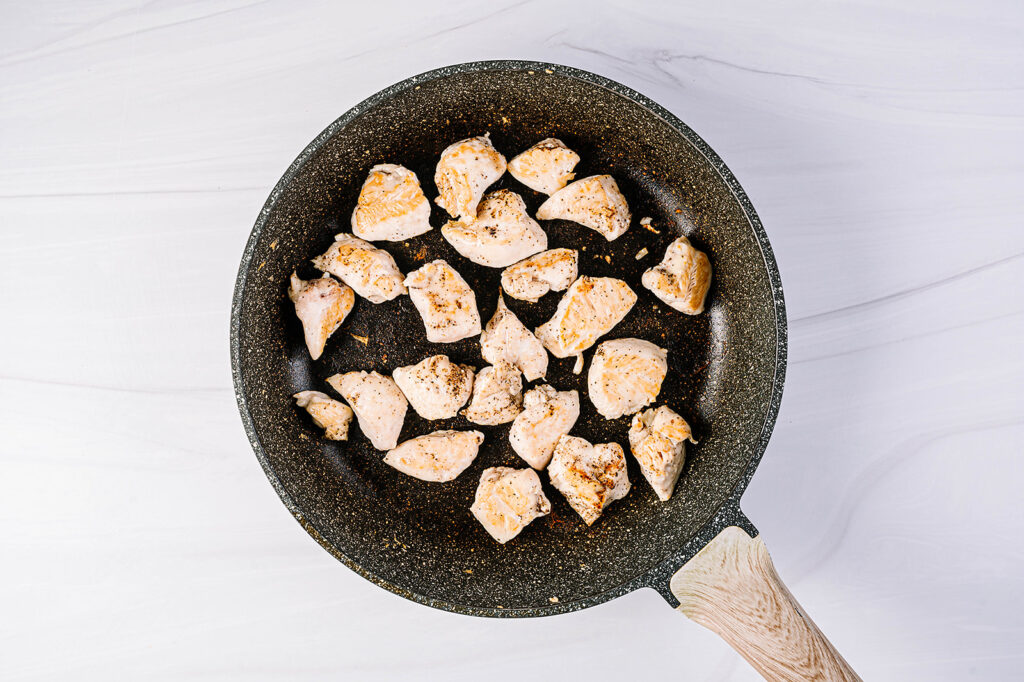
While spaghetti squash cooks, cut chicken into cubes and season with salt and pepper. Heat a large sauté pan over medium-high heat. Once hot, add oil and chicken; brown chicken and cooked through until 165 degrees F. Remove chicken from pan and set aside. Note: you may need to do this step in batches. Do not overcrowd the pan.
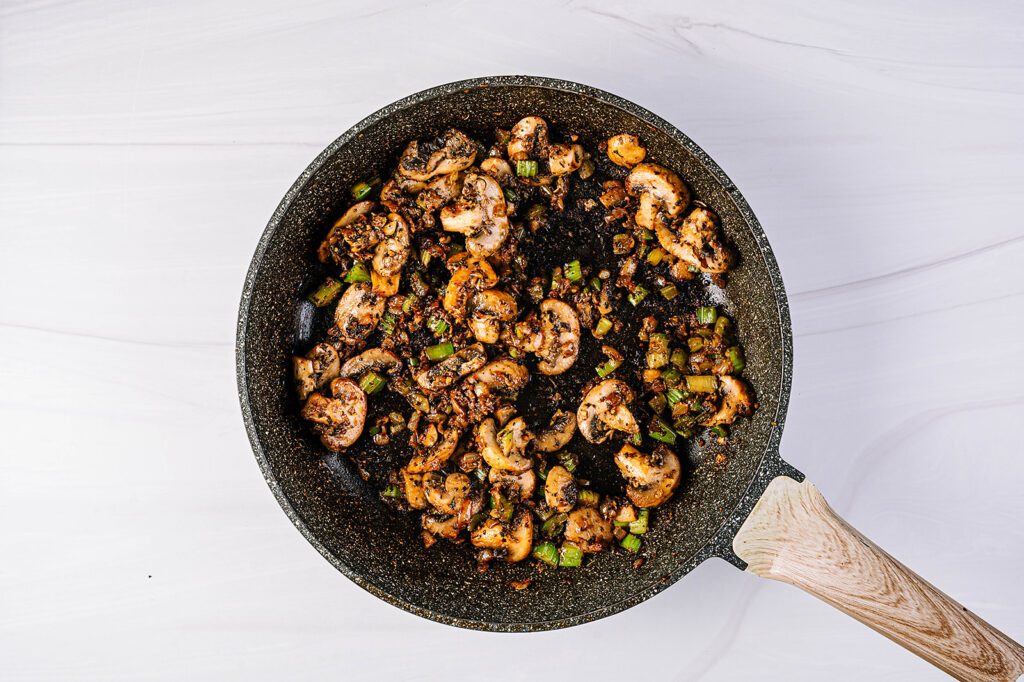
Using the same pan, heat the remaining 2 tablespoons olive oil over medium-high heat. Add onions and sauté until translucent. Add garlic and cook until fragrant, about an additional minute. Add celery, mushrooms, basil, oregano, and parsley. Cook for about 10 minutes or until mushrooms are tender.
Once squash is fully cooked and tender enough to easily insert a fork, remove from oven and allow to cool. When squash is cool enough to handle, scoop out the flesh of the squash with a fork to create spaghetti like strands. Note: If squash is very watery, press with a paper towel to remove as much water as possible. Set squash aside.
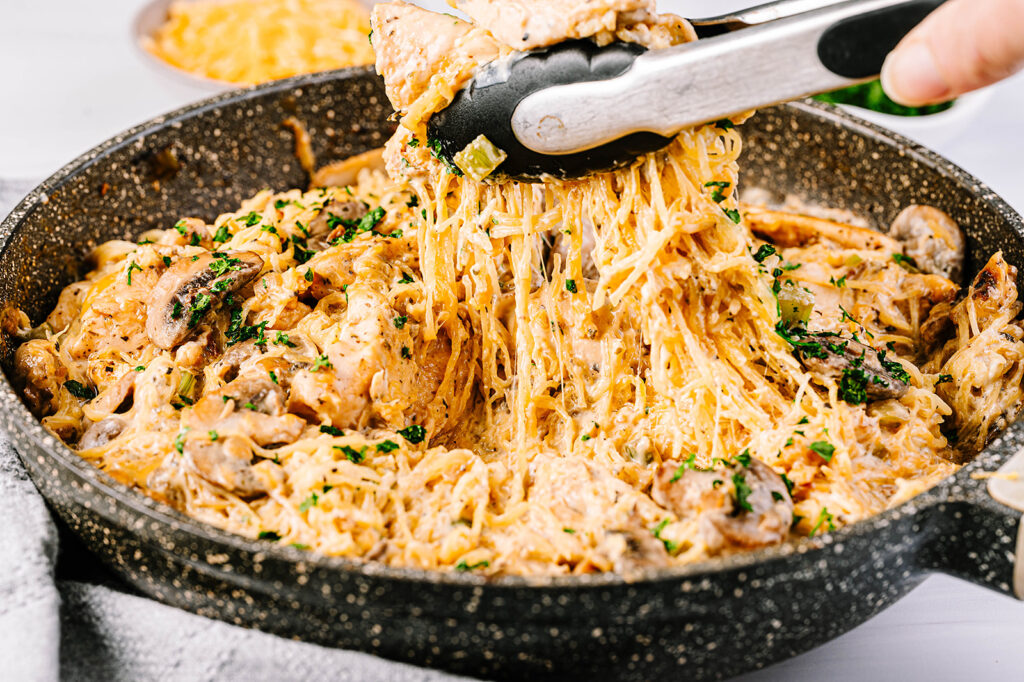
To the pan with vegetables, add back cooked chicken along with the spaghetti squash. Stir in the Greek yogurt and cheddar cheese and continue to cook until cheese melts.
Variations
Vegetarian – Leave out the chicken and add another package of mushrooms or a can of beans.
Greek yogurt – swap soy or coconut yogurt for dairy free
Cheddar cheese – swap plant-based cheese for dairy free
How do you Cut a Spaghetti Squash?
Having a hard time cutting squash in half? To make it easier to cut the spaghetti squash, pierce the squash with a paring knife.
Place on a baking sheet and bake for 10 minutes just to slightly soften, so it will be
easier to cut in half. It will be hot do be careful! Then slice in half, scoop out the seeds
and proceed with cooking the squash according to the recipe directions.
Storing and Reheating
Refrigerate leftovers in an airtight container for up to 5 days. Reheat individual servings in the microwave, or reheat the entire dish on the stovetop.
FREE Cooking Class
This recipe was featured as part of Virtual Teaching Kitchen’s FREE virtual cooking classes. Click here to learn more about the Virtual Teaching kitchen.
Every week Dietitian Ann sends app subscribers a new seasonal menu with 10 fresh meal ideas. Substitute recipes from the database of 800+ options and adjust serving sizes of the recipes to make your perfect plan.
With a weekly customizable menu, lots of healthy, delicious recipe options, AND a made-for-you grocery list, meal planning has never been easier!
Cut spaghetti squash in half, remove and discard seeds, and place flesh side down on the baking pan. Roast for 30-40 minutes or until fork tender.
Season chicken with salt and pepper. Add 2 tablespoons olive oil to a large sauté pan over medium-high heat. Brown chicken and cooked through until 165 degrees F. (Might need to do this step in batches. Do not overcrowd the pan.) Remove from pan and set aside.
Heat remaining 2 tablespoons olive oil over medium-high heat. Add onions and sauté until translucent. Add garlic and cook until fragrant, about an additional minute.
Add celery, mushrooms, basil, oregano, and parsley. Cook for about 10 minutes or until mushrooms are tender.
When squash is cool enough to handle, scoop out the flesh of the squash with a fork to create spaghetti like strands. (If squash is very watery, press with a paper towel to remove as much water as possible)
Return chicken back to the pan along with the spaghetti squash. Stir in the Greek yogurt and cheddar cheese and continue to cook until cheese melts.
Notes
To make vegetarian: Leave out the chicken and add another package of mushrooms or a can of beans.
Leftovers: Leftovers can be refrigerated in an airtight container for up to 5 days.
Substitution Ideas: Olive oil – swap canola oil, avocado oil, or unsalted butter Greek yogurt – swap soy or coconut yogurt for dairy free Cheddar cheese – swap plant-based cheese for dairy free
Having a hard time cutting squash in half? To make it easier to cut the spaghetti squash, pierce the squash with a paring knife. Place on a baking sheet and bake for 10 minutes just to slightly soften, so it will be easier to cut in half. It will be hot do be careful! Then slice in half, scoop out the seeds and proceed with cooking the squash according to the recipe directions.
This post may contain affiliate links. Read my privacy policy.
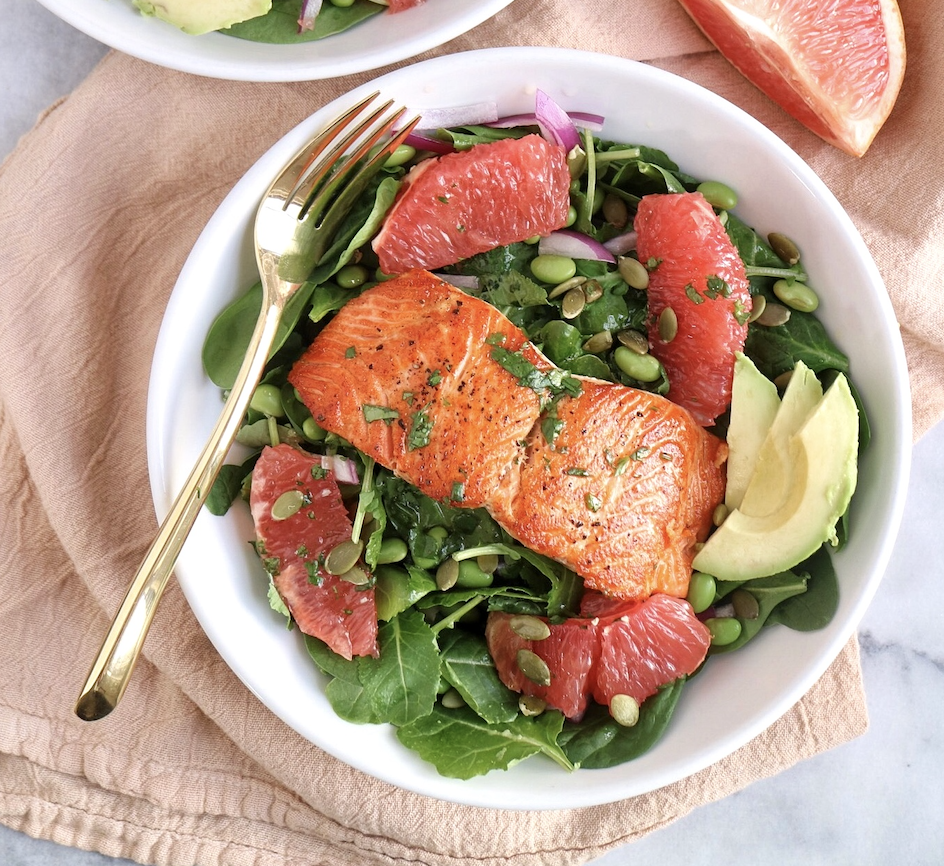
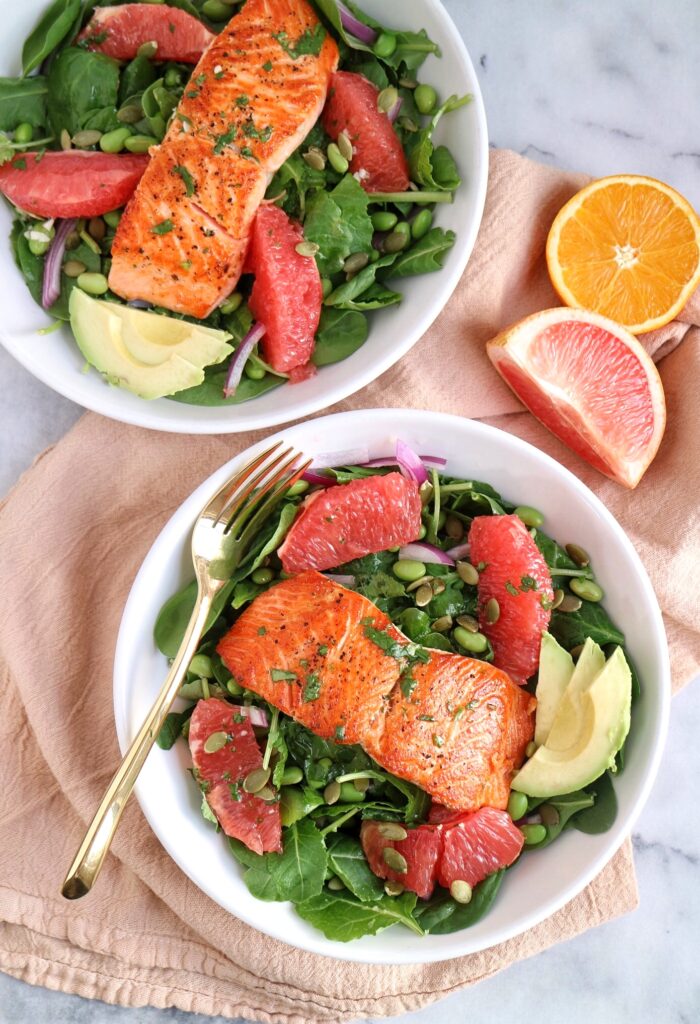
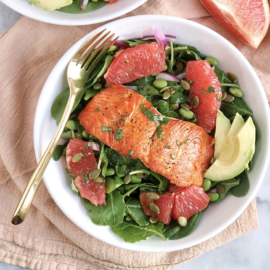
Brighten up your salad routine with this refreshing, nutrient-rich salad.
The grapefruit, salmon, and creamy avocado go so well together, and it’s all topped off with a homemade citrus vinaigrette. The salmon and citrus vinaigrette can be prepared in advance of the salad.
Salads don’t have to be boring! You may have already tried my favorite roasted sweet potato kale salad or Greek pasta salad. Salads are all about building layers of flavor and various textures to always get an exciting bite.
FREE Cooking Class
This recipe was featured as part of Virtual Teaching Kitchen’s FREE virtual cooking classes. Click here to learn more about the Virtual Teaching kitchen.
Ingredients needed:
For the citrus vinaigrette:
fresh orange juice – squeezed from an orange or all natural juice (no sugar added)
fresh grapefruit juice – save drippings when segmenting the grapefruit
olive oil
fresh cilantro
white wine vinegar
lime juice
garlic – use a microplane to help mince it very fine.
For the salad:
salmon – I prefer with the skin on!
salt
black pepper
olive oil
baby kale and spinach – or any greens you like!
grapefruit – watch video above how to segment
avocado
frozen shelled edamame
red onion
pumpkin seeds
Health benefits of salmon:
Salmon is one of the best sources of omega-3 fatty acids, which may lower the risk of heart disease and lower inflammation levels in the body. Your body cannot make these acids, so it’s important to regularly include foods like salmon in your diet.
What if I don’t have access to fresh salmon?
No worries! Canned salmon is a good swap to top your salad with! Not a fan of salmon? Swap with tuna, chicken, steak, shrimp, beans, etc.
Brighten up your salad routine with this refreshing, nutrient-rich salad. The grapefruit, salmon, and creamy avocado go so well together, and it’s all topped off with a homemade citrus vinaigrette. The salmon and citrus vinaigrette can be prepared in advance of the salad.
1/2 medium avocado, peeled, pitted, and sliced thin
1/2 cup frozen edamame, thawed
1/4 cup red onion, thinly sliced
2 tablespoons unsalted shelled pumpkin seeds
Instructions
For the citrus vinaigrette: Combine all the ingredients in a small bowl or a liquid measuring cup. Whisk together and set aside.
For the salmon salad: Place salmon skin side down on a plate. Pat with a paper towel to dry. Season with salt and pepper.
Heat a 10″ skillet over medium high heat, then add oil. Carefully place salmon fillets skin side down in the skillet and reduce heat to medium. Cook 4-5 minutes on one side until golden brown and salmon easily releases from the pan before turning fillets over with tongs. Continue to cook 3-5 minutes. Once cooked through, place the fillets on a clean plate.
Prepare salads in two large bowls. starting with the baby kale and spinach mix. Top with grapefruit, avocado, edamame, onion, and pumpkin seeds.
Store salmon, dressing, and salad in separate airtight containers in the refrigerator up to 3 days, 5 days for the dressing. Salmon does not have to be reheated to eat with the salad. If you choose to reheat it, place it in a microwave safe dish covered with a lid and microwave 2-3 minutes or until internal temperature reaches 165 degrees F.
This post may contain affiliate links. Read my privacy policy.
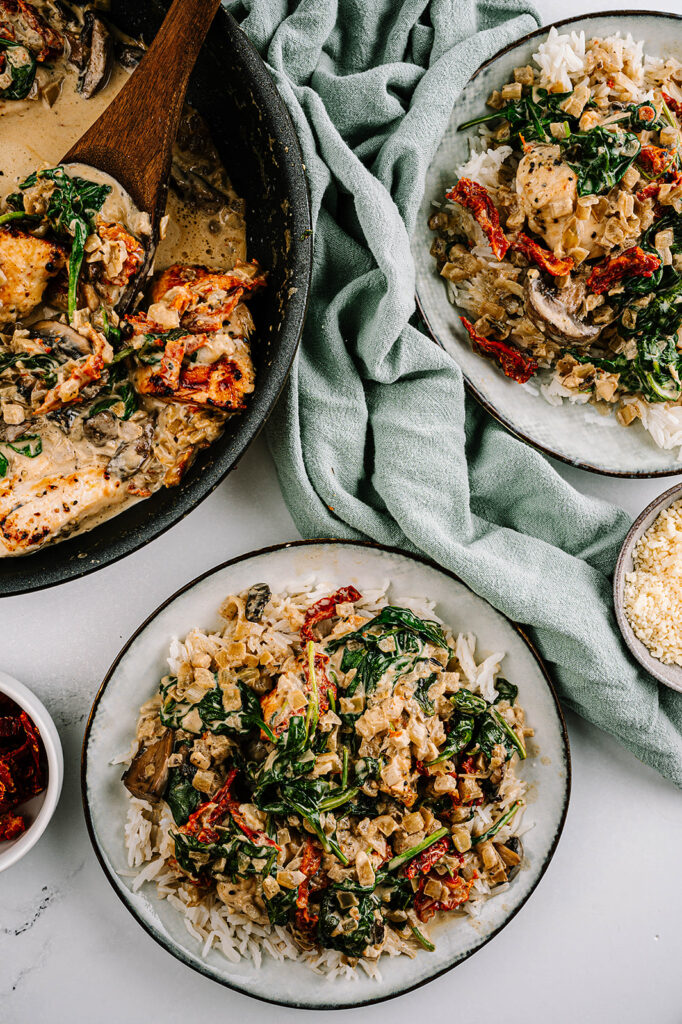
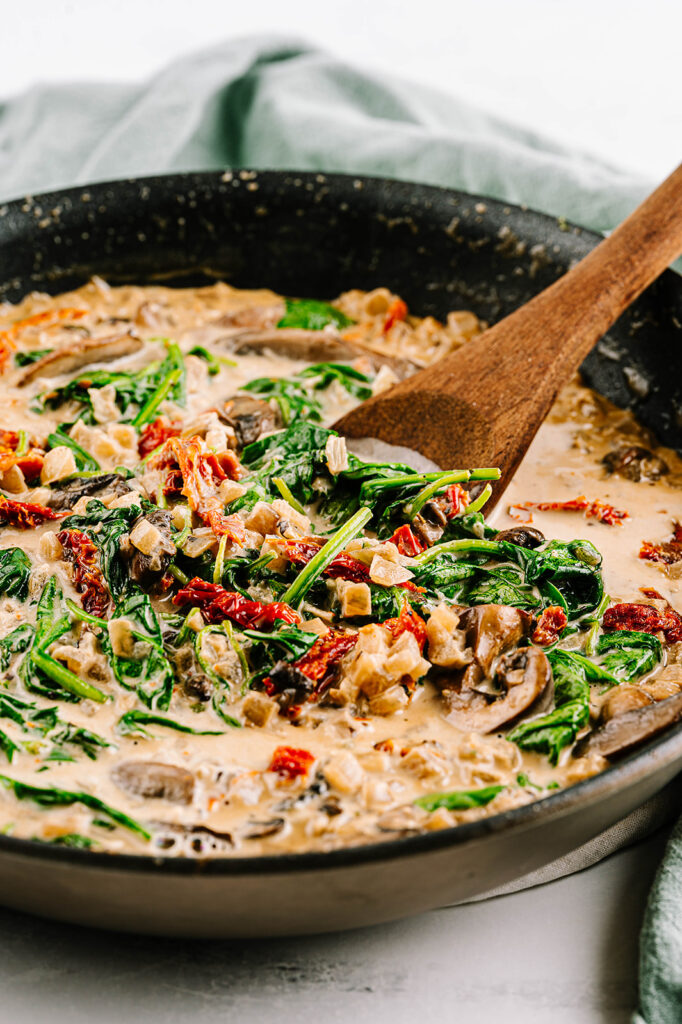
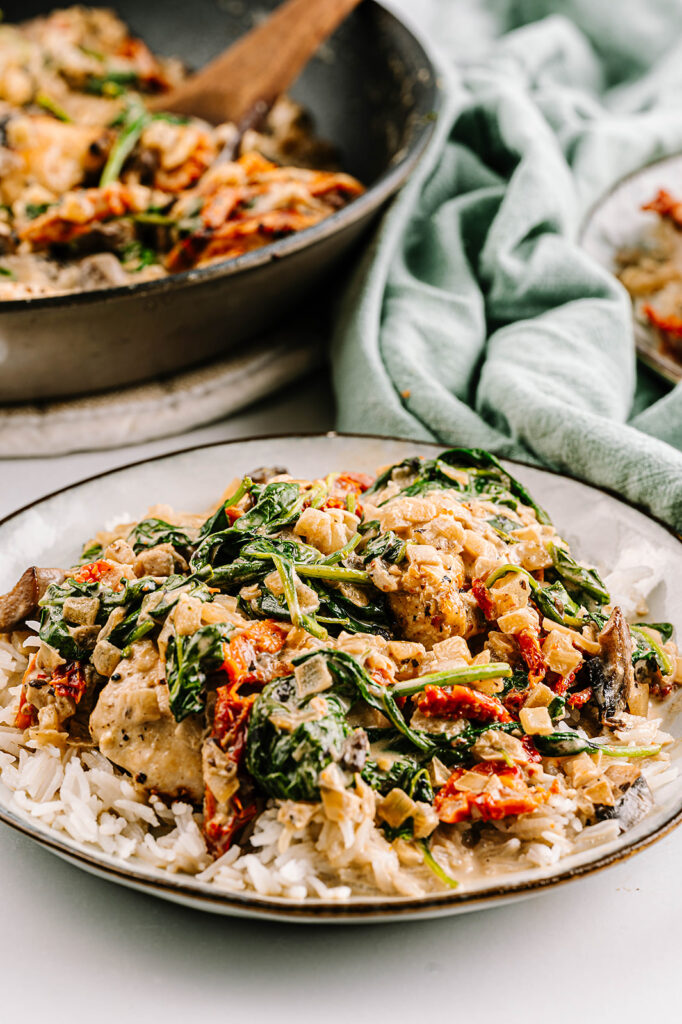
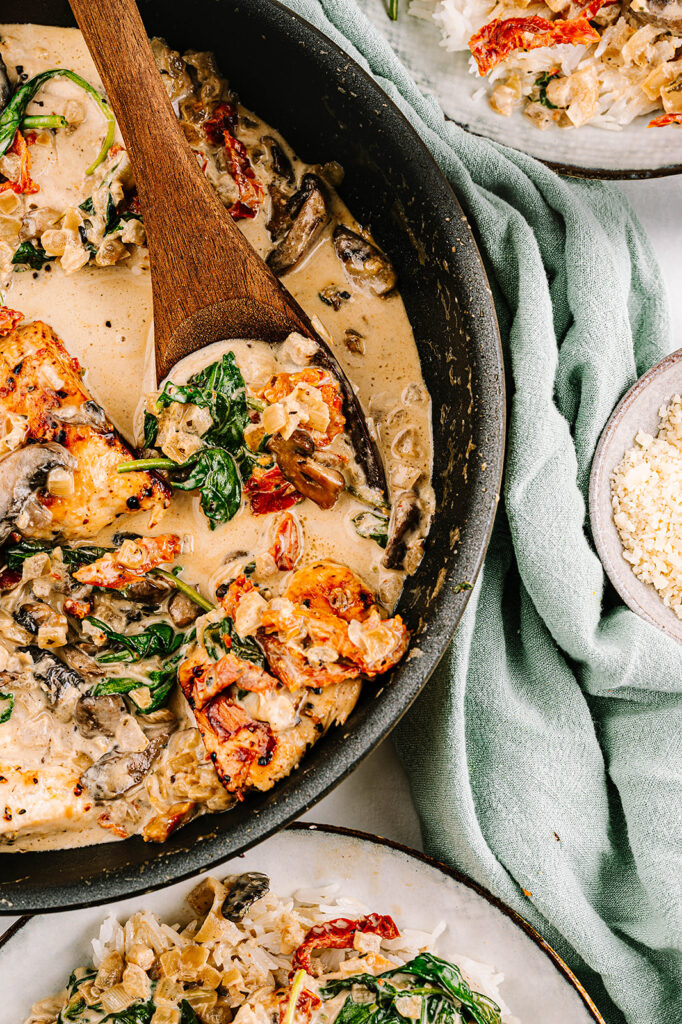
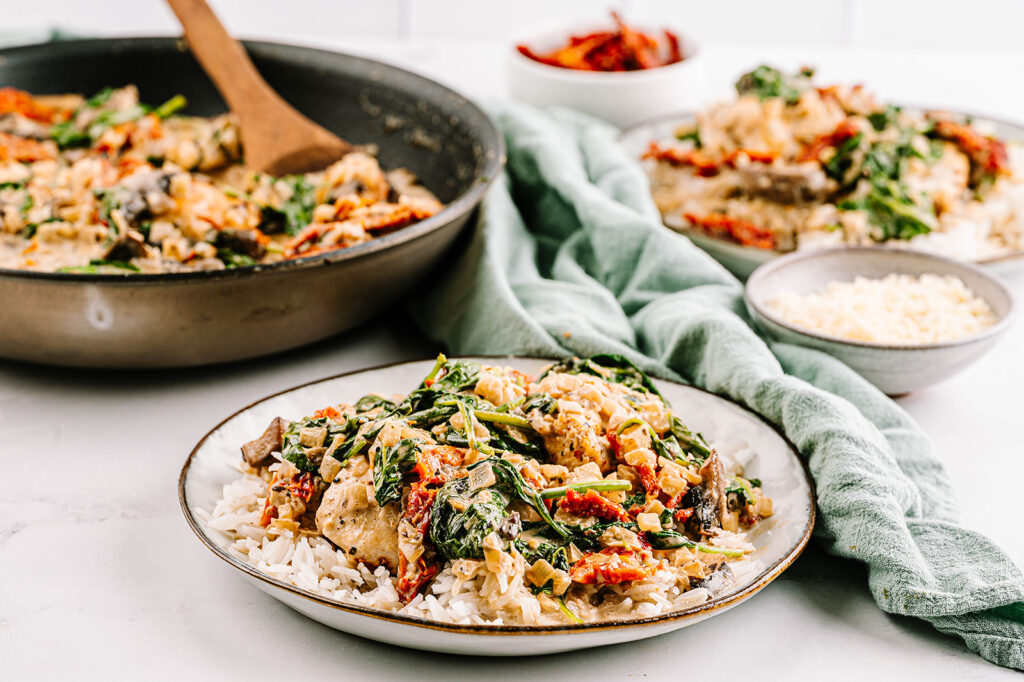
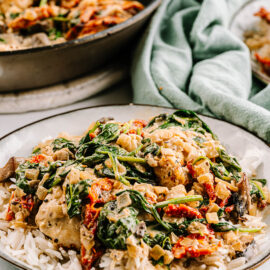
Creamy Tuscan chicken is an easy, but flavorful 30 minute meal that is perfect for busy weeknights and can be served in a variety of ways.
Even though we may associate Tuscan style dishes with being fancy, it’s actually really simple to get that amazing flavor. With all the veggies and chicken, my Tuscan chicken recipe is a hearty meal and better than any restaurant!
You may also like my Veggie-Packed Beef Lasagna if you are a real fan of Italian favorites. If you find yourself with leftover sun-dried tomatoes, try these Sun Dried Tomato Corn Muffins. They are savory, cheesy, and a fun twist on normal muffins.
Ingredients Needed:
olive oil – to saute the chicken in.
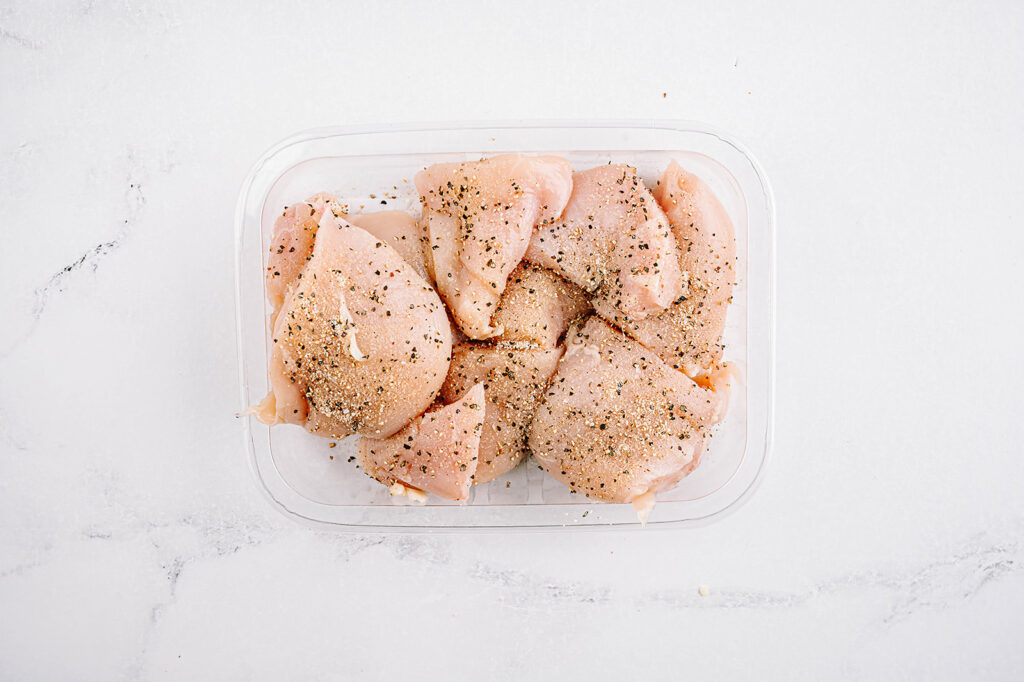
boneless, skinless chicken breasts – cut these in half horizontally before starting.
Veggies: onion, mushrooms, sun dried tomatoes, baby spinach
Seasonings: lemon pepper, garlic, Italian seasoning, garlic powder, salt, and black pepper.
Dijon mustard – adds depth and flavor to the sauce.
Chicken broth – we prefer to use low sodium.
Heavy cream – could also use whole milk, but the cream makes it richer.
Parmesan cheese – freshly grated is the best!
How to Make Creamy Tuscan Chicken
Heat a large pan over medium-high heat. Add 2 tablespoons of oil.
Season the sliced chicken breasts with the lemon pepper. Saute in the skillet for 4-5 minutes on each side. Remove the chicken from the pan and set aside.
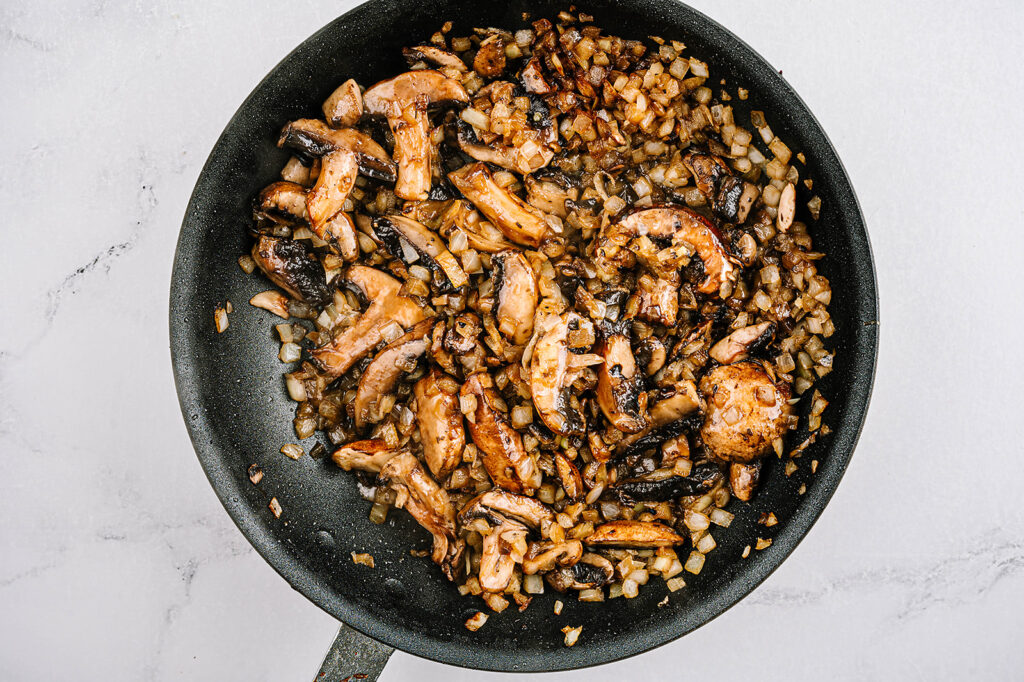
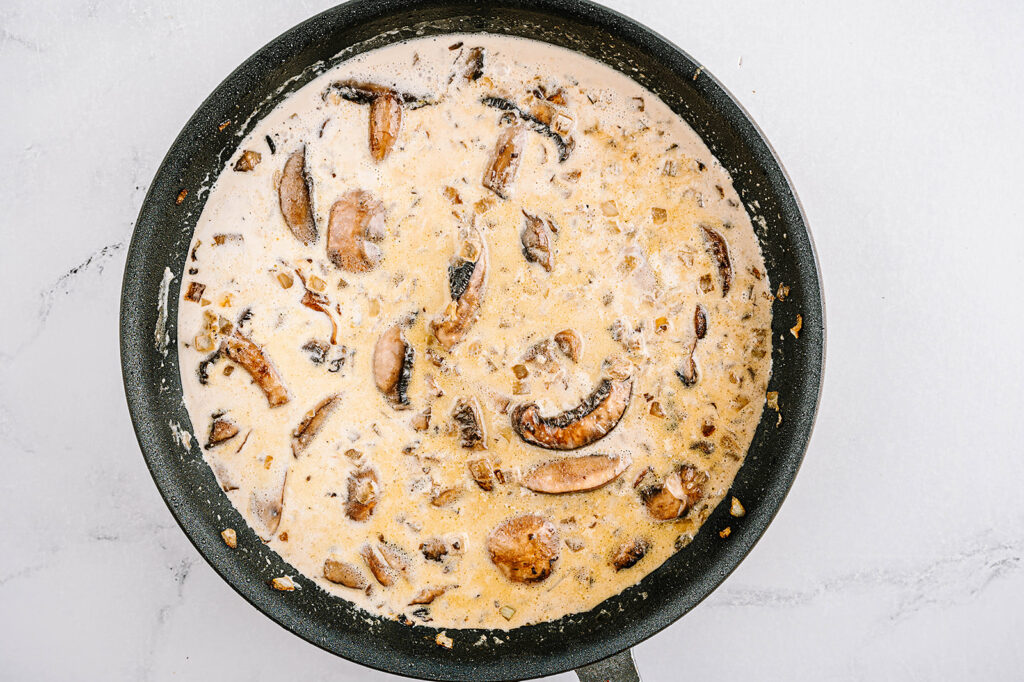
Add another tablespoon of olive oil to the pan. Saute the onions and mushrooms until both are soft and tender.
Stir in the garlic, and cook for 1 minute.
Add the dijon mustard and stir until combined. Pour in the chicken and scrape the bottom of the pan so the brown bits come off.
Add the heavy cream and simmer for 1 minute.
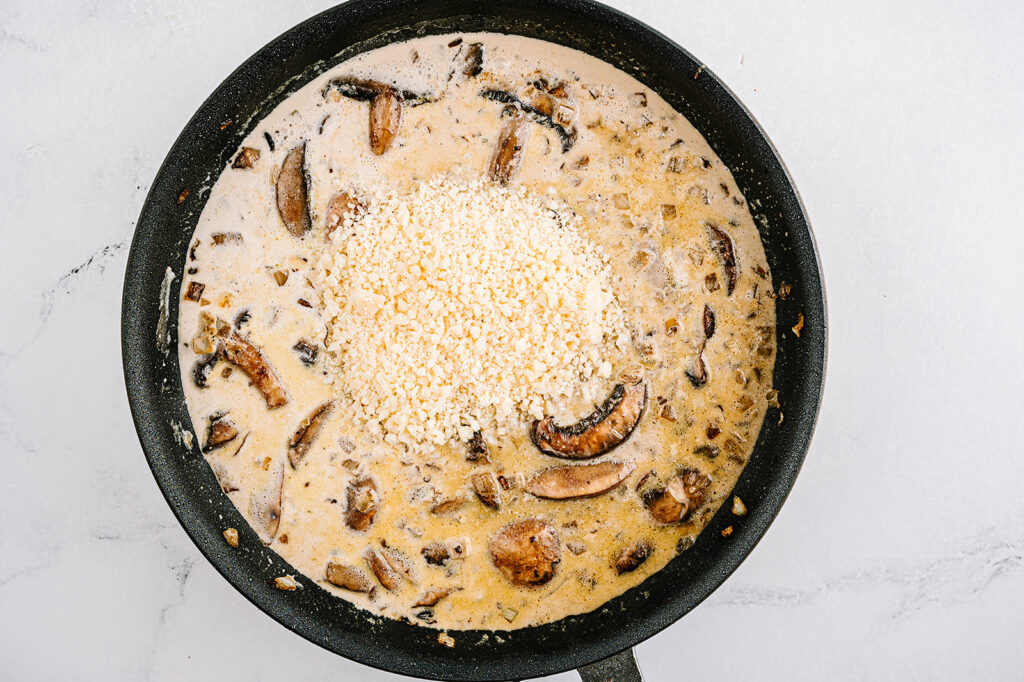
Stir in the parmesan cheese until melted.
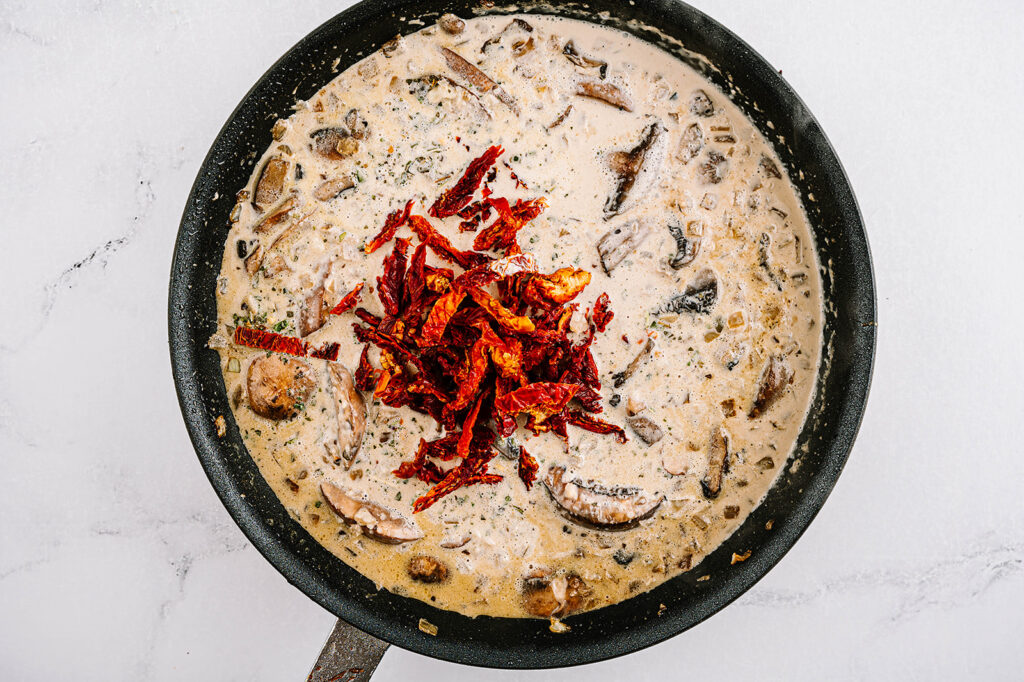
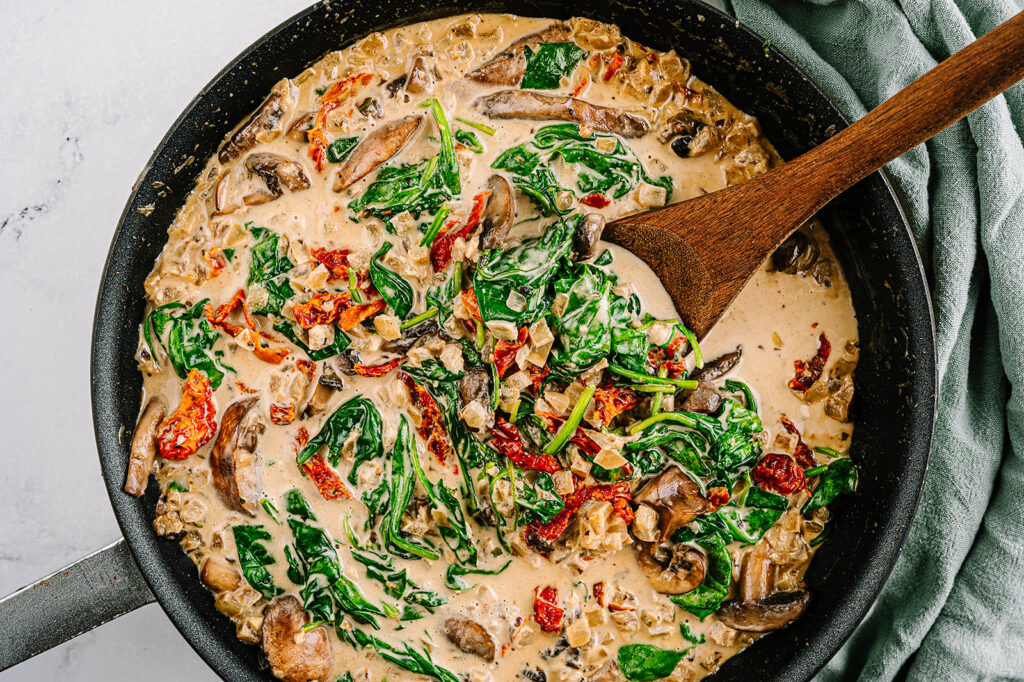
Add the garlic powder, Italian seasoning, tomatoes, and spinach. Continue cooking until the spinach has wilted.
Place the chicken back in the sauce and season with salt and pepper to taste.
Heat large skillet over medium high heat, Add 2 tbsp oil and allow to heat.
What to Serve with Tuscan Chicken?
Tuscan chicken goes great on top of rice, lentils, polenta, mashed potatoes, or mashed cauliflower. Any of these options will soak up the sauce beautifully!
Variations
Spicy – add a dash or two of red pepper flakes.
Shrimp – this sauce is amazing with shrimp too.
Pasta – cook your favorite pasta according to the package instructions. Drain and add to the skillet before placing the chicken back in.
Dairy free – use plant based milk and swap the parm for nutritional yeast or a dairy free cheese.
Gluten free – this easy chicken recipe is naturally gluten free, just be sure to serve it will gluten free pasta or another alternative.
Can You Make Tuscan Chicken in the Slow Cooker?
Sure can!
Start by seasoning the chicken, then add to the bottom of the crockpot. Quickly saute the onions and mushrooms, then add the garlic. Layer this mixture over top of the chicken.
Combine the mustard, broth, and cream in a small bowl. Add the Italian seasoning, garlic powder, and parmesan cheese. Stir in the tomatoes, and pour over top of the chicken.
Cook on low for 5 hours or high for 3.
In the last 30 minutes, add the spinach and cook until wilted.
If you need the sauce to be thicker, whisk a tablespoon of cornstarch with a tablespoon of cold water together in a bowl. Pour the slurry in and let it simmer until thickened.
Storing and Reheating
Keep leftover Tuscan chicken in an airtight container in the refrigerator for up to 3 days. Reheat low and slow over the stovetop. You can also add a splash of cream or broth to thin it out if needed.
This recipe was featured as part of Virtual Teaching Kitchen’s FREE virtual cooking classes. Click here to learn more about the Virtual Teaching kitchen.
2 lbs. boneless, skinless chicken breasts, cut in half horizontally
1 1/2 teaspoons lemon pepper seasoning
1 onion, chopped
2 cups mushrooms, sliced
3 clove garlic, minced
1 teaspoon Dijon mustard
1/2 cup low-sodium chicken broth
1 cup heavy cream
1/2 cup freshly grated Parmesan cheese
1/2 cup sun-dried tomatoes, sliced thin
1 teaspoon Italian seasoning
1/2 teaspoon garlic powder
4 cups baby spinach
salt and pepper, to taste
Instructions
Heat large skillet over medium high heat, Add 2 tbsp oil and allow to heat.
Season chicken with lemon pepper. Add chicken to skillet and cook 4 to 5 minutes per side, or until cooked through (165 degrees F). Remove chicken and set aside.
Add 1 tbsp of olive oil to the pan. Add onion and mushrooms to skillet and cook until onions are translucent and mushrooms are tender. Add garlic and cook for 1 more minute, until fragrant. Stir in Dijon mustard.
Add chicken broth and scrape up any browned bits from the bottom of the skillet.
Add heavy cream and bring to a simmer for 1 minute. Add Parmesan and stir until melted.
Add sun-dried tomatoes, Italian seasoning, and garlic powder.
Stir in spinach. Cook and stir until spinach is wilted. add chicken back in and coat with the sauce.
Season to taste with salt and pepper, to taste.
Notes
Tuscan chicken goes great on top of rice, lentils, polenta, mashed potatoes, or mashed cauliflower. Any of these options will soak up the sauce beautifully!
This post may contain affiliate links. Read my privacy policy.
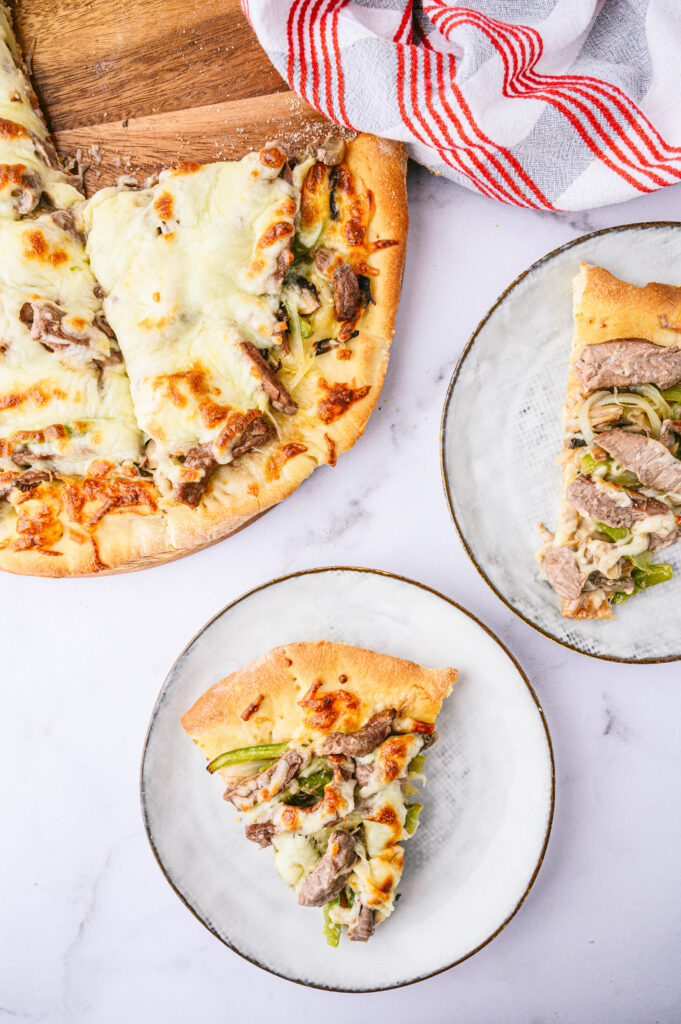
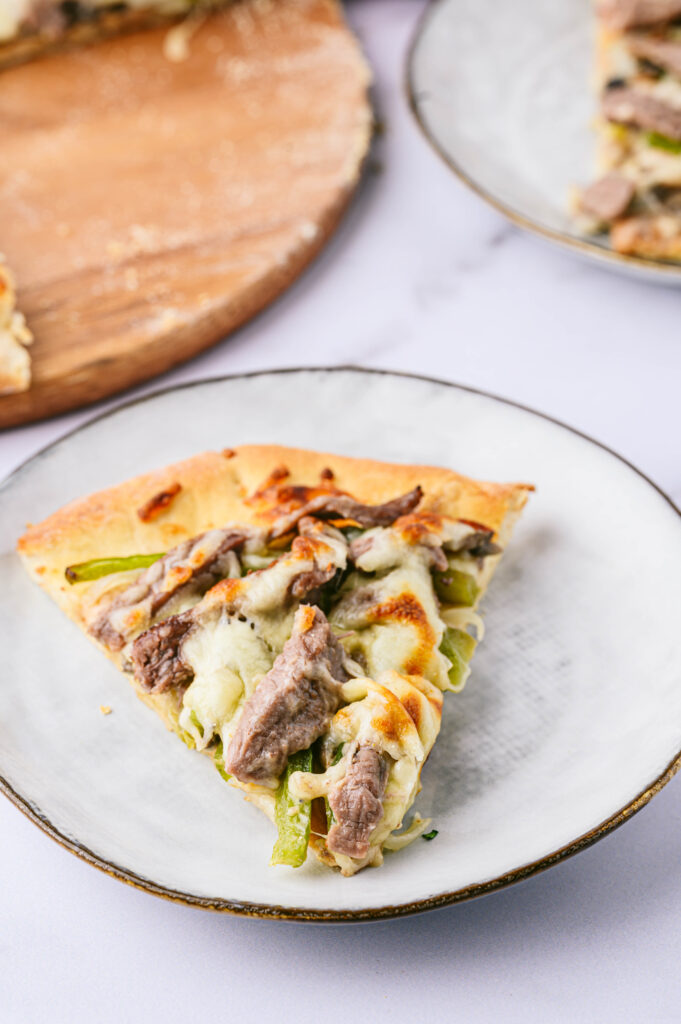
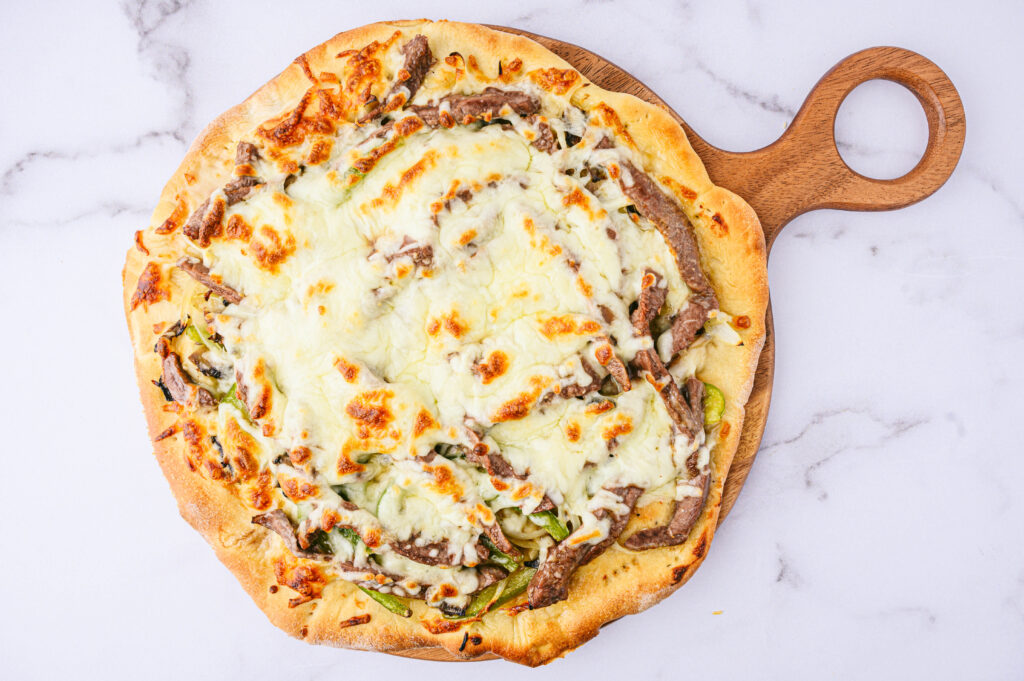
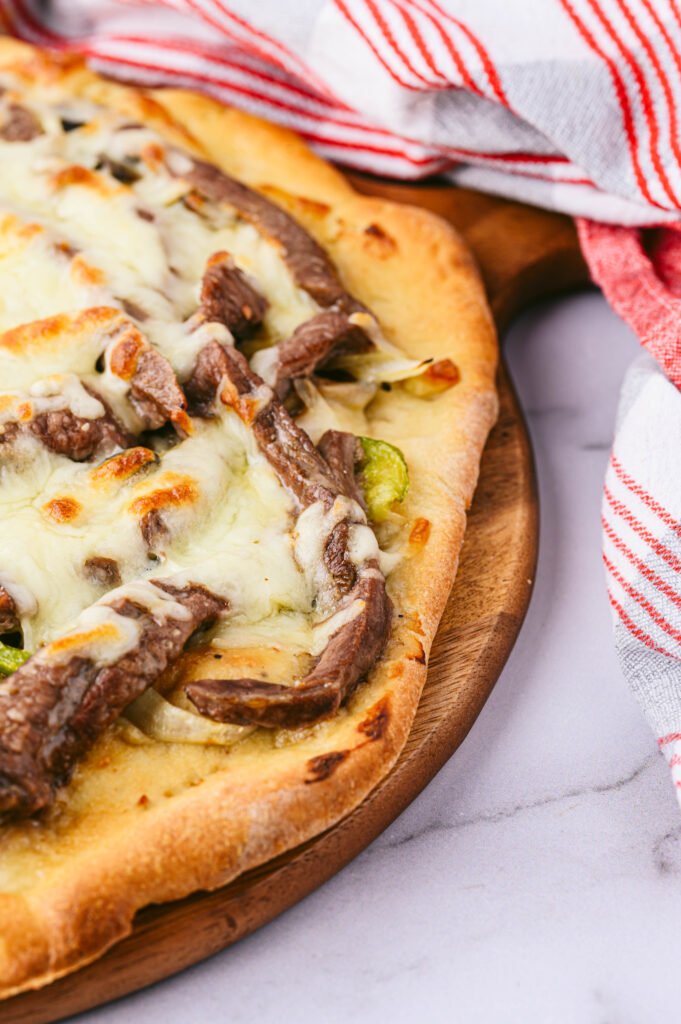
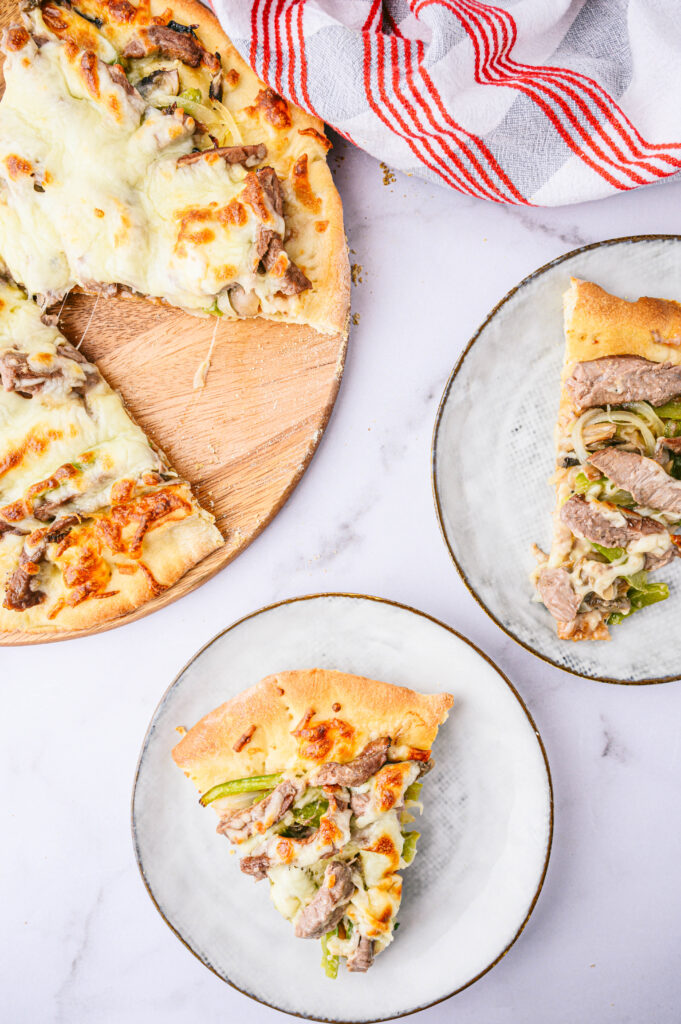
Never choose between your two favorite foods again! This Philly cheesesteak pizza recipe combines traditional flavors on a crispy golden crust, with a creamy sauce that will have your mouth watering!
Has there ever been a time when you were craving a Philly, but you kind of wanted pizza too? That’s when you need this recipe! Not only is it delicious, but it’s also a fun meal to make on the weekends that the whole family will love!
To make things easy you can stick with store bought dough, but to get the full experience you have to try my homemade pizza dough that is super simple!
This pizza is perfect when you have a leftover steak that didn’t get eaten, and it’s like two totally different meals!
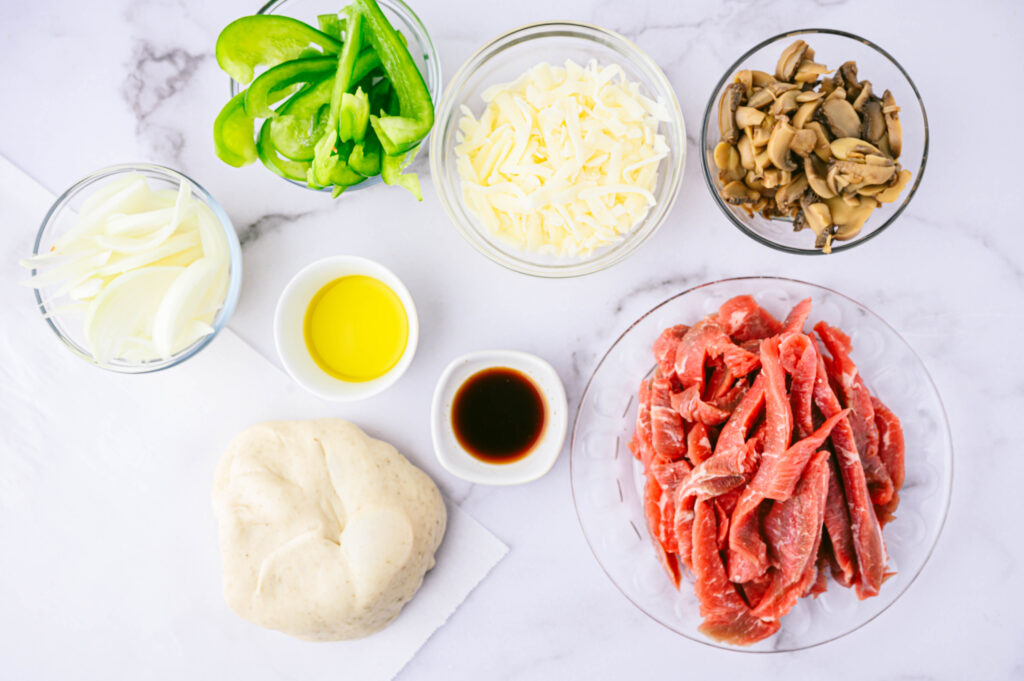
Garlic cloves – if you don’t have fresh, store bought minced garlic can be used or garlic powder.
flour
Milk – be sure it’s cold!
chicken stock – vegetable stock can be substituted if needed.
crushed red pepper flakes – add more if you like it spicy.
salt
ground black pepper
ground nutmeg
parmesan cheese
For the pizza:
ribeye steak – could also use flank or skirt steak
olive oil
Worcestershire sauce
onion
green pepper
mushrooms
prepared pizza dough – if the dough has been refrigerated, allow it to sit at room temperature for 1-2 hours before rolling it out to use.
mozzarella cheese
provolone cheese
How to Make the Best Philly Cheesesteak Pizza Recipe:
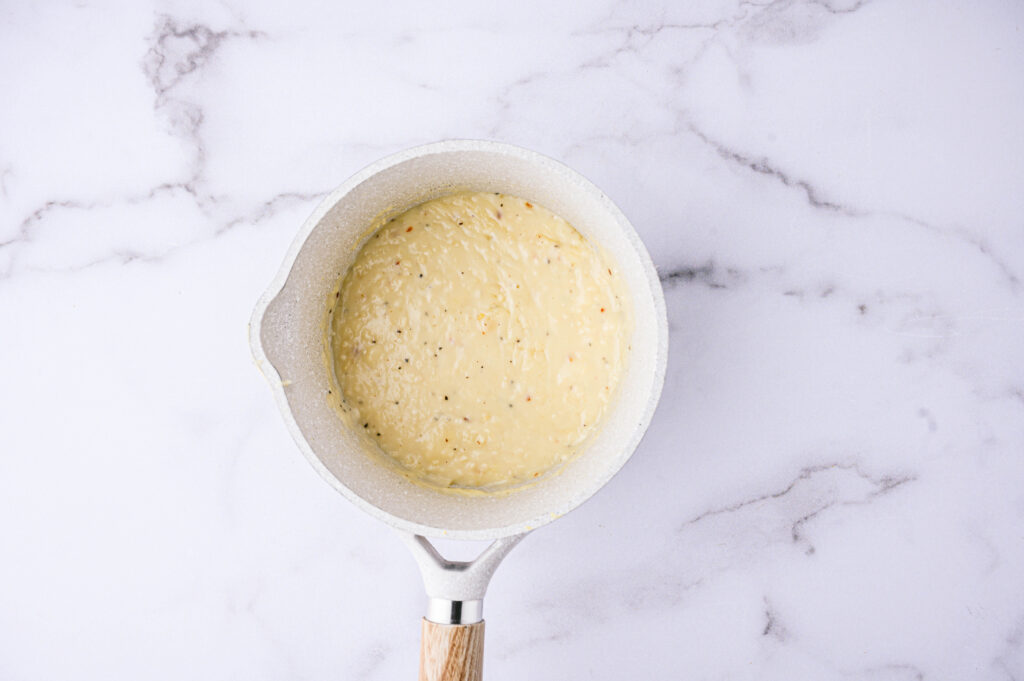
In a small skillet over medium heat, melt the butter. Stir in the garlic and cook for 30 seconds then the flour. Cook until bubbly.
Slowly whisk in the milk and chicken stock until the sauce has thickened. Add the seasonings and parmesan cheese, then remove from the heat and set aside.
Place the steak in the freezer for about 10 minutes. This makes it much easier to slice. Trim off any large fatty pieces around the edges. Slice as thin as possible.
Preheat the oven to 500 degrees and sit the pizza stone in to warm.
Heat a tablespoon of oil over medium high heat in a large skillet. Season the steak with salt, pepper, and Worcestershire sauce. Cook for a couple of minutes, then remove from the pan.
Add the remaining oil and saute the veggies until they are tender.
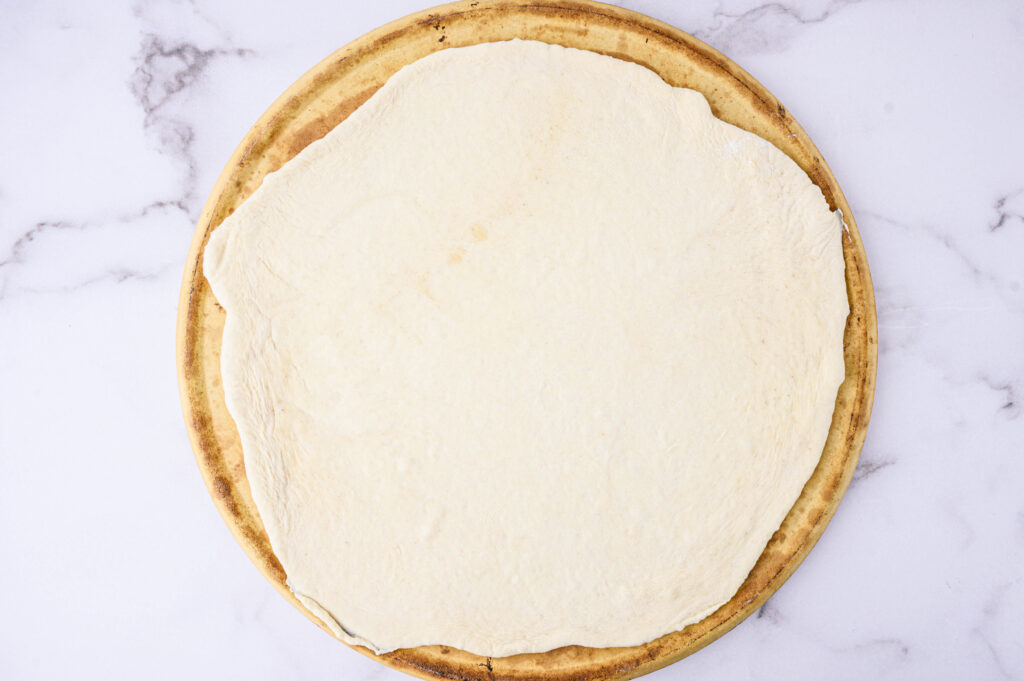
Roll out the pizza dough. Remove the pizza stone from the oven and coat with cooking spray.
Spread the dough on the stone and piece with a fork. Bake for 3-5 minutes.
Remove the dough from the oven and spread on the cheese sauce. Add the steak, onions, peppers, and mushrooms. Then top with mozzarella and provolone cheese.
Bake until the dough is golden brown and the cheese has melted.
Tips for Making
The stone can also be dusted with flour or cornmeal instead of greasing with cooking spray.
If you don’t have a pizza stone, you can still use a regular baking sheet to make homemade pizzas! The stone retains the heat really well, so you may want to cook it a little longer the first time to make sure it gets nice and crispy.
Using leftover steak? Skip the cooking instructions and add it directly to the pizza.
To make ahead of time, prep the steak and veggies (in advance) then follow the remaining instructions. This is great when it comes to entertaining.
Feel free to add your other favorite pizza toppings.
Storing and Reheating Cheesesteak Pizza
Keep leftover pizza in the refrigerator for up to 5 days.
When reheating to keep the crust crispy, it’s best to use the oven or air fryer. Cook at 400 degrees until it’s warmed through. For a chewy crust, bake at 350 degrees.
Microwaving is the fastest reheating method, but as you know, the crispiness just isn’t there so we don’t recommend it.
If you would like to freeze it, it’s best without the veggies. They get a little mushy during the thawing process.
Never choose between your two favorite foods again! This philly cheesesteak pizza recipe combines traditional flavors on a crispy golden crust, with a creamy sauce that will have your mouth watering!
Ingredients
Scale
For the creamy sauce: 1 tablespoon butter 2 cloves garlic, finely minced 1 tablespoon flour 1/4 cup cold milk 1/4 cup chicken stock 1/8 teaspoon crushed red pepper flakes 1/8 teaspoon salt pinch of ground black pepper pinch of ground nutmeg ¼ cup parmesan cheese
For the pizza:
6 oz. ribeye steak 2 tablespoons olive oil, divided 1 tablespoon Worcestershire sauce 1 onion, thinly sliced 1 green pepper, thinly sliced 1 cup mushrooms, thinly sliced prepared pizza dough 1 cup shredded mozzarella cheese 1 cup shredded provolone cheese
Instructions
Add butter to small skillet over medium heat. Add garlic and cook for 30 seconds. Add flour and cook for about 1 minute, or until bubbly.
Slowly whisk in milk and chicken stock and cook until thickened. Add crushed red pepper, salt, pepper, nutmeg, and parmesan cheese, stirring to combine. Remove from heat and set aside.
Place steak in the freezer on a sheet pan for about 10 minutes so it gets very cold but not frozen through. Trim off any large pieces of fat normally around the edges of the steak, but some veins of fat in the middle of the steak are good. Slice the steak as thin as possible with a sharp knife.
Place pizza stone in oven and preheat to 500 degrees F.
Heat 1 tablespoon of olive oil in a large skillet over medium-high heat. Season steak with Worcestershire sauce, salt, and pepper. Cook for 2-3 minutes, stirring occasionally. Remove from pan and set aside.
Notes
If using prepared pizza dough that has been refrigerated, remove from the fridge, and allow to rest for 1-2 hours before rolling out and using.
This post may contain affiliate links. Read my privacy policy.
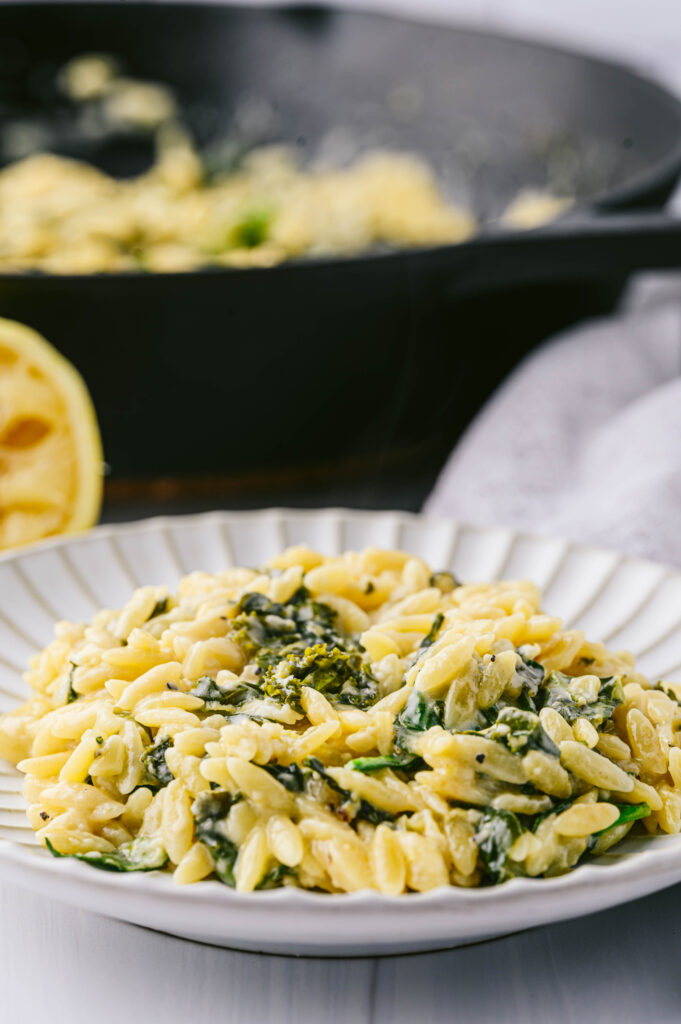
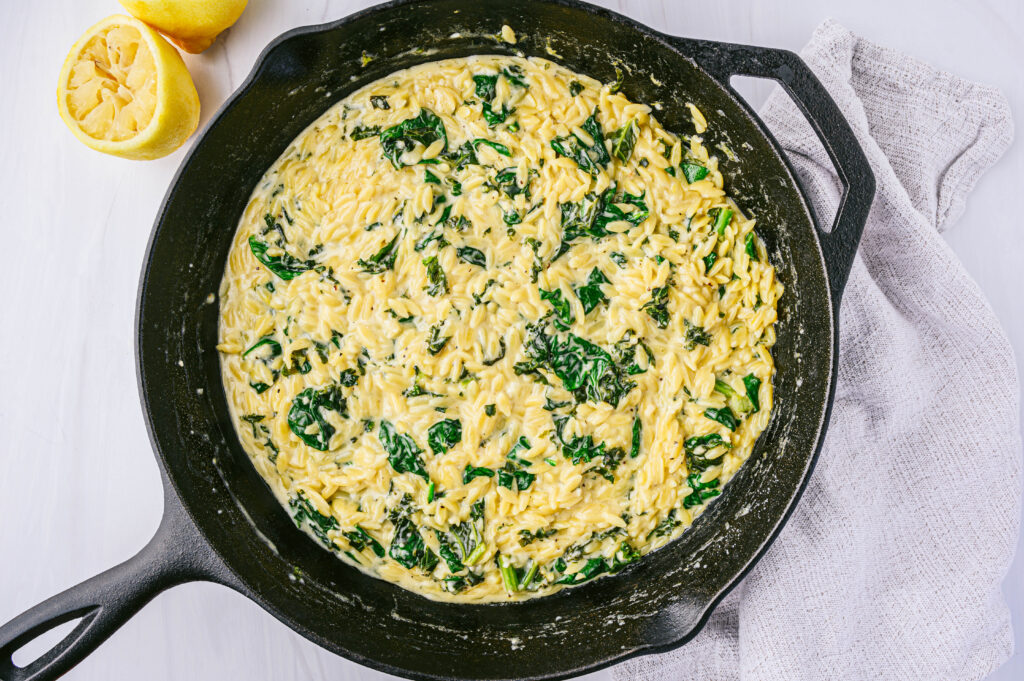
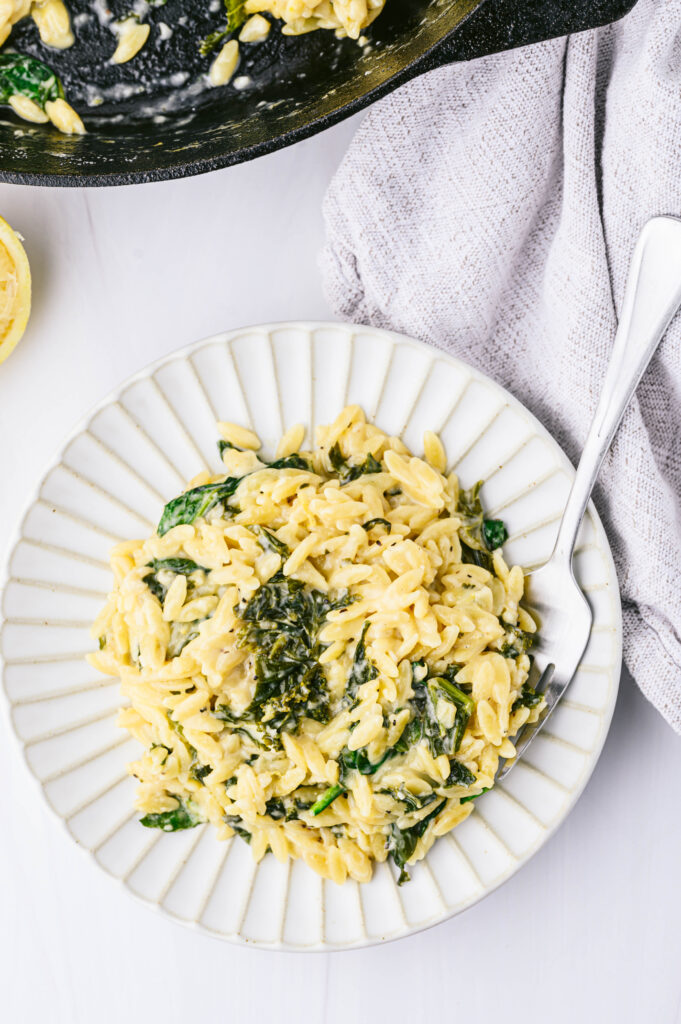
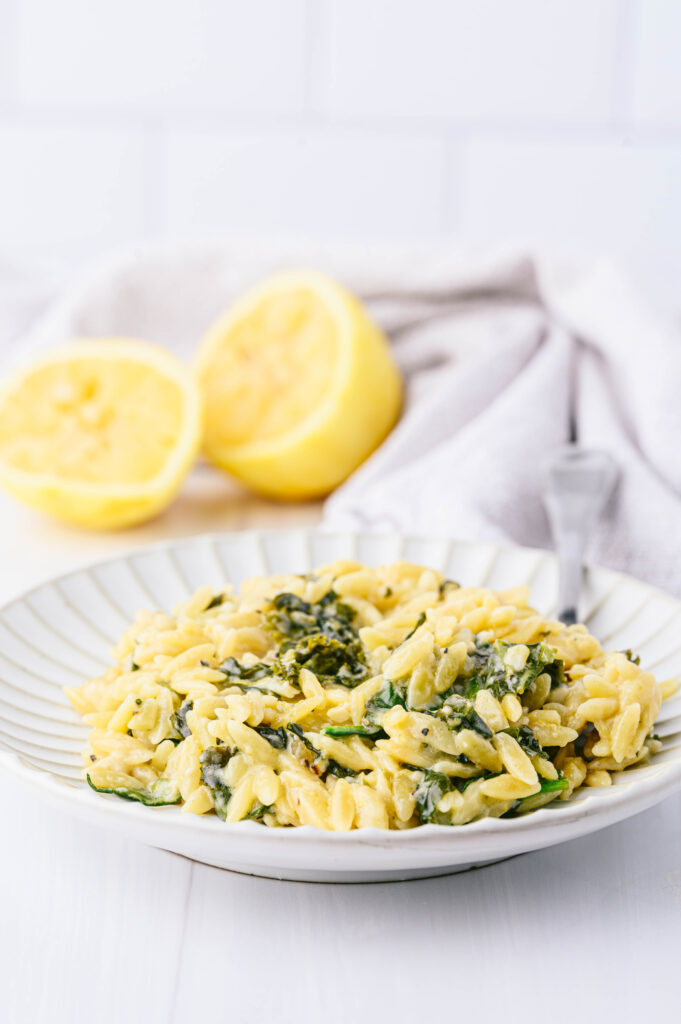
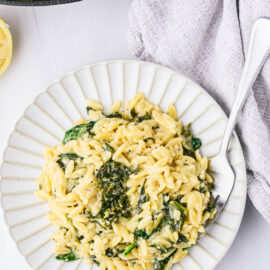
Lemon orzo with spinach is creamy, cheesy, and bursting with flavor! It’s an easy, but delicious meal that is ready in less than 30 minutes with minimal cleanup!
Whether you are searching for a tasty side dish or meatless main course, lemon orzo is on the must make list! It’s almost a sin at how quick and easy it is to make.
You can even serve your favorite protein on the side for a full balanced meal! Grilled salmon or chicken would taste delicious.
Why We Love Spinach Lemon Orzo
The entire meal is cooked in one pan.
It’s simple and quick.
Can be served alongside a main course or by itself.
An easy way to sneak some extra greens in.
Ingredients Needed
olive oil
Garlic cloves
kale
low-sodium vegetable broth
heavy cream
orzo
baby spinach
grated Parmesan cheese
lemon
Salt and pepper
How to Make Creamy Lemon Orzo with Spinach
Heat the olive oil in a large skillet over medium high heat. Add the garlic and saute until fragrant.
Stir in the kale and cook until it starts to wilt.
Then stir in the heavy cream and veggie broth, bring to a simmer.
Stir in the orzo and cook until al dente (or for about 9 minutes).
Stir in the spinach and turn off the heat.
Add the parmesan cheese, lemon zest, and lemon juice.
Season with salt and pepper, then serve!
Tips for Making Lemon Orzo
Although it’s not always available, whole wheat orzo can be used.
Any hearty dark leafy green (such as Swiss chard, collard greens, or mustard greens) can be substituted for the kale.
Do not let the garlic burn! If it gets over cooked it will have a bitter taste.
To add more lemon flavor with the acid use zest instead.
We love using orzo, but you can also use other small pastas if needed.
For those who like using herbs, basil and thyme go great with these flavor combos.
Peas and mushrooms are other veggie options that could be added if desired.
Storing and Reheating
Orzo recipes are best eaten the same day, but when kept in an airtight container in the fridge they can be eaten up to 3 days later.
When it cools, the orzo soaks up the sauce. When reheating you may want to add a little more broth, cream, or water to thin it out. It’s also best reheated over low heat on the stovetop.
Is Orzo and Rice the Same Thing?
No. Orzo is actually considered pasta. Normally you would cook it in boiling water and drain just like any other noodles. Rice is a grain that soaks up the moisture while cooking.
Remember, for this recipe the orzo cooks in the creamy sauce! So there’s no reason to make it in another pot.
Lemon orzo with spinach is creamy, cheesy, and bursting with flavor! It’s an easy, but delicious meal that is ready in less than 30 minutes with minimal cleanup!
Ingredients
Scale
1 tablespoonolive oil 2 cloves garlic, sliced 2 cups kale, chopped 2 cups low-sodium vegetable broth ½ cup heavy cream 1 cup orzo 3 cups baby spinach, stems removed ¾ cup grated Parmesan cheese 1 lemon, juiced and zested Salt and pepper, to taste
Instructions
1. In a large skillet heat olive oil over medium-high heat. Add garlic and cook until just fragrant, about 1 minute. (Do not overcook or garlic will burn, and garlic will be bitter) Add the kale and sauté for a minute until it starts to wilt. 2. Stir in vegetable broth and heavy cream; bring to a simmer. 3. Stir in orzo and cook for 9 minutes or until al dente. 4. Stir in spinach. 5. Turn off the heat and stir in parmesan, lemon juice, and lemon zest. 6. Season with salt and pepper, to taste.
Notes
Can substitute with whole wheat orzo (although it is not always available in grocery stores) Substitute any hearty dark leafy green for the kale like collard greens, Swiss chard, mustard greens, etc.
This post may contain affiliate links. Read my privacy policy.
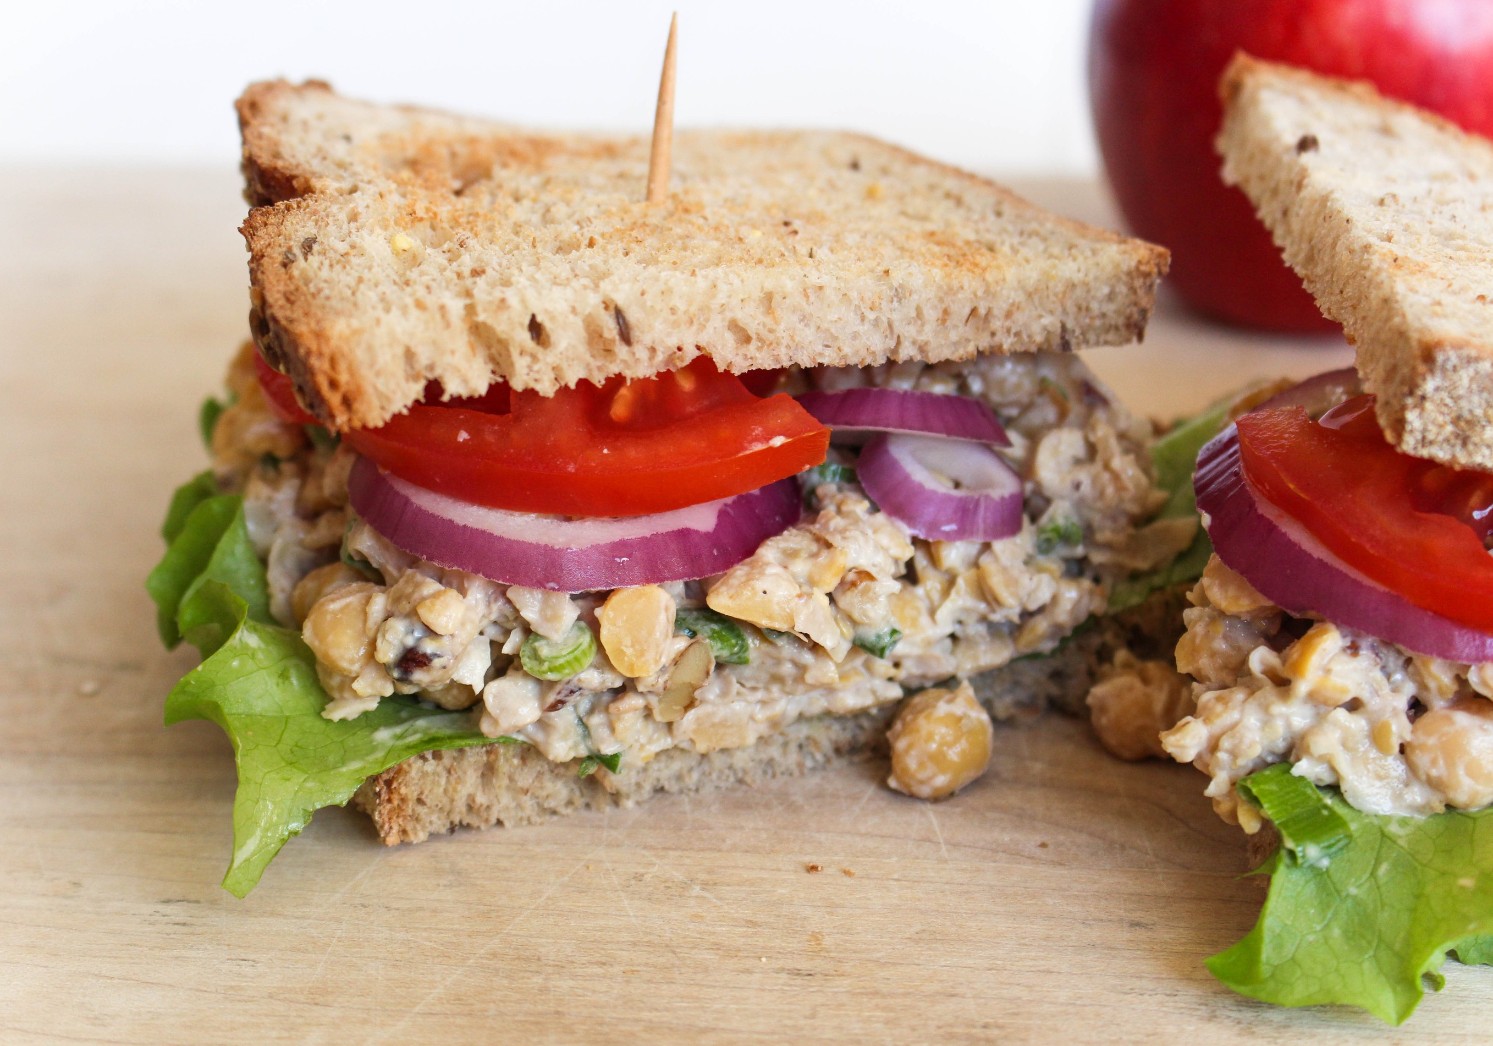
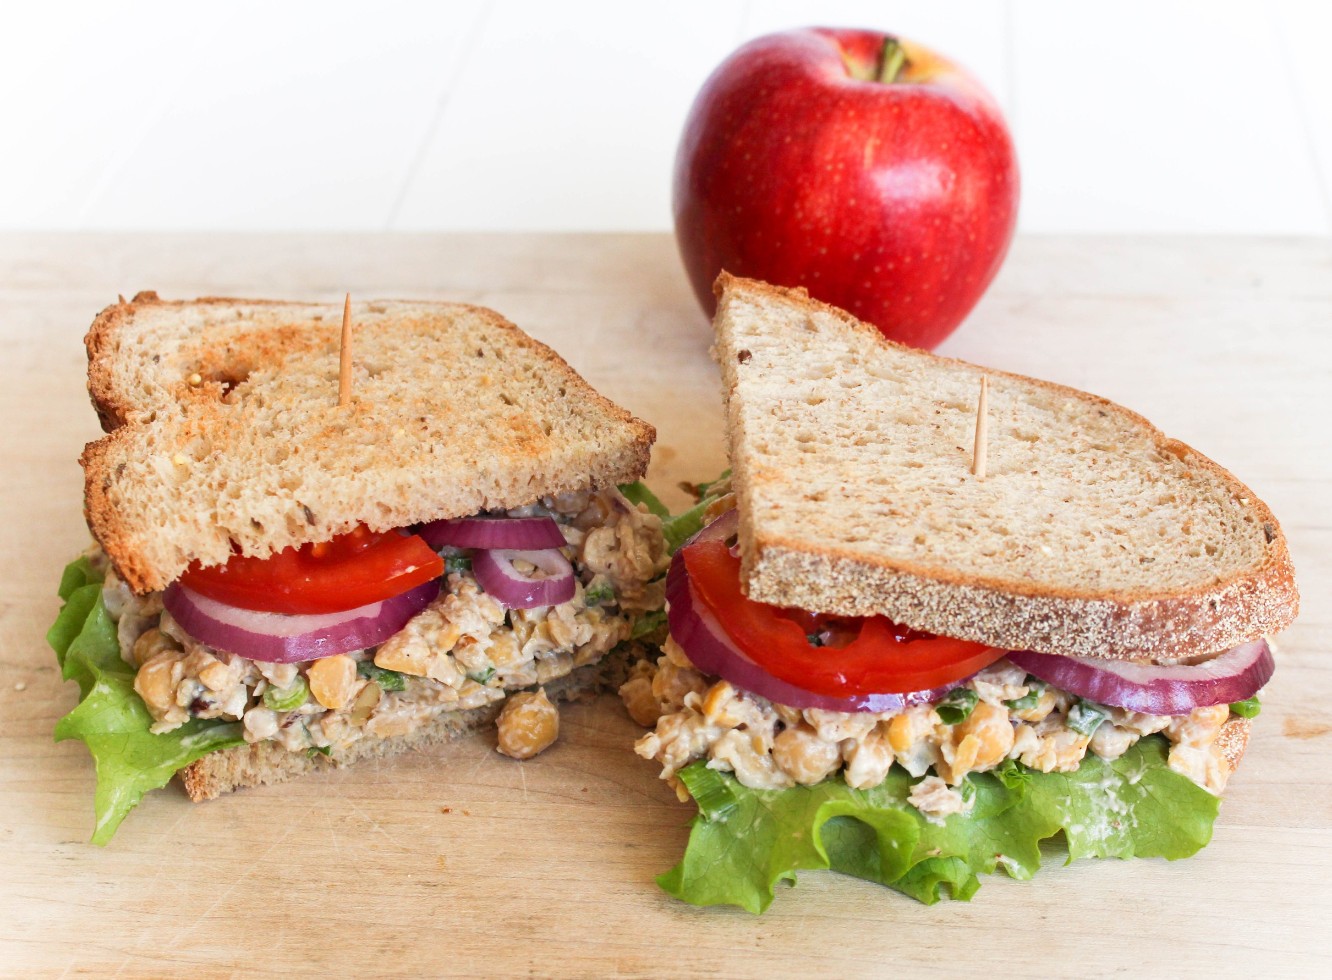
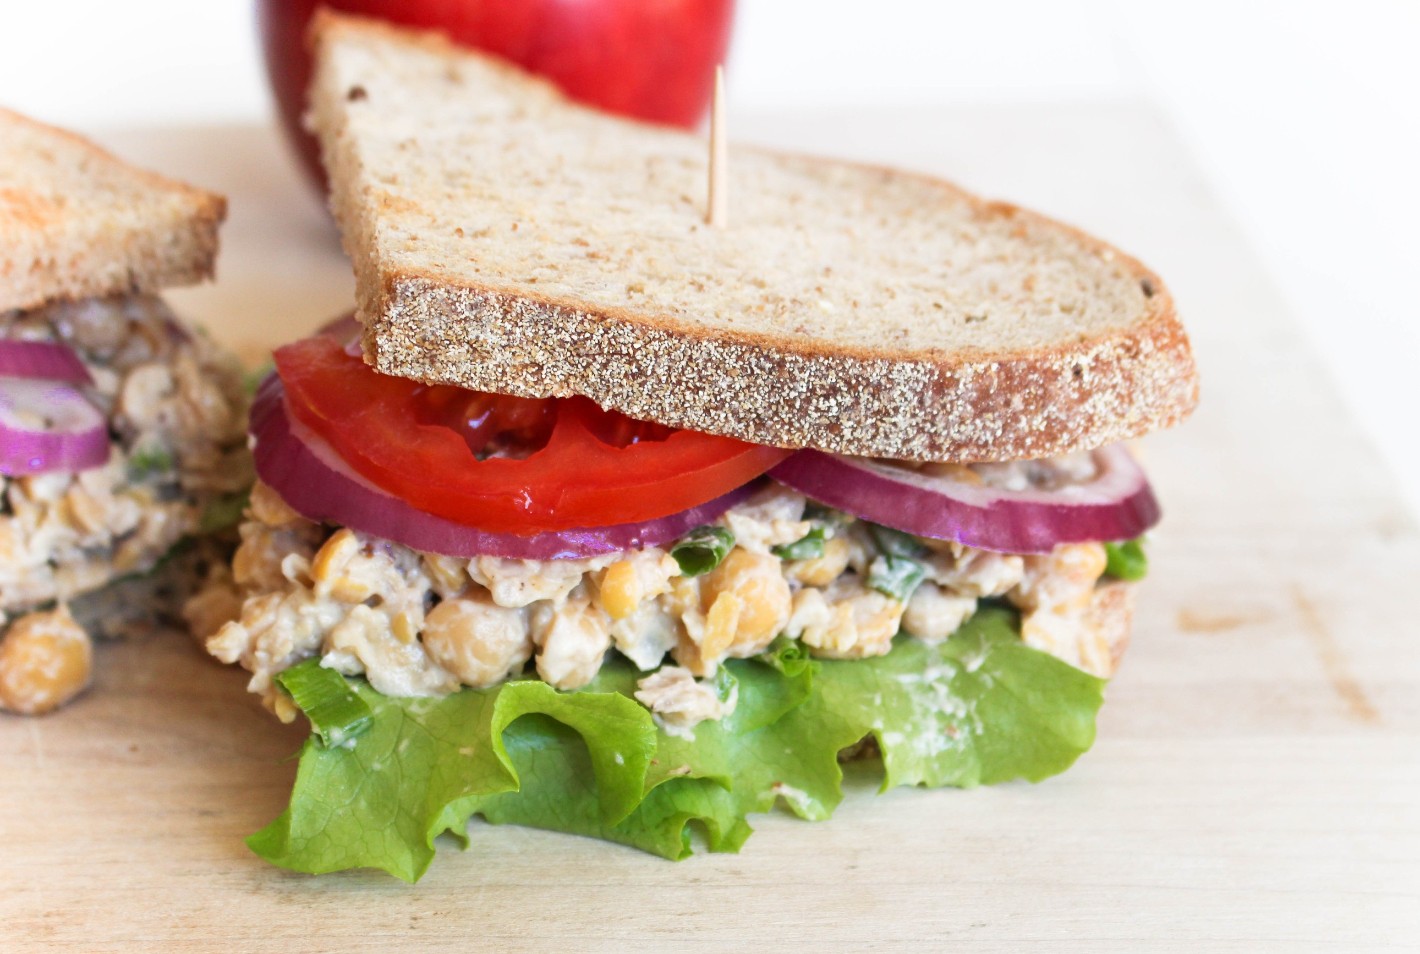
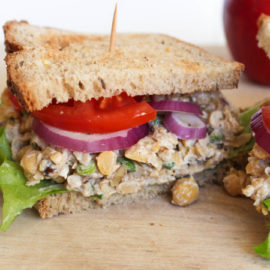
Get out of your lunchtime rut and make packing lunches more exciting with this Chickpea Salad Sandwich.
Ever get in a lunch rut? Need new ideas for packing your kids’ or your own lunch? Are packable noontime options dwindling? Surely you’ve met the ‘What shall I pack for lunch?” question.
I always pack my lunch for the next day the night before. If not, I’m typically running out the door and a Siggi’s yogurt, KIND bar, and a piece of fruit are just tossed in my bag on my way out. I don’t mind those “snacky” kind of lunches once in a while, but I’d prefer more of a meal kind of lunch.
Plant-Based Proteins:
This chickpea walnut sandwich is a plant-based tuna/chicken salad makeover. I always try and make sure protein is present at lunchtime to help keep me full through the afternoon. Chickpeas are the perfect pulse for this recipe because the firm texture holds its shape. The addition of the walnuts is key for the crunch factor, while also providing heart-healthy fats.
Are garbanzo beans the same as chickpeas?
Yes. Originally the name garbanzo bean came from the Spanish community and over time different cultures have referred to them as another name. Eventually, these beans came to be known as chickpeas to most people in the world today.
Are chickpeas lectins?
Yes, chickpeas are considered a legume, and all legumes contain lectin. Lectin, a protein, binds to carbs and is known to some as an anti-nutrient. This is somewhat a controversial concept, because people with stomach sensitives may see an effect, but most do not. Also, most foods containing lectin are high in antioxidants, so the good outweighs the bad. If you are concerned about lectins, know that once they are cooked, the lectin is deactivated.
Ingredients for Chickpea Salad Sandwiches
chickpeas
walnuts
plain Greek yogurt – Greek yogurt is a great substitute for mayonnaise to trim back on saturated fat and replace it with a boost of protein and calcium instead.
Dijon mustard
honey
scallions
salt and pepper to taste
whole wheat bread, toasted
(Optional) Toppings: lettuce, tomato, onion
How to Make a Chickpea Salad Sandwich Without Mayo
Mash the chickpeas in a small bowl using a fork. Don’t over-mash, we aren’t making hummus!
Mix in the nuts, mustard, greek yogurt, honey, and scallions. Season with salt and pepper to taste.
Spread the chickpea salad on your bread to make the perfect sandwich. You can also add it on top of a salad, or dip with crackers – this chickpea walnut mixture is versatile to get you out of your lunchtime rut.
Should you rinse canned garbanzo beans?
You should and mainly it’s because the liquid contains a lot of unnecessary sodium which is why. most recommend draining and rinsing chickpeas before using.
Add chickpeas to a bowl and lightly mash with a fork. (Not too much. We aren’t making hummus!) Add walnuts, Greek yogurt, Dijon mustard, honey, and scallions and mix together. Season with salt and pepper, to taste.
Add a desired amount of the chickpea mixture to the bread and add desired toppings. Top with the other slice of bread.
This post may contain affiliate links. Read my privacy policy.
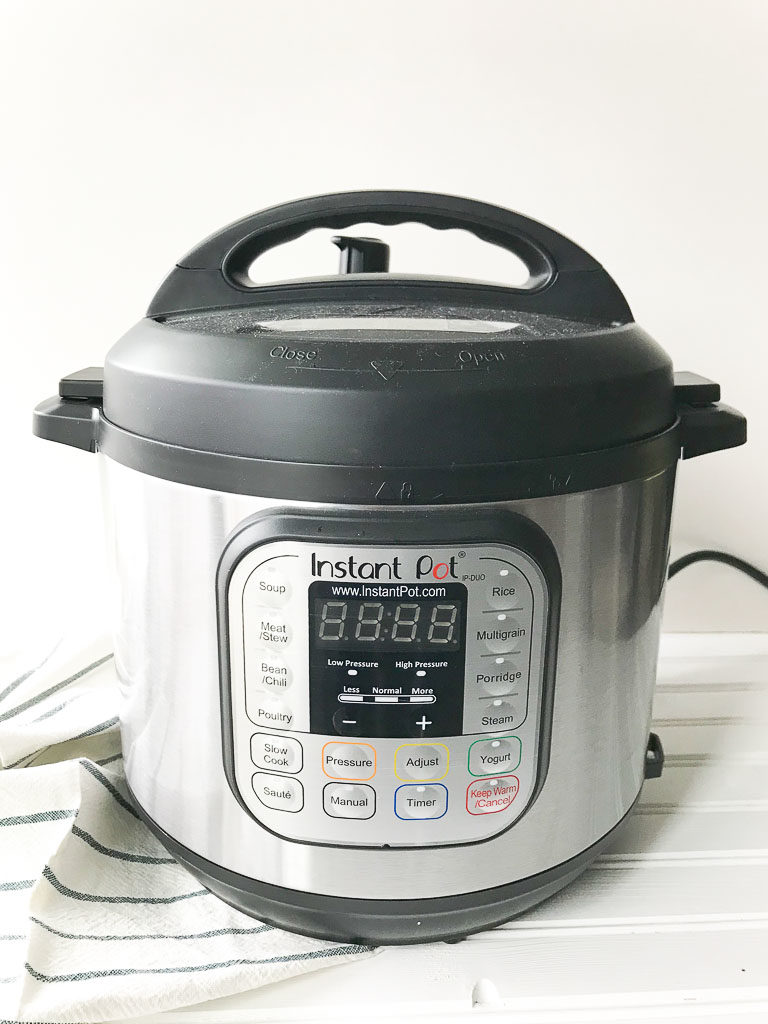
Do you have an Instant Pot and don’t know where to start? I am still getting the hang of it, but I’ve mastered how to make PERFECT hard-boiled and soft-boiled eggs in the Instant Pot.
Disclosure: This post was sponsored by the American Egg Board and the Egg Nutrition Center. Thank you for supporting the brands that make this blog possible!
What Can the Instant Pot Do?
215,000+ Amazon customers purchased the Instant Pot on Prime Day alone. Now that it’s in everyone’s kitchen they are looking for new recipes to try.
The Instant Pot is a single appliance that does the job of seven (yes, seven!) different kitchen appliances. It can handle the tasks of a slow cooker, electric pressure cooker, rice cooker, steamer, yogurt maker, sauté/browning pan, and a warming pot. Think of all those appliances taking up space in your kitchen that can be replaced by one.
New to using the Instant Pot? Learn about these seven tips for efficiently using your Instant Pot.
While I am still learning all the functions of the Instant Pot, the first technique I mastered was preparing hard and soft-boiled eggs.
How Are Eggs Healthy?
One large egg has 6 grams of high-quality protein and all 9 essential amino acids. Nearly half the protein is in the yolk so don’t ditch the yolk!
Eggs were once avoided and criticized for their cholesterol content. However, the totality of scientific research has shown no or little effect between dietary cholesterol and cardiac outcomes or markers of heart disease risk in healthy individuals.
Government and health organizations have revised their dietary cholesterol recommendations. The 2015-2020 Dietary Guidelines for Americans place no daily limit on dietary cholesterol intake. Foods like egg yolks and some shellfish are higher in dietary cholesterol but not saturated fats making them a healthful choice along with healthy eating patterns.
Hard-boiled eggs are something I pretty much meal prep every week for myself. One large egg has varying amounts of 13 essential vitamins and minerals, including choline plus the antioxidants lutein and zeaxanthin, all just for 70 calories.
Why the Instant Pot method works:
Now, I know making hard-boiled eggs on the stovetop is not too challenging, but this Instant Pot method makes it even simpler and in just 5 minutes, they are ready. Plus, there is a science behind why cooking eggs in the Instant Pot make them easier to peel. The reason according to Alton Brown is:
“Eggs that are quickly heated are easier to peel than eggs that are slowly heated, say in cold water brought to a boil. Fast cooking prevents the white from bonding so epoxy-like to the outer membranes. Since pressure steamers can generate temperatures between 230 and 250 degrees F it is suspected that this is actually why folks think they’re magic egg machines.” Also, thorough cooling eases peeling by allowing the proteins in the albumen to fully set and harden, thus preventing tearing.
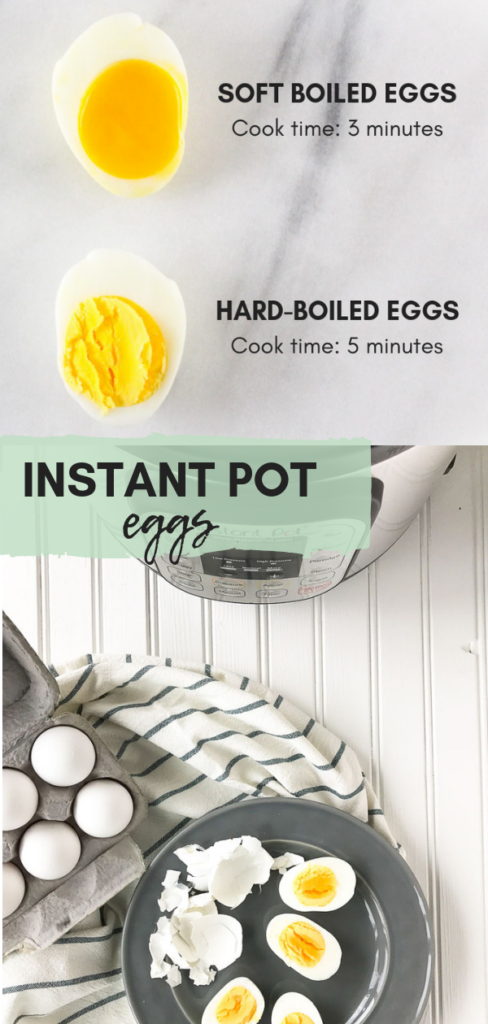
How to Make Soft Boiled Eggs in the Instant Pot
Pour the water in and place the rack (trivet) in the bottom. Then sit the eggs on the rack in the Instant Pot in a single layer.
Cook for 3 minutes on high pressure. Once the timer goes off, quickly release the pressure.
Transfer the eggs to a bowl with ice and cold water until they are cool enough to hold in your hand.
Peel right away.
The Best Pressure Cooker Hard Boiled Eggs
If you want to make hard boiled eggs in the Instant Pot, pour the water in. Set the rack in the bottom. Place the eggs on the rack. Cook for 5 minutes using high pressure. Let the pressure release naturally for 5 minutes, then transfer to an ice bath. Peel once they are cool enough for you to hold.
Tips for Making
Make sure the eggs are in a single layer, do not stack them.
There is an accessory you can buy that is specifically for making eggs in the Instant Pot that may allow you to cook more at a time.
When you release the pressure, place a towel over the top. Also make sure the pressure cooker is away from cabinets so the steam doesn’t ruin them.
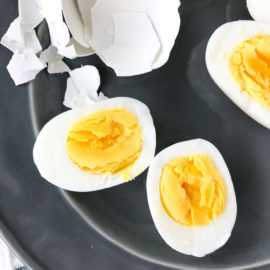
How Long Do Cooked Eggs Last?
Hard-Boiled Eggs will keep up to a week in your refrigerator. Make a few perfect hard-boiled eggs to create delicious recipes throughout the week.
A few ways I use hard-boiled eggs are:
Pair hard-boiled eggs with avocado and tomato. I usually just add a little salt and pepper, but when I’m looking to add an extra pop of flavor, I add everything but the bagel, sesame seasoning blend.
For a filling snack, try my version of a “quick deviled egg”. Scoop out the yolk, mix with hummus and fill back in the egg white.
Ways to Use Instant Pot Eggs
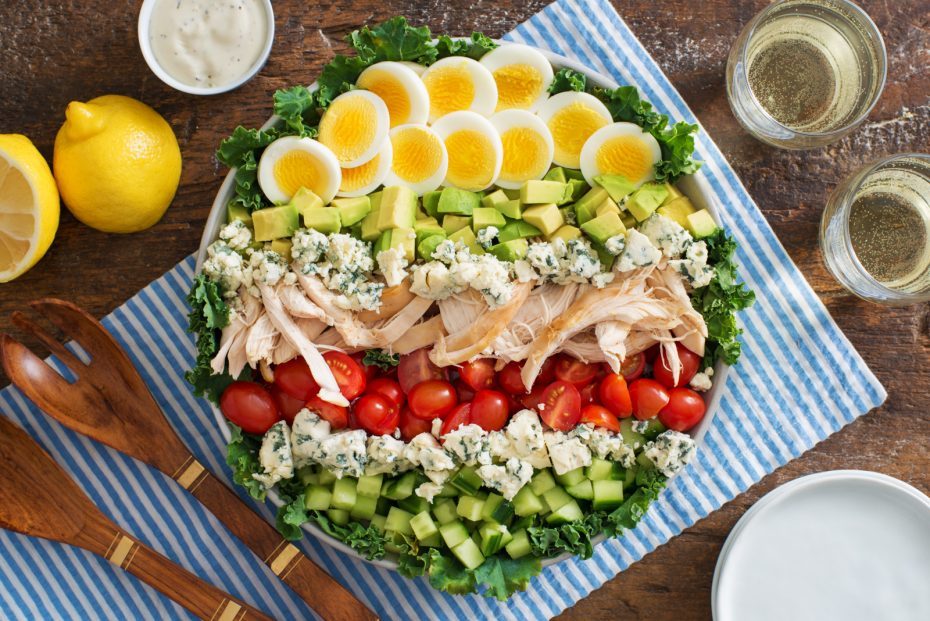
Go for a traditional cobb salad but switch up your greens with a Kale Cobb Salad
Place the rack in the bottom of the pot. Pour the water in the pot. Place the eggs on the rack.
For soft-boiled: Set Instant pot on high pressure on manual 3 minutes. Quick release placing a towel over the valve. Quickly add eggs to a bowl with cold water and ice until cool enough to hold. Peel right away.
For hard-boiled: Set Instant Pot on high pressure on manual 5 minutes. Natural release 5 minutes then use quick release placing a towel over the valve. Quickly add eggs to a bowl with cold water and ice until cool enough to hold. Peel right away.
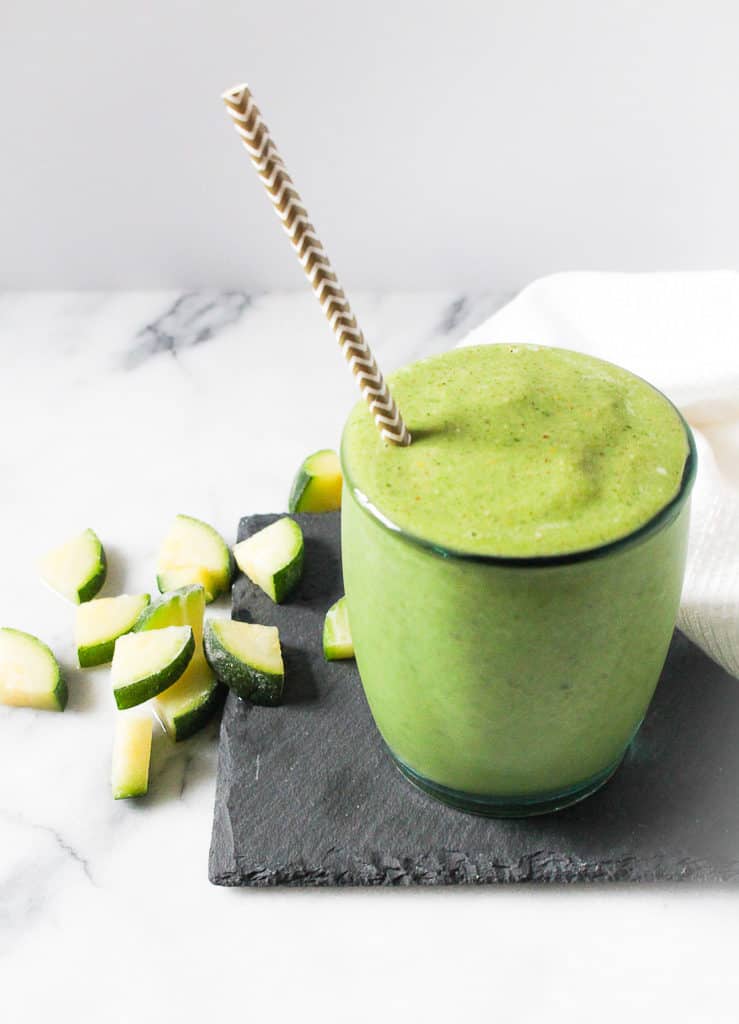
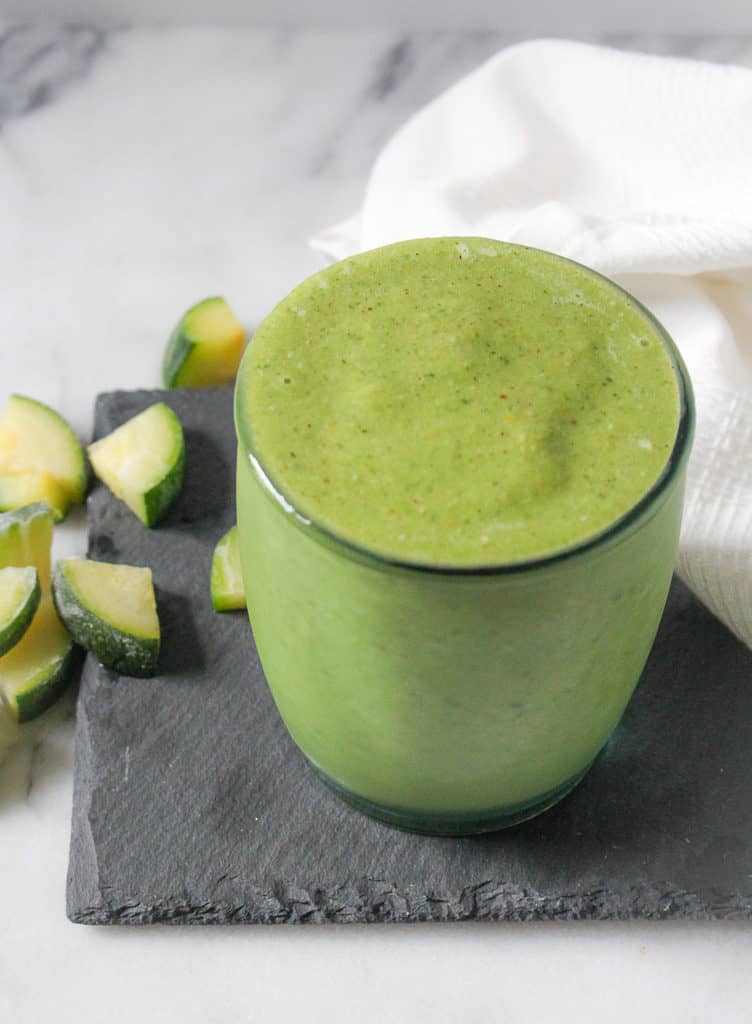
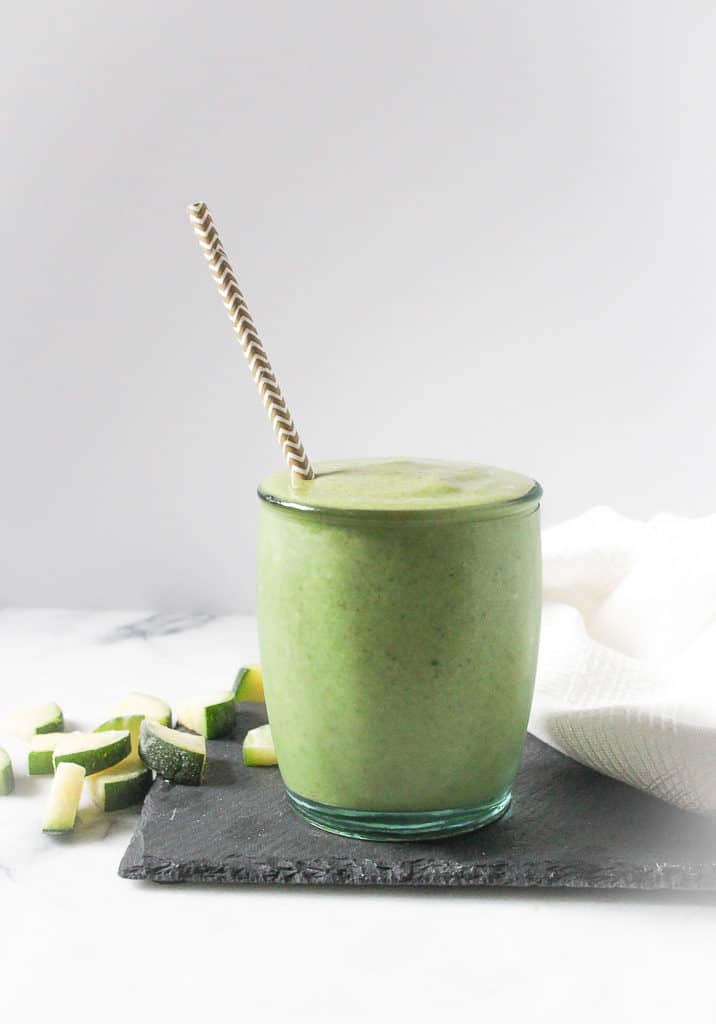
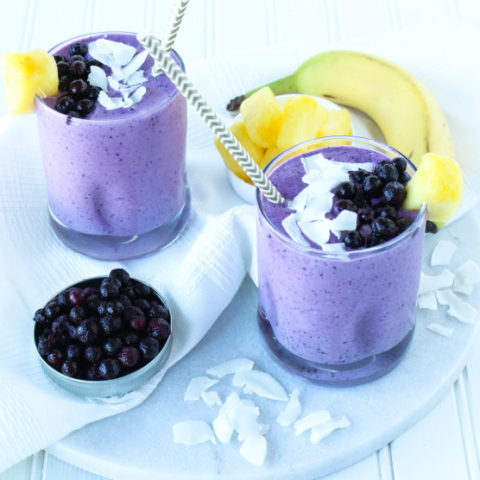
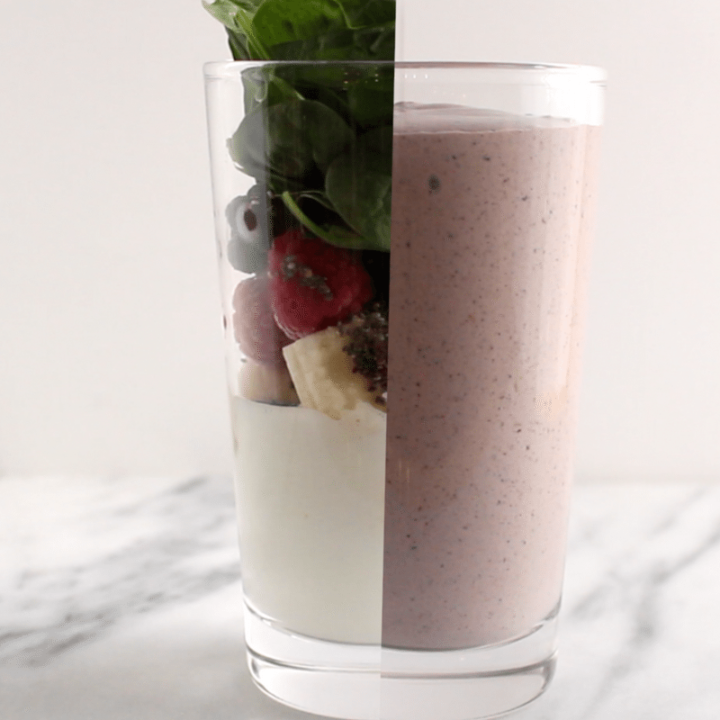
This Zucchini Smoothie tastes exactly like your favorite veggie bread! Only 8 ingredients needed for a full on powerhouse in a glass!
This smoothie literally does taste like zucchini bread. When I took the first sip of this smoothie, my tastebuds could identify every single flavor that was blended together.
We pretty much have all heard of adding leafy greens to smoothies but have you considered veggies like zucchini. I recently started adding this vegetable to my smoothie with the plethora I’ve been picking up from the farmer’s market.
The other recipe that I run to when I have too many zucchini on hand is my chocolate chip zucchini bread, which I’m sure everyone has tried at some point (there’s also a gluten free version). One thing I really love about this smoothie is that it’s healthy, but its taste is absolutely delicious!
Don’t let the green color be a turn-off. Actually, most green smoothies are the ones with the best nutrition profiles!
Check out all of the vitamins, minerals, and antioxidants that are packed in every glass you make!
Banana: rich in potassium and fiber Zucchini: vitamins C and A, potassium, folate, and fiber Spinach: potassium, magnesium, and vitamins B6, B9, and E, high amounts of carotenoids, vitamin C, vitamin K, folic acid, iron, and calcium Walnuts: rich in omega-3 fats, protein, copper, manganese Cinnamon: polyphenol antioxidants Ginger: anti-inflammatory and antioxidant properties Orange Zest: fiber, vitamins, and polyphenols
Smoothie Meal Prep Tips
If you are a beginner at making smoothies, I recommend starting with baby spinach. It’s a neutral veggie that blends well. Honestly, if you are using nut butters, protein powder, and/or berries; all of those ingredients overpower the taste of the spinach. You can’t even tell it’s in there!
PRO TIP: After you open your spinach (the kind in the plastic containers from the store) place a paper towel on top. This keeps the condensation from the lid off the greens and makes it stay fresher a little longer.
Chop and steam your zucchini before adding it to your smoothie. Not only does it blend better this way, but your body can absorb more nutrition. When you steam the zucchini, it breaks down the cell wall and opens up the micronutrients, which makes it easier for your body to absorb and digest.
Transfer the steamed zucchini to a parchment-lined baking sheet and place it in the freezer (this is also a good tip for berries too). Once they are frozen, place them in small plastic bags so you can easily toss them in the blender the next time you go to make a smoothie.
You can watch the video for all of the smoothie tips if you want!
This post may contain affiliate links. Read my privacy policy.
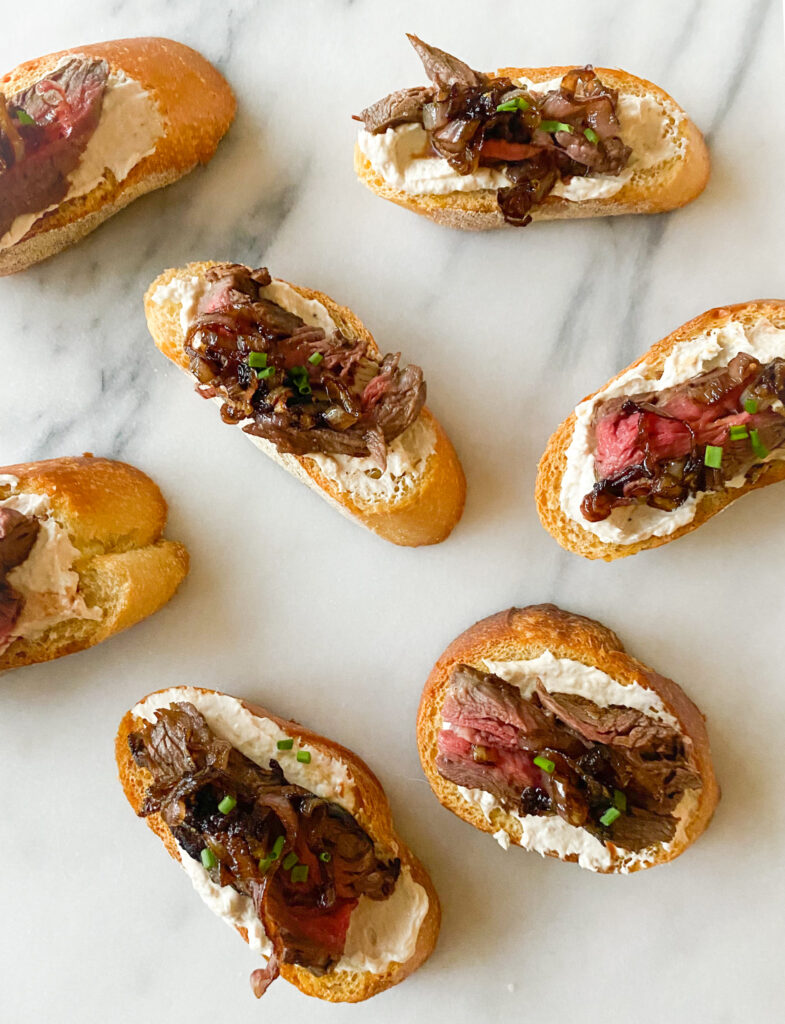
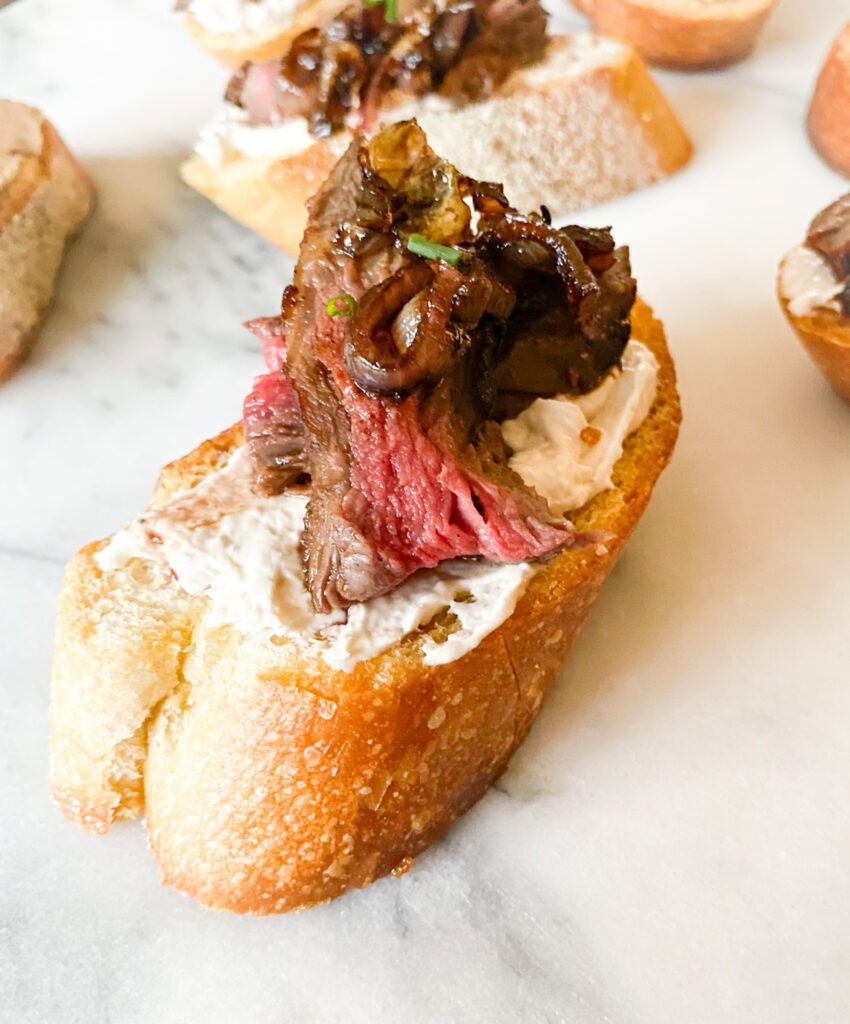
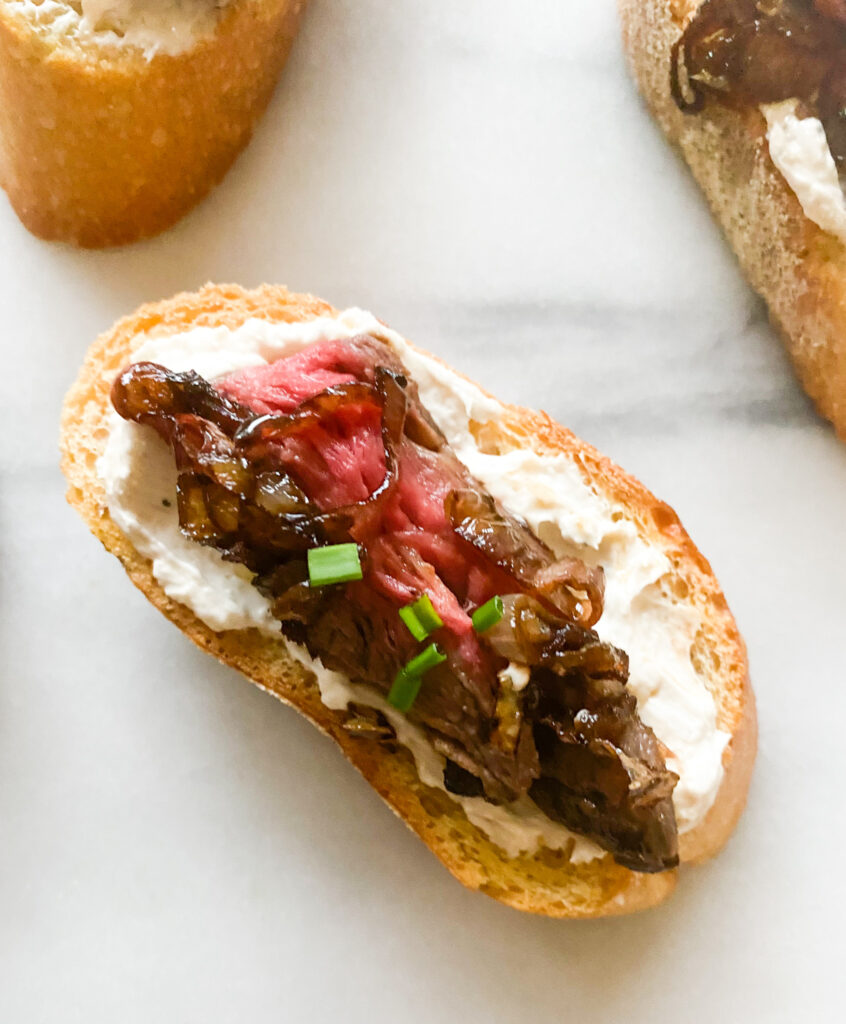
Enjoy this Beef Crostini appetizer topped with a creamy horseradish spread the next time you host a party or just want a light, delicious dinner.
Doesn’t the word crostini just sound fancy? If you didn’t know what it was and saw it on a menu, you would probably wonder what that fancy-sounding appetizer was.
Today I am going to show you how easy it is to make steak crostinis with a delicious creamy horseradish spread that is going to keep you and your guests coming back for more! Even though people love making these for cocktail parties and special occasions, they are also a great lunch idea!
Although these crostinis sure are tasty, they are healthy too!
When compared to other ingredients that people consider high protein such as quinoa, peanut butter, black beans, and edamame, a 3 ounce serving of beef contains the same amount of protein but with fewer calories.
It’s also full of other great nutrients like iron to help the body use oxygen, choline which has been shown to help support nervous system development, and selenium to help prevent cell damage.
Beef Crostini Ingredients
Beef – rib cap, skirt, or flank steak
shallots, thinly sliced
olive oil
salt
balsamic vinegar
French baguette
Chives for garnish
For the Marinade:
Worcestershire sauce
balsamic vinegar
olive oil
Dijon mustard
maple syrup
Salt and black pepper
For the Horseradish Spread:
horseradish (not horseradish sauce)
plain Greek yogurt
cream cheese
lemon juice
Salt and black pepper
Worcestershire sauce
How to Make Crostinis with Beef and Horseradish Sauce
Making the Marinade: Whisk together the Worcestershire sauce, balsamic vinegar mustard, oil, maple syrup, and salt and pepper in a large shallow dish. Cover both sides of the beef by submerging it. Cover the dish and allow it to marinate for one and a half to two hours.
Preparing the Spread: Combine the horseradish, greek yogurt, lemon juice, cream cheese, salt, pepper, and Worcestershire sauce in a small bowl. Mix until it’s combined. You can also use a hand mixer to whip the spread for a lighter and fluffier consistency. Refrigerate until you are ready to use.
Cooking the Shallots: Over medium-high heat, warm up the saucepan. Add the thinly sliced shallots and salt, then saute until they are golden brown. Pour in the vinegar and continue cooking until the shallots have absorbed the balsamic. Take the pan off the heat and set it aside.
Making the Crostini: Preheat the oven to 400 degrees and prep a baking sheet by lining it with parchment paper. Lightly brush the olive oil on the bread using a pastry brush and place it on the baking sheet. Bake for 5 to 10 minutes, then flip them and continue baking until they are toasted.
Cooking the Beef: Heat a cast-iron skillet over high heat. While you are waiting, remove the beef from the marinade and pat dry. Add the oil to the pan, once it’s warm, sear the beef for 5 minutes or until a nice crust forms. Flip and repeat for the other side and cook until the internal temperature reaches 135 degrees. Let the steak rest for 5-10 minutes to lock in the flavor and to finish cooking to 140 degrees.
Assembling the Crostinis: Spead the horseradish sauce onto both sides of the bread slices. Add the beef and top with the balsamic shallots. If you are using chives as a garnish just sprinkle those on.
What Other Cuts of Meat Can You Use to Make Crostini Appetizers?
You can use whatever cut of beef you would like. Here are some of the more popular options.
Roast beef – if you wanted to add that to this recipe or skip the marinading you could buy roast beef from the deli.
Filet mignon – prepare the same way as the recipe is written
Beef tenderloin
Making Steak Crostini Ahead of Time
If you want to avoid the party stress of making everything at once, you can easily make the horseradish spread a day before.
While the beef would be best freshly made, you could also make it a day or so ahead of time, then reheat it before assembling the crostinis.
For the marinade: In a large shallow dish, whisk together the Worcestershire sauce, balsamic vinegar, olive oil, Dijon mustard, maple syrup, salt, and pepper. Submerge the meat into the marinade, being sure to cover both sides. Cover with plastic wrap and marinate for one in a half to two hours.
For the spread: As the meat is marinating, in a small bowl mix together the horseradish, yogurt, cream cheese, lemon juice, salt, pepper, and Worcestershire sauce until well combined. (For a lighter texture, beat with an electric mixer for a fluffier consistency) Place spread in the refrigerator until ready to use
For the shallots: Heat a small sauté pan over medium-high heat. Add shallots and salt and sauté until golden brown. Add the balsamic vinegar and continue to sauté until balsamic has absorbed into the shallots. Remove from heat and set aside.
For the crostini: Preheat the oven to 400 degrees F. Line a baking sheet with parchment paper. Using a pastry brush, lightly brush olive oil on the bread and place on the baking sheet. Bake for about 10-15 minutes, turning halfway through the cook time, until toasted.
For the meat: Heat a large cast iron skillet over high heat. Remove the meat from the marinade, pat dry, and discard the marinade. Heat oil in the pan. Place meat in the hot skillet and sear for about 5 minutes until a nice crust forms. Using tongs, turn the meat to sear the other side for about 5 minutes or until internal temperature reaches 135 degrees F. Remove from heat and let rest for 5-10 minutes allowing it to carry over cook to 140 degrees for medium. Slice along the grain.
Assemble: Spread the horseradish mixture on each of the slices of bread. Top with slices of meat and then top with balsamic shallots. Sprinkle with chives, if using.
This website uses cookies to improve your experience. We'll assume you're ok with this, but you can opt-out if you wish.AcceptRejectRead More
Privacy & Cookies Policy
Privacy Overview
This website uses cookies to improve your experience while you navigate through the website. Out of these, the cookies that are categorized as necessary are stored on your browser as they are essential for the working of basic functionalities of the website. We also use third-party cookies that help us analyze and understand how you use this website. These cookies will be stored in your browser only with your consent. You also have the option to opt-out of these cookies. But opting out of some of these cookies may affect your browsing experience.
Necessary cookies are absolutely essential for the website to function properly. This category only includes cookies that ensures basic functionalities and security features of the website. These cookies do not store any personal information.
Any cookies that may not be particularly necessary for the website to function and is used specifically to collect user personal data via analytics, ads, other embedded contents are termed as non-necessary cookies. It is mandatory to procure user consent prior to running these cookies on your website.