The Best Overnight Oats

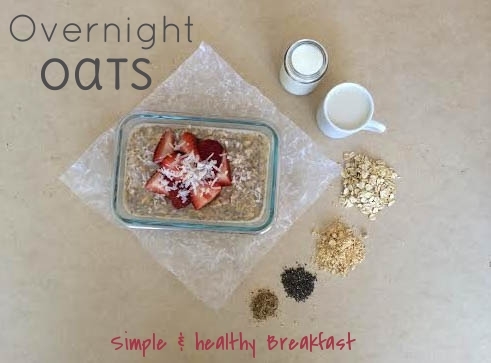
Not have enough time to make a wholesome breakfast every morning? Enjoy this overnight oats recipe that you can make the night before to help power you through your busy morning. 

The Best Overnight Oats: simple & healthy breakfast
Oatmeal is one of those “stick-to-your-guns” kind of breakfast that I know will fuel me through the morning. Problem is, I don’t always have the time in the morning. I will savor that extra 10 minutes of sleep knowing I have breakfast ready to go waiting for me. I’ll even sacrifice doing my hair in the morning for extra sleep. Top buns for the win.

Half the time I am so rushed in the morning, I drink my coffee on the way to work and then eat my breakfast as I am returning emails and getting organized for my day.
The Best Overnight Oats: simple and healthy breakfast
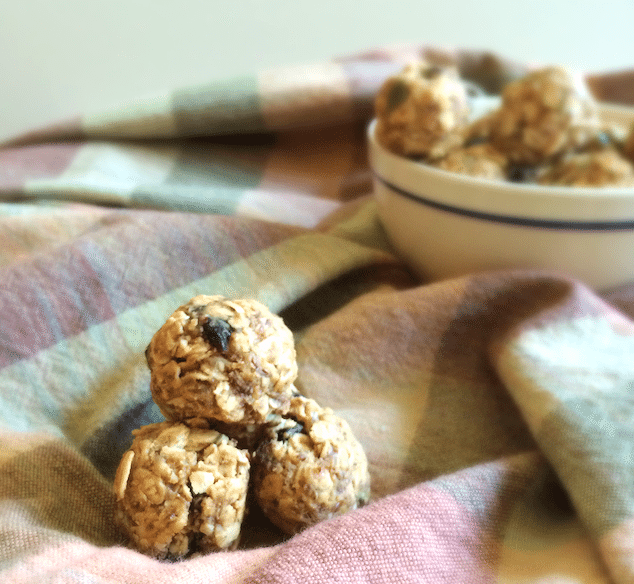
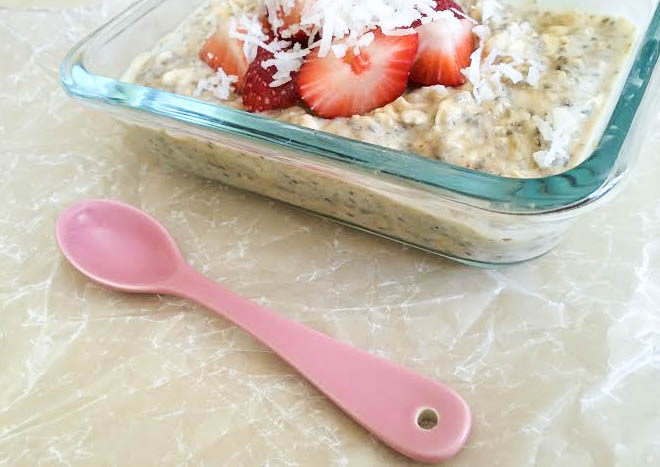
Skip those instant oatmeal packets. They are typically loaded with added sugar and even salt! This recipe is packed with ingredients you can feel good about. Filled with fiber & protein, it will keep you full all morning. Overnight, the oats absorb all the liquid and it becomes a thick cake batter consistency.
The Best Overnight Oats: simple and healthy breakfastYou could always heat the oats up, but I enjoy them cold. Of course this recipe can be easily adapted with your favorite fix-ins. I always like adding a little extra fruit on top. And if I am feeling a little indulgent, I’ll stir in a little unsweetened cocoa powder for a chocolate peanut butter flavor!
The Best Overnight Oats: simple and healthy breakfast

Print
clock clock iconcutlery cutlery iconflag flag iconfolder folder iconinstagram instagram iconpinterest pinterest iconfacebook facebook iconprint print iconsquares squares iconheart heart iconheart solid heart solid icon
simple overnight oats with a pink spoon

The Best Overnight Oats

  • Author: Julie @ RDelicious Kitchen
  • Prep Time: 5 mins
  • Total Time: 5 mins
  • Yield: 1
  • Category: Breakfast

Description

Never have enough time in the morning to make breakfast? Make these overnight oats the night before for a wholesome breakfast you can enjoy in the morning.
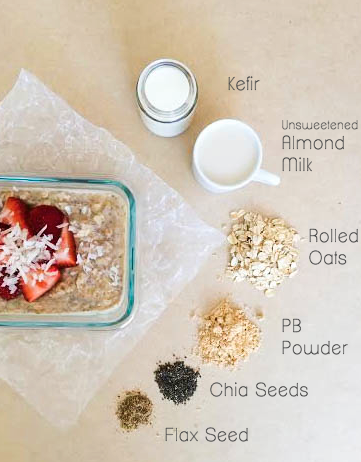

Ingredients

Scale
  • 1/3 cup rolled oats
  • 1/3 cup plain kefir
  • 1/3 cup unsweetened almond milk
  • 1 small banana, mashed
  • 1 tbsp peanut butter powder
  • 1 tsp chia seeds
  • 1 tsp ground flax seed
  • [optional] Toppings: fresh fruit, unsweetened coconut, unsalted nuts

Instructions

  1. Simple stir all ingredients together.
  2. Cover and refrigerate overnight.
  3. The next morning add toppings and enjoy chilled.

Notes

Nutrition facts based on My Fitness Pal.


Nutrition

  • Serving Size: 1
  • Calories: 267
  • Sugar: 17
  • Sodium: 106
  • Fat: 10
  • Saturated Fat: 1
  • Trans Fat: 0
  • Carbohydrates: 43
  • Fiber: 8
  • Protein: 12
  • Cholesterol: 3
Recipe Card powered byTasty Recipes

What’s your go-to breakfast to keep you full and focused all morning?

RDelicious Kitchen

Cheesy Deviled Eggs with a Cheese Crisp

Family and friends will love this cheesy version of classic deviled eggs.  

Cheesy Deviled Eggs with a Cheese Crisp
Growing up, I really never liked deviled eggs. I think because the traditional way is heavy with mayonnaise and I just absolutely do not like mayo.  It is just one of those foods that gives me the heebie jeebies. I don’t mind that I dislike mayo, because as a dietitian, I always encourage others to cut back on condiments like mayo and to use other substitutes like yogurt instead.
Don’t even get me started about cilantro. I think it tastes like soap. We can talk about that another day. Let’s get back to these deviled eggs. I wanted to make them cheesy, but also pop with flavor. That’s why I chose the horseradish variety for this recipe. Of course, you can always substitute with any kind of cheddar you would like. #cheddaisbetta
Cheesy Deviled Eggs with a Cheese Crisp
What’s that delicious crispy garish? Keep scrolling.. you won’t be sorry.

By posting this recipe I am entering a recipe challenge sponsored by Cabot Creamery and am eligible to win prizes associated with the contest. I was not compensated for my time. 

Print
clock clock iconcutlery cutlery iconflag flag iconfolder folder iconinstagram instagram iconpinterest pinterest iconfacebook facebook iconprint print iconsquares squares iconheart heart iconheart solid heart solid icon
cheesy deviled eggs on a tan board

Cheesy Deviled Eggs with a Cheese Crisp

  • Author: Julie @ RDelicious Kitchen
  • Yield: 12 1x

Ingredients

Scale

Instructions

  1. Place 6 eggs in a pot and fill with cold water, covering the eggs by an inch. Bring the water to a boil, uncovered. Turn off the heat and cover the pot. As soon as the water comes to a boil, remove the pot from heat and cover. Leave the eggs in the covered pan for 10-12 minutes. Remove from water, Chill, and peel.
  2. Cut each egg in half and scoop out the yolk into a bowl. Add the horseradish cheddar cheese, yogurt, dijon mustard, and chives. Mix well.
  3. Stuff the egg whites with the yolk mixture. Garnish with chives, a sprinkle of paprika, and a cheesy chip.

Recipe Card powered byTasty Recipes

Let’s talk about these cheesy crisps. It will change your life. Okay, maybe a little dramatic, but if you are a cheese lover you understand. 😉
cabot horseradish cheese
Confession: I had to make extra cheesy crisps for the pictures because I may have snacked on the first batch a little too much.
horseradish cheese garnish

Print
clock clock iconcutlery cutlery iconflag flag iconfolder folder iconinstagram instagram iconpinterest pinterest iconfacebook facebook iconprint print iconsquares squares iconheart heart iconheart solid heart solid icon
cheesy deviled egg with cheese crisp

Cheese Crisp

  • Author: Julie @ RDelicious Kitchen
  • Yield: 12 cheese crisps 1x

Ingredients

Scale
  • 1/4 cup your favorite cheddar cheese

Instructions

  1. Preheat oven to 350 degrees.
  2. Finely grate cheddar cheese.
  3. Using a teaspoon, make 12 small piles of cheese about an inch apart on a baking sheet. (if using an aluminum baking sheet, use parchment paper)
  4. Bake in the oven for 5-7 minutes until cheese has full melted and golden brown.
  5. Remove pan from oven and let cool for cheese to harden before removing from the pan.
  6. Use as a garnish, or to simply munch on!

Recipe Card powered byTasty Recipes

Don’t know what to make this weekend for Super Bowl Sunday? Welp, I think you know what you’re making now!

Cheddar, Apple, & Arugula Flatbread

Revamp pizza night into flatbread night, with this Cheddar, Apple, & Arugula Flatbread. 

What makes this flatbread really stand out? Let’s just look at these toppings.
Cheddar, Apple, & Arugula Flatbread

Toppings:
Cabot White Oak Cheddar // Granny Smith Apple // Walnuts // Arugula // Red Onion

Cheddar, Apple, & Arugula Flatbread
I must say, I love all the Legacy Cabot flavors, but since the beginning White Oak Cheddar has been my favorite. It has an oaky and buttery silky flavor to it that pairs well with the rest of the flatbread toppings.

Cheddar, Apple, & Arugula Flatbread
Lucky for me, I have a panel of professional taste testers for all of my recipes. My boyfriend, Adrain, REALLY liked this recipe. And when I say he REALLY liked it, means that a full flatbread was gone in one sitting. My friend Steph has become quite the Cabot cheese enthusiast, like myself. When I sent her a picture of the recipe, this happened …
text
Lucky for Steph, we live right down the street from each other. Flatbread delivery! Now if only places delivered this kind of food ..
Cheddar, Apple, & Arugula Flatbread

Eggnog Smoothie

I’ve been a little obsessed with kefir lately. When I saw they had an eggnog flavor, I jumped right on it. I’ve been enjoying kefir as is, but this time wanted to try it in a recipe.
Eggnog Smoothie | Recipe by Julie @ RDelicious Kitchen
Kefir naturally has a tangy flavor, so when incorporating it in a smoothie, a banana was the perfect way to sweetened it up.

Eggnog Smoothie | Recipe by Julie @ RDelicious Kitchen
Eggnog only comes around once a year, so I don’t mind indulging in a small glass one time a year. Eggnog just screams Christmas to me, and I want to enjoy that seasonal treat more than once without the guilt!
Eggnog Smoothie | Recipe by Julie @ RDelicious Kitchen
Enjoy as a breakfast, snack, or dessert to get in the holiday spirit! I know what I’ll be making for breakfast Christmas morning!

Print
clock clock iconcutlery cutlery iconflag flag iconfolder folder iconinstagram instagram iconpinterest pinterest iconfacebook facebook iconprint print iconsquares squares iconheart heart iconheart solid heart solid icon
Eggnog Smoothie

Eggnog Smoothie

  • Author: Julie @ RDelicious Kitchen
  • Yield: 2

Description

Indulge in the holiday seasonal flavors without packing on the pounds. Feel good about drinking eggnog with this eggnog smoothie recipe!


Ingredients

Scale
  • 1 banana
  • 1 cup Lifeway kefir eggnog
  • 1 cup unsweetened almond milk
  • (optional) ground nutmeg
  • (optional) ice

Instructions

  1. Simply add ingredients to a blender and blend until smooth.
  2. For a thinner consistency add more almond milk. For a thicker consistency add ice.
  3. Sprinkle with ground nutmeg.

Notes

For a festive rim: take 2 tbsp of sugar and mix in 1 drop of red food coloring. With a damp paper towel moisten the rim of the glass. Coat the rim of the glass with sugar.

Recipe Card powered byTasty Recipes

Signature

Greek Yogurt Pumpkin Pie Bars

I have a cooking classes coming up this week at work with the theme of lightened up Thanksgiving desserts. I’ve been playing around with the recipe idea all weekend after posting my Supermarket RD’s Pick of pumpkin puree.
Greek yogurt pumpkin pie bars 1
Pumpkin pie is my ultimate favorite dessert on Thanksgiving and I make sure I always save room for it. Of course, there’s not too much room after a delicious Thanksgiving day meal, so I always found it so annoying when I would try to cut myself a sliver of pie and end up making a mess trying to get that perfect little piece.
Greek yogurt pumpkin pie bars 2
This recipe I decided to skip the pie plate and use a sheet cake pan to easily cut into little squares to get that perfect little slice.
Greek yogurt pumpkin pie bars 3
While this recipe is still a dessert, it is lightened up by cutting back on sugar and adding Greek yogurt in place of other fats.

This was the first time I made a graham cracker crust, but using yogurt instead of butter and I am quite pleased with the results.

Print
clock clock iconcutlery cutlery iconflag flag iconfolder folder iconinstagram instagram iconpinterest pinterest iconfacebook facebook iconprint print iconsquares squares iconheart heart iconheart solid heart solid icon
Greek yogurt pumpkin pie bars on a baking sheet

Greek Yogurt Pumpkin Pie Bars

  • Author: Julie @ RDelicious Kitchen
  • Prep Time: 15 mins
  • Cook Time: 55 mins
  • Total Time: 1 hour 10 mins

Description

Move over pumpkin pie. These pumpkin pie bars can satisfy your craving with lightened up ingredients. Plus, it’s easier for portion control by cutting them into small squares versus trying to cut a sliver of pie.


Ingredients

Scale
  • For the crust:
  • 1 cup graham crackers, crushed
  • 1 cup quick oats
  • 1 tbsp cinnamon
  • 1/4 cup light brown sugar
  • 2/3 cup Cabot low fat vanilla yogurt
  • 1/2 tsp vanilla extract
  • For the pumpkin pie filling:
  • 1 (29 oz) can pumpkin puree
  • 1 cup Cabot low fat vanilla yogurt
  • 1/4 cup evaporated skim milk
  • 1/3 cup sugar
  • 1/3 cup light brown sugar
  • 2 eggs, beaten
  • 1 heaping tbsp pumpkin pie spice

Instructions

  1. Preheat the oven to 425 degrees F.
  2. For the crust: With cooking spray, grease a 9×13 baking dish; set aside. In a food processor, combine the graham crackers and quick oats. and pulse until fine crumbs. Add the cinnamon, light brown sugar, yogurt, and vanilla extract. Press evenly in the bottom of the baking dish.
  3. For the pumpkin pie filling: In a large bowl, whisk together the pumpkin puree, yogurt, sugar, brown sugar, eggs, and pumpkin pie spice.
  4. Pour the filling over the crust evenly. Bake in the oven at 425 degrees F for 10 minutes, then turn down to 350 and bake for an additional 45 minutes. Take out of the oven and let cool completely before slicing.

Recipe Card powered byTasty Recipes

Let me tell you, I even surprised my hardest critics with this recipe. It tastes exactly like pumpkin pie!
Signature

Pumpkin Peanut Butter Bites

It’s pumpkin everything this time of year. When I saw Wild Friends create a new seasonal pumpkin spice peanut butter, I was so excited! I am a big fan of wild friends nut butters.

I’m not going to lie, I’ve been eating it straight from the jar with a spoon. I made energy bites with wild friends vanilla espresso flavor, so I created another energy bite recipe using this new nut butter!

pumpkin pb bites 1Perfect little bite size snacks for on the go easy snacking.
pumpkin pb bites 3
Play around with the ingredients to create the perfect flavor for you!
pumpkin pb bites 2

Print
clock clock iconcutlery cutlery iconflag flag iconfolder folder iconinstagram instagram iconpinterest pinterest iconfacebook facebook iconprint print iconsquares squares iconheart heart iconheart solid heart solid icon
pumpkin peanut butter bites in a bowl with checkered napkin

Pumpkin Peanut Butter Bites

  • Author: Julie @ RDelicious Kitchen

Ingredients

Scale

Instructions

  1. Add oats, flax seed, dried cranberries and pumpkin seeds in a large bowl. Toss to combine.
  2. Put pumpkin spice peanut butter and maple syrup in a small bowl and microwave for 30 seconds or until softened.
  3. Combine the peanut butter mixture with the oat mixture until combine. The mixture will be thick. Shape into tablespoon-sized balls. Store in refrigerator.

Notes

Use certified gluten free oats to guarantee gluten free recipe.

Recipe Card powered byTasty Recipes

Signature

Double Chocolate Zucchini Muffins

What do you do when you have an over abundance of zucchini and don’t know what to do with it all? … Make muffins!! Double chocolate zucchini muffins that is.
double chocolate zucchini muffins 3
Two of my biggest nutrition tips for making healthy choices regarding muffins:

1. Make them yourself from scratch

2. Keep the size in check

double chocolate zucchini muffins 2
1. When you make your own muffins, you know exactly what is going in your recipe. Don’t like how much sugar the recipe calls for, simply trim the amount or use healthier swaps like pure maple syrup.
2. I always opt for the traditional size muffin tin when I am baking. Even though I am always trying to make my baked good recipes a little lighter, they aren’t a substitute for a whole meal.
For example, many grab breakfast on the go going to work in the morning. Maybe they pick up a coffee and a reduced fat blueberry muffin. One may think deciding on the reduced fat is a healthier choice, but let’s see how that measures out. Below is an example of a reduced fat blueberry muffin from a popular chain restaurant:

Just by looking at the nutrition facts, it looks like a cupcake in disguise. 410 calories!? 40 grams of sugar !? 26% of the daily value of sodium!? 10 grams of total fat!?

Scroll down a little and look at the ingredients from the muffins I made. Now scroll back up and look at the ingredients in that muffin? Have you even heard of half of those ingredients before? I’m thinking my muffins win!

double chocolate zucchini muffins 1

Real food. Real ingredients. (while sneaking in some vegetables!)
Pair one of these muffins with a glass of milk and a piece of fruit for a balance way to start your day! (instead of a giant sugar bomb!)

Print
clock clock iconcutlery cutlery iconflag flag iconfolder folder iconinstagram instagram iconpinterest pinterest iconfacebook facebook iconprint print iconsquares squares iconheart heart iconheart solid heart solid icon
double chocolate zucchini muffins in a muffin tin

Double Chocolate Zucchini Muffins

  • Author: Julie @ RDelicious Kitchen
  • Yield: 12 1x

Ingredients

Scale
  • 1 cup oat flour
  • 1/2 cup unsweetened cocoa powder
  • 1/2 tsp salt
  • 1 tsp baking soda
  • 1/4 tsp baking powder
  • 1/3 cup coconut oil (melted then cooled – make sure it’s not hot!)
  • 1/3 cup maple syrup
  • 4 egg whites
  • 1 tsp vanilla
  • 2 cups grated zucchini
  • 3/4 cup chocolate chips

Instructions

  1. Preheat the oven to 350 degrees. Line a 12-cup muffin tin with muffin liners or grease with cooking spray.
  2. In a bowl combine the oat flour, cocoa, salt, baking soda, and baking powder. Set aside.
  3. In another bowl, whisk together the coconut oil, maple syrup, eggs and vanilla.
  4. Slowly incorporate the dry ingredients into the wet ingredients.
  5. Using a few paper towels or a cloth wring out excess moisture from the zucchini. Fold in the zucchini and chocolate chips (save some to add on top) until just combined.
  6. Fill each muffin tin and sprinkle a few chocolate chips on top.
  7. Bake for 18-20 minutes. Let cool for at least 5 minutes before removing from the pan. Store in an airtight container.

Recipe Card powered byTasty Recipes

PB&J Bites

Looking for a healthy snack to power you through the afternoon? You’ve come to the right place. These full of flavor homemade PB & J Bites are similar to the store bought Larabars. Careful, they are addicting ;)
fruit-and-nut-bites-rd

When I was younger a peanut butter & jelly sandwich was frequently found in my lunch box for school. Now, I am a working gal in my 20’s and I still pack a peanut butter & jelly sandwich for lunch sometimes. I must say though, I am much more selective of the type of bread, peanut butter, and jelly I use.

Print
clock clock iconcutlery cutlery iconflag flag iconfolder folder iconinstagram instagram iconpinterest pinterest iconfacebook facebook iconprint print iconsquares squares iconheart heart iconheart solid heart solid icon
peanut butter and jelly energy bites in mini muffin liners

PB & J Bites

  • Author: Julie @ RDelicious Kitchen
  • Prep Time: 5 mins
  • Total Time: 5 mins
  • Category: snack

Description

Homemade larabars turned into little bites. Perfect for on the go and healthy snacking.


Ingredients

Scale
  • 1/3 cup roasted peanuts (unsalted)
  • 1/3 cup dried cherries (unsweetened)
  • 2 cups pitted dates
  • 1 tbsp cinnamon

Instructions

  1. Place nuts in food processor and pulse until finely ground.
  2. Add in dates, cherries and cinnamon. Pulse until a clump forms in the processor.
  3. Take out the mixture and either wrap in plastic wrap and refrigerate for 30 min to harden, or you can start making your bites right out of the food processor.
  4. Form into 30 small balls. Wrap them with plastic wrap and put in fridge for later snacking.

Recipe Card powered byTasty Recipes

I determined a theory in college if snacks were good on-the-go kind of snacks. It was called the “backpack test”. If my snack managed to be still okay by the afternoon getting jostled around my backpack all morning and getting smushed between books then it passed. I’ve made these plenty of times in college because these PB&J Bites passed the “backpack test” with flying colors. Now it’s not so much the “backpack test” but more of a “giant professional bag turned into everyday bag turned into everything I ever need” kind of bag! haha 🙂

Cheesy Stuffed Peppers with Beef and Quinoa

Cabot recently released their new line of farmers’ legacy collection of aged cheddar cheese.

stuffed peppers 1
Traditionally, stuffed pepper recipes call for beef and rice. I swapped out rice for quinoa to incorporate whole grains and a little extra protein punch!
stuffed peppers 2
I served these peppers with green beans on the side for a complete satisfying meal.
stuffed peppers 3

Print
clock clock iconcutlery cutlery iconflag flag iconfolder folder iconinstagram instagram iconpinterest pinterest iconfacebook facebook iconprint print iconsquares squares iconheart heart iconheart solid heart solid icon
stuffed peppers on a wooden board

Cheesy Stuffed Peppers with Beef and Quinoa

  • Author: Julie @ RDelicious Kitchen

Ingredients

Scale
  • 4 large bell peppers
  • 1 lb ground beef, 96% lean
  • 2 tbsp, onion, chopped
  • 2 cloves garlic, minced
  • 1 cup cooked quinoa
  • 1 (15 oz) can fire roasted diced tomatoes
  • 1 cup Cabot white oak cheddar, shredded

Instructions

  1. Cut a thin slice on the top each bell pepper to remove top stem of the pepper. Remove seeds and membranes inside. Cut a thin slice from bottom of each pepper to help the peppers stand up. Bring a large pot of water to a boil. Add the peppers and cook for about 2 minutes; drain.
  2. In a large skillet sauté onions and garlic until translucent. Add the beef and cook for about 8-10 minutes until browed; drain. Return beef back to the pan and add the quinoa and fire roasted tomatoes; cook until heated through. Stir in ¾ cup of cheese.
  3. Heat oven to 350°F.
  4. Stuff peppers with beef mixture. Stand peppers upright in baking dish.
  5. Cover tightly with foil. Bake 10 minutes. Uncover and bake another 15 minutes longer or until peppers are tender. Sprinkle with remaining cheese.

Recipe Card powered byTasty Recipes

What would you make with one of the three new farmers’ legacy collection aged cheddar cheeses?