Baba Ganoush (Roasted Eggplant Dip)

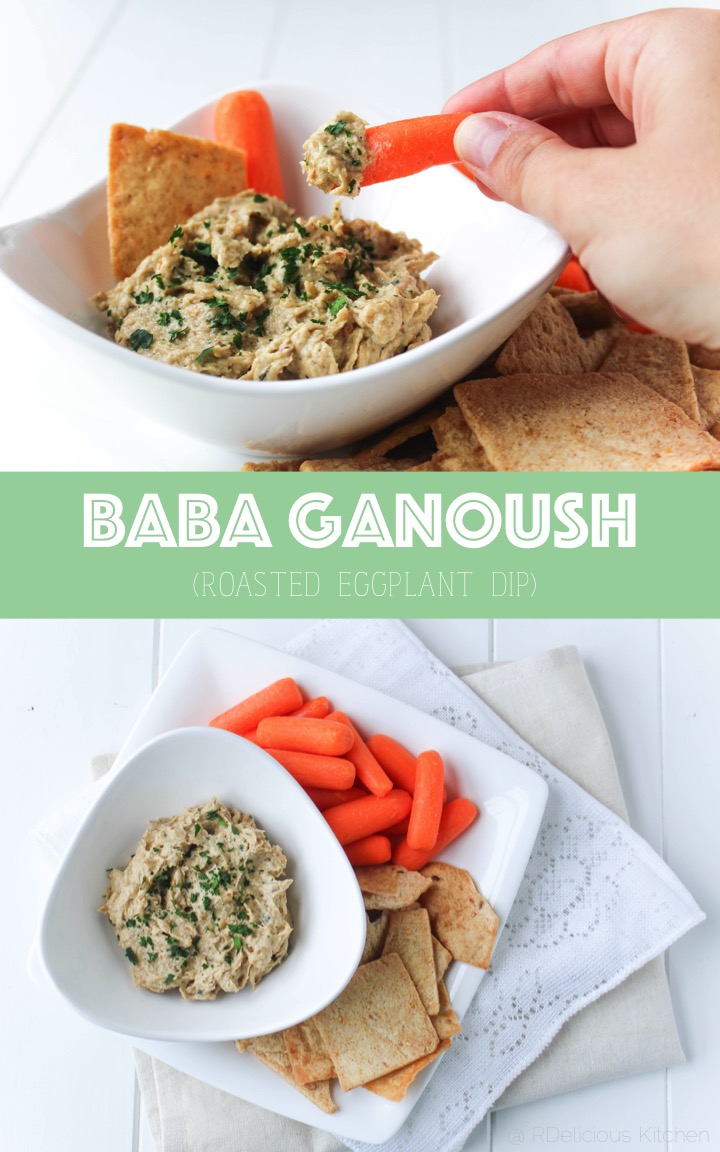
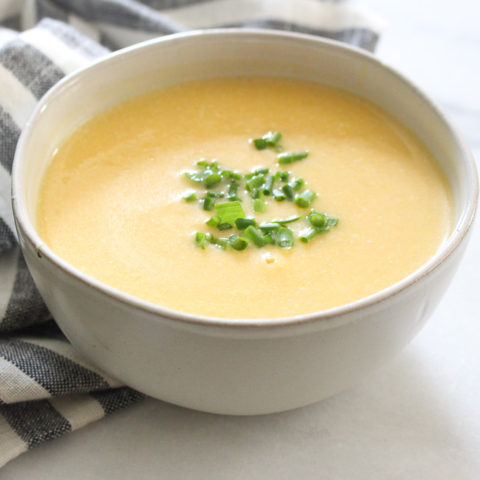
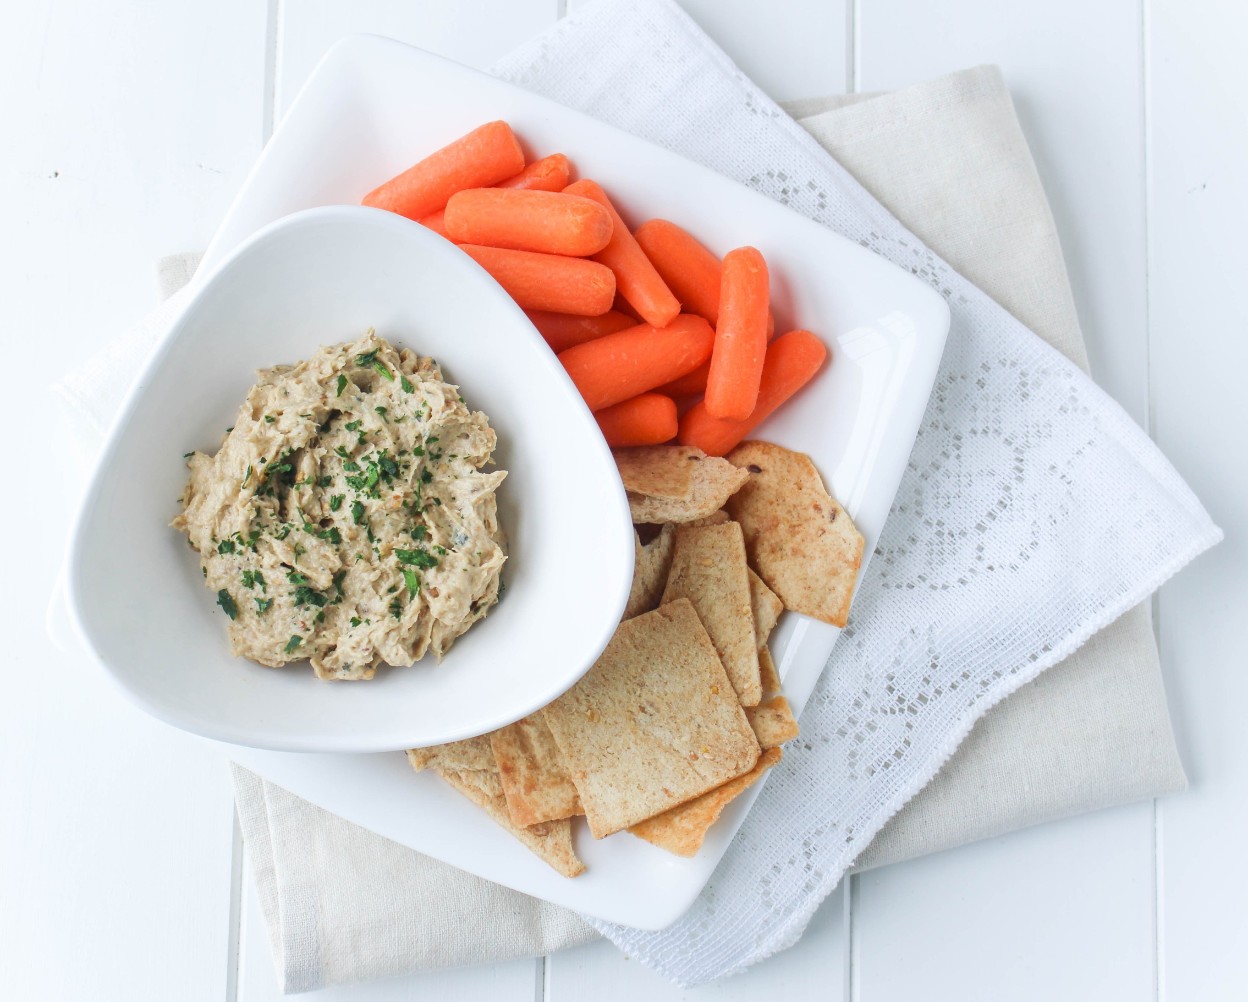
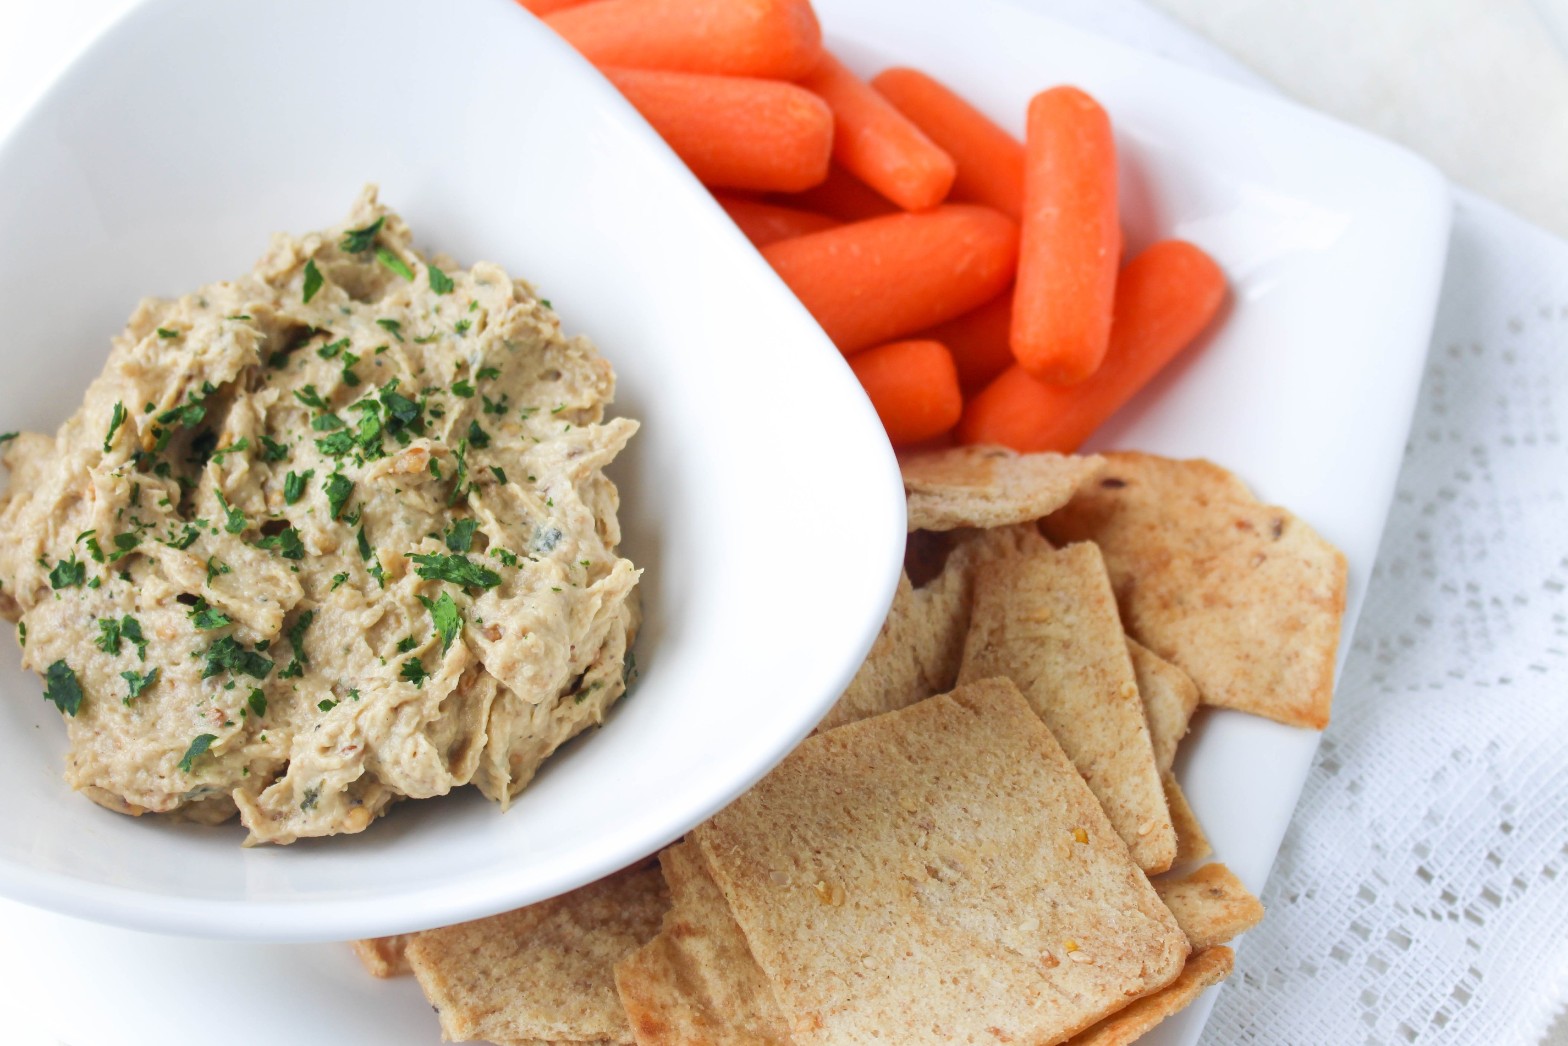
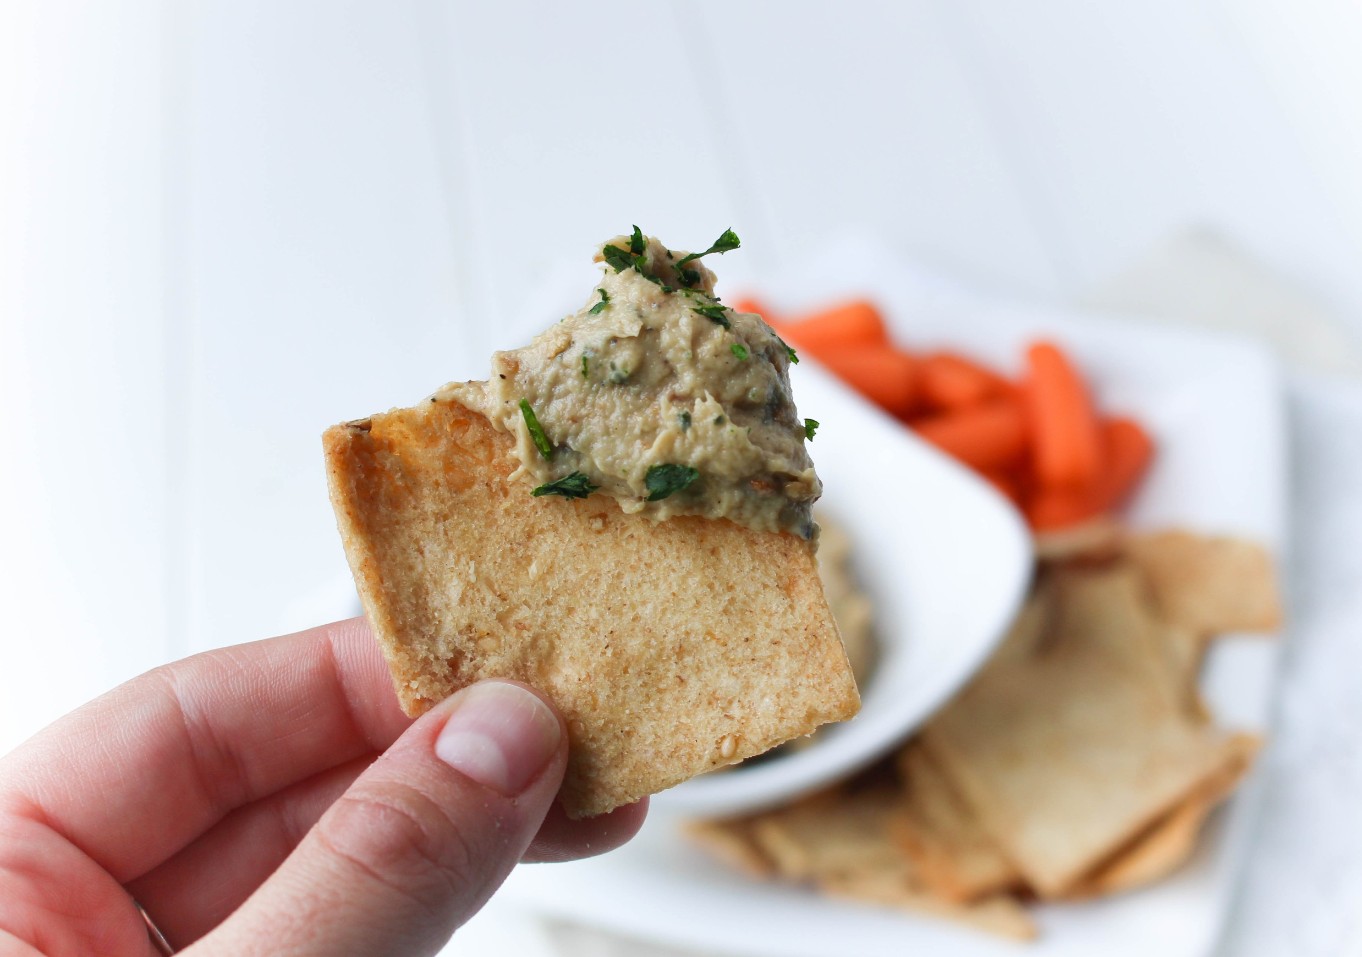
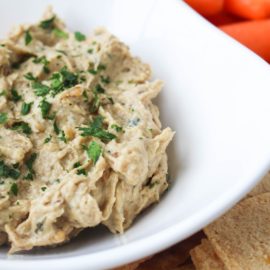
Looking for a new dip for your veggies? Try baba ganoush – a signature Middle Eastern roasted eggplant puree enriched with tahini and seasoned with lemon juice and lots of garlic.
Baba Ganoush (Roasted Eggplant Dip) via RDelicious Kitchen @rdkitchenBaba Ganoush (Roasted Eggplant Dip) via RDelicious Kitchen @rdkitchen

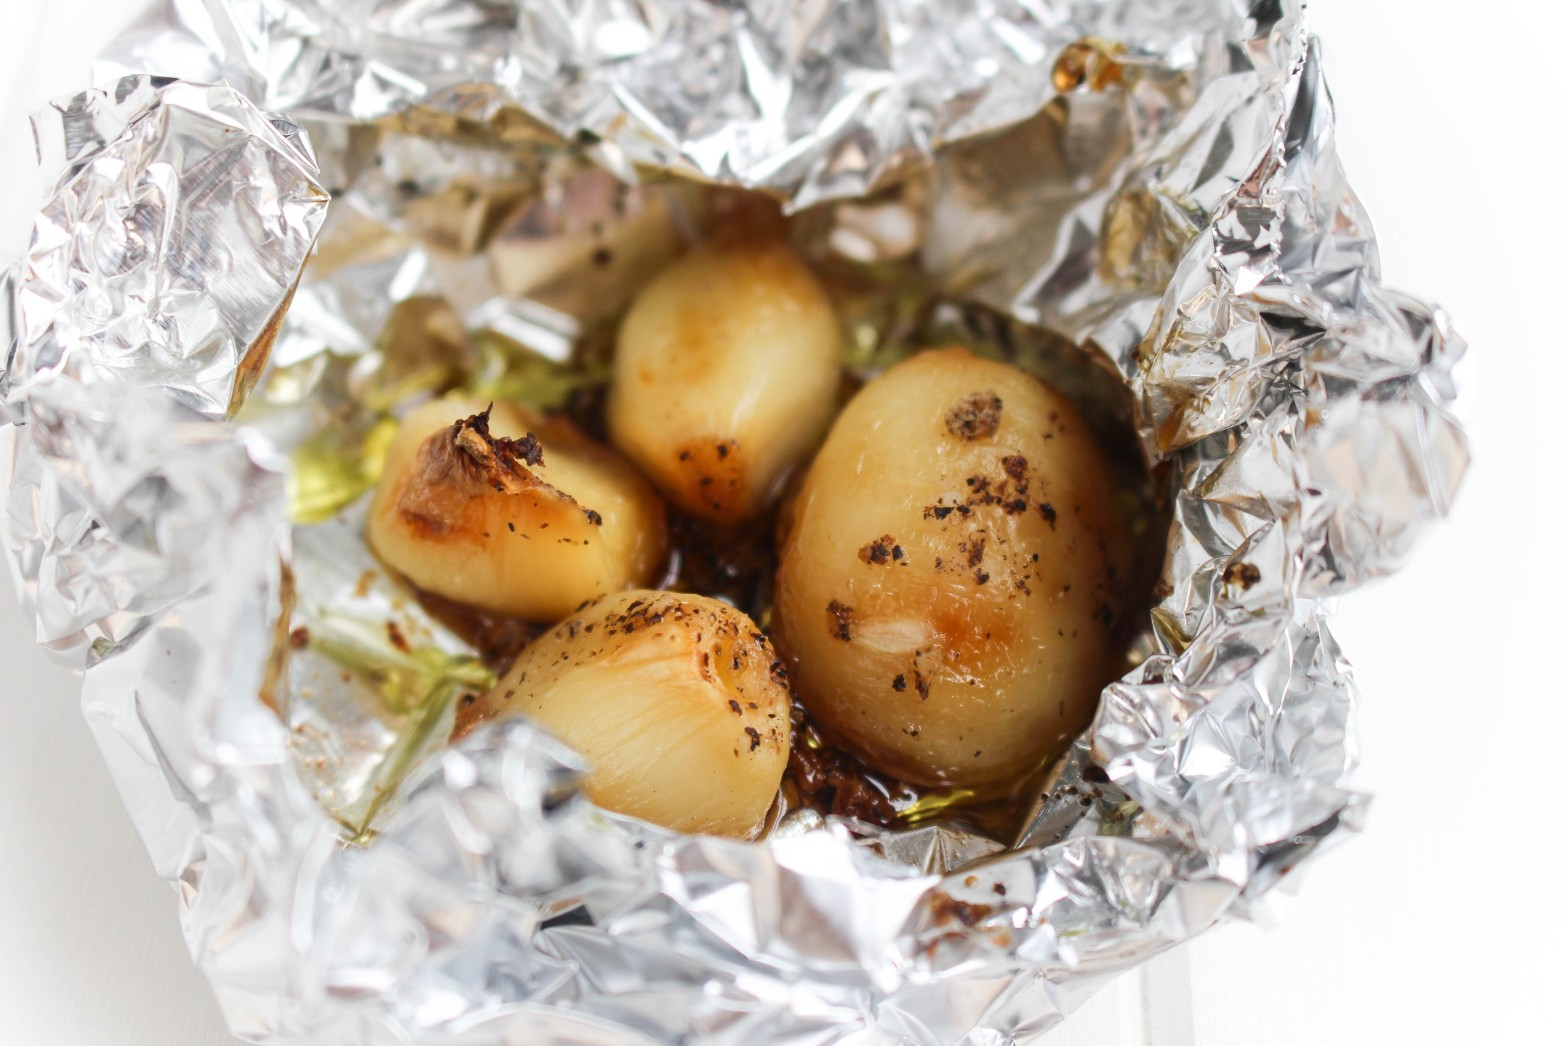
My favorite part of this dip is the smokiness that the dish brings when roasting the eggplant. I additionally roasted the garlic for this dip too. Have you ever roasted garlic before? It adds that same smokiness but also a subtle sweet flavor. Simply add cloves of garlic (you can even do the whole head of garlic at once!) in a little tin foil pouch, drizzle with some olive oil and sprinkle a little salt and pepper. Seal up the foil and roast along with the eggplant. This will also help incorporate the garlic flavor throughout the dip because it is much easier to blend since it is softer when you puree the dip.

Baba Ganoush (Roasted Eggplant Dip) via RDelicious Kitchen @rdkitchenI picked up a bunch of eggplant at my last farmer’s market visit. It’s been sitting in my refrigerator because I just couldn’t decide what to make. I had so many recipe ideas running through my head. #foodbloggerproblems
Baba Ganoush (Roasted Eggplant Dip) via RDelicious Kitchen @rdkitchenMy extended family decided this year to do a big fantasy football draft. It was pretty entertaining. One thing about our family is that we are all very loud. So all of in the room trying to have an organized fantasy draft = chaos. Everyone was just talking over each other, but once we figured everything out, everyone picked their teams. Wish me luck this season!

Baba Ganoush (Roasted Eggplant Dip) via RDelicious Kitchen @rdkitchenBaba ganoush is very similar to hummus, but instead of chickpeas being the base, roasted eggplant is. Don’t skimp on the tahini (ground sesame seeds). It really adds that extra boost of flavor, plus heart healthy unsaturated fats.
Baba Ganoush (Roasted Eggplant Dip) via RDelicious Kitchen @rdkitchen
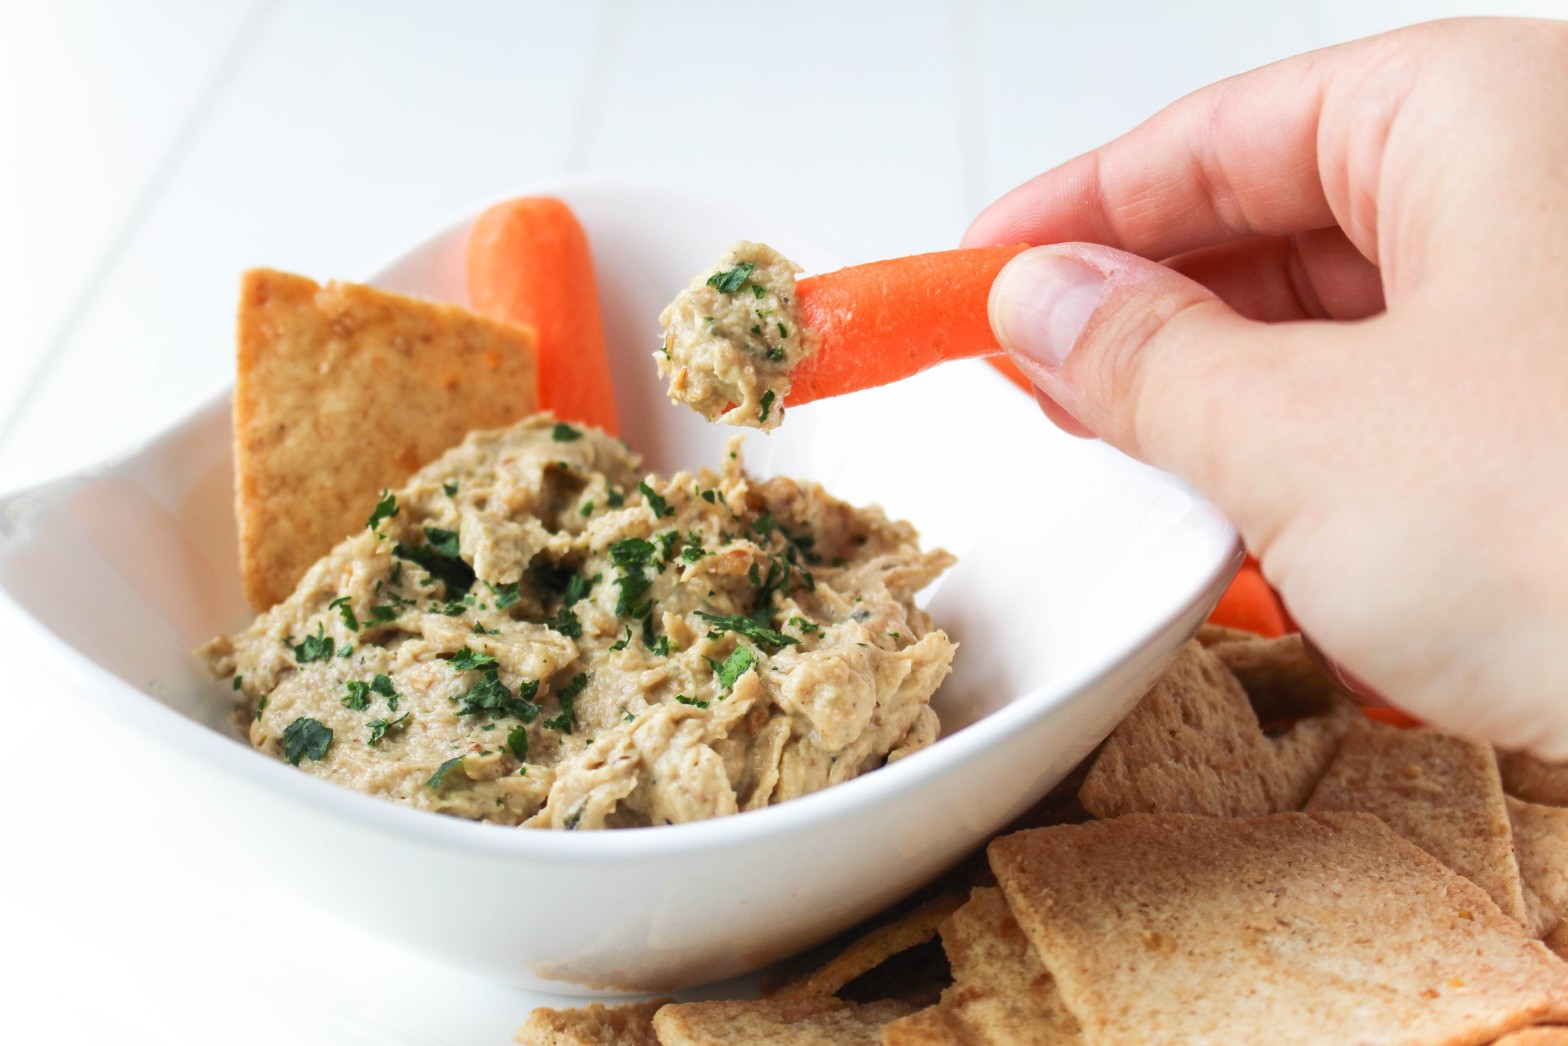
You can use baba ganoush like in any application where you would use hummus. Spread it on a sandwich instead of mayo. Swirl it in to mashed potatoes or mashed cauliflower to kick it up with some flavor. Or just simply dunk with your favorite veggies or pita chips.

Baba Ganoush (Roasted Eggplant Dip) via RDelicious Kitchen @rdkitchen

Print
clock clock iconcutlery cutlery iconflag flag iconfolder folder iconinstagram instagram iconpinterest pinterest iconfacebook facebook iconprint print iconsquares squares iconheart heart iconheart solid heart solid icon
Baba Ganoush (Roasted Eggplant Dip) in a white bowl

Baba Ganoush (Roasted Eggplant Dip)

  • Author: Julie @ RDelicious Kitchen
  • Prep Time: 15 mins
  • Cook Time: 35 mins
  • Total Time: 50 mins

Ingredients

Scale
  • 2 tablespoons olive oil, divided
  • 1 large eggplant
  • 4 cloves garlic
  • 2 tablespoons tahini
  • 1 lemon, juiced
  • 1 tablespoon parsley
  • salt and pepper, to taste

Instructions

  1. Preheat the oven to (high) broil.
  2. Slice eggplant into 1/4 inch rounds and place on a large baking sheet. Drizzle with 1 tablespoon olive oil and sprinkle with salt and pepper.
  3. On a small piece of tin foil, add the garlic cloves, drizzle over 1/2 tablespoon of olive oil and sprinkle with salt and pepper. Loosely wrap the foil around the garlic. Place the wrapped garlic on the baking sheet with the eggplant.
  4. Broil for 5 minutes, turn eggplant and broil for an additional 5 minutes. Turn broiler off, but do not remove eggplant from the oven. Heat oven to 350 degrees and roast for an additional 25 minutes.
  5. Remove from pan, wrap the rounds in foil to lock in moisture; let sit for about 5 minutes.
  6. Peel away most of the skin of the eggplant and add flesh to a food processor. It should be soft and tender and the skin should come off easy. Add the roasted garlic tahini, lemon juice, remaining 1 tablespoon olive oil, and parsley. Process until smooth and creamy. Season with salt and pepper.
  7. Garnish with additional parsley. Serve with pita chips and veggies.

Recipe Card powered byTasty Recipes

Baba Ganoush (Roasted Eggplant Dip) via RDelicious Kitchen @rdkitchen

Double Layer Chocolate Peanut Butter Fudge

Chocolate fudge or peanut butter fudge – which one is your favorite? If you can’t decide like me, layer them together to make delicious creamy fudge.
Double Layer Chocolate Peanut Butter Fudge via RDelicious Kitchen @rdkitchenThe Recipe ReDux is challenging members this month to take a trip down memory lane with recreating a fun vacation memory recipe.

A Vacation-Inspired Recipe:
Start unpacking your favorite vacation memories. Think about a trip you took state-side or internationally and create a healthy recipe from an unforgettable meal you enjoyed. Or, create a recipe from a native ingredient you saw or tasted on your travels.

Double Layer Chocolate Peanut Butter Fudge via RDelicious Kitchen @rdkitchenWhen I was younger, my family used to go down to Wildwood, NJ every summer. I was recently reminiscing about our Wildwood vacations with my mom and the one place that we HAD to stop by was Fudge Kitchen. They make the silkiest fudge that just melts in your mouth. Plus, they had so many flavors to choose from, it was so hard to decide which one to get.
Double Layer Chocolate Peanut Butter Fudge via RDelicious Kitchen @rdkitchenWe used to get combo boxes of fudge because everyone in my family wanted different flavors. My two favorite were the classic chocolate and peanut butter fudge. So why not get the best of both flavors and layer them! Now, I know fudge is a treat, but hey when you’re on vacation it’s okay to indulge a little.
Double Layer Chocolate Peanut Butter Fudge via RDelicious Kitchen @rdkitchenTo lighten up this fudge I swapped out the sugar and sweetened it with a little maple syrup and a banana. The only problem with this fudge is you have to be patient. Since there are two layers you have a waiting time in the middle for the chocolate layer to harden before you can add the peanut butter layer.

Print
clock clock iconcutlery cutlery iconflag flag iconfolder folder iconinstagram instagram iconpinterest pinterest iconfacebook facebook iconprint print iconsquares squares iconheart heart iconheart solid heart solid icon
Double Layer Chocolate Peanut Butter Fudge stacked on top of each other

Double Layer Chocolate Peanut Butter Fudge

  • Author: Julie @ RDelicious Kitchen

Ingredients

Scale
  • 1 tablespoon cocoa powder
  • 1/4 cup dark chocolate chips
  • 3/4 cup natural peanut butter
  • 1 medium banana
  • 1 teaspoon vanilla extract
  • 2 tablespoons coconut oil
  • 2 tablespoons pure maple syrup

Instructions

  1. In a small pot over low heat, combine 1/4 peanut butter, 1/2 teaspoon vanilla extract, 1 tablespoon coconut oil, 1 tablespoon maple syrup, and 1/4 cup dark chocolate chips; until melted. Let cool slightly.
  2. In a food processor or blender combine 1/2 banana and chocolate mixture and blend until smooth.
  3. Pour into an 8×8 pan lined with wax paper; spread evenly.
  4. Place in the freezer for 1 hour to harden.
  5. In a small pot over low heat, combine remaining 1/2 cup peanut butter, 1/2 teaspoon vanilla extract, 1 tablespoon coconut oil, and 1 tablespoon maple syrup; until melted. Let cool slightly.
  6. In a food processor or blender combine 1/2 banana and peanut butter mixture and blend until smooth. Pour peanut butter mixture over the chocolate layer; spread evenly. Return back to the freezer for an hour or until fudge hardens.
  7. (Store in the freezer)

Recipe Card powered byTasty Recipes

Signature
Double Layer Chocolate Peanut Butter Fudge via RDelicious Kitchen @rdkitchen

Dark Chocolate Covered Kiwi Pops

Have you heard of SunGold kiwifruit? It’s not like your typical kiwi, with its smooth skin and bright yellow flesh. Learn some more about these vitamin C packed fruit and try a delicious Dark Chocolate Covered Kiwi Pop treats.
Chocolate Covered Kiwi Pops via RDelicious Kitchen @rdkitchenI received free samples of Zespri SunGold Kiwifruit mentioned in this post. By posting this recipe, I am entering a recipe contest sponsored by Zespri Kiwifruit and am eligible to win prizes associated with the contest. I was not compensated for my time.
SunGold kiwifruit is popping up throughout grocery stores (June-October), since being one of the new fastest growing fruits globally.

So, I never really knew that kiwifruit was one word until recently… oops. I was typing it a text and it kept autocorrecting it to one word. Don’t worry, you won’t even have to type it anymore now that a fun kiwifruit emoji is coming!
Chocolate Covered Kiwi Pops via RDelicious Kitchen @rdkitchen
Anytime I am teaching a cooking class or doing a cooking demo I always like to throw out fun facts about the food I’m cooking with. I would sweep a food category in jeopardy.
Five surprising facts about SunGold Kiwifruit:
1. Not all kiwifruit is “fuzzy” on the outside.
Zespri SunGold kiwifruit have a smooth, hairless skin. SunGold is also yellow on the inside, which is a surprise in and of itself because Americans are more familiar with the green kiwifruit variety with the fuzzy skin. Zespri SunGold kiwis have, a juicy, yellow flesh, and a tropical-sweet taste.
2. You don’t peel kiwifruit.
Kiwifruit is the perfect portable snack because it is easy to eat! Just cut in half with a knife and scoop with a spoon. That’s it – just cut, scoop, and enjoy!
3. Kiwifruit is a good meat tenderizer.
Both green and SunGold kiwifruit contain an enzyme called actinidin that helps break down protein. Actinidin occurs only in kiwifruit and improves digestive comfort by increasing the breakdown of proteins and facilitating digestion and emptying of the stomach. The actinidin can serve as a meat tenderizer: just peel and mash a kiwifruit and spread over meat or make a kiwifruit marinade. Actinidin will also break down protein in dairy so recipes with dairy should be consumed right away.
4. You can “measure” the taste of SunGold.
Zespri growers achieve the best-tasting kiwifruit through a measure called the brix. The higher the brix, the sweeter the fruit. The dry matter content (where all water is removed) indicates how high the brix will be once the fruit is ripe. A higher dry matter means the better quality the kiwifruit will be- it stores better and tastes better. Not all kiwifruit brands put so much focus on the brix and that’s why not all kiwifruit is created equal. With Zespri, you can really taste the difference!
Chocolate Covered Kiwi Pops via RDelicious Kitchen @rdkitchen
Now that you know a little bit more about the Zespri SunGold kiwifruit, how do you pick the prefect one to enjoy? To tell if a SunGold kiwifruit is ripe – hold the kiwifruit in the palm of your hand and squeeze gently.  It should yield to slight pressure when ripe. SunGold’s get softer and sweeter as they ripen.


This little fruit has quite the nutrition credentials to go along with is delicious taste, including

  • an excellent source of vitamin C, containing 2x more vitamin C than oranges
  • provides as much potassium as a banana
  • and a good source of the antioxidant vitamin E

Chocolate Covered Kiwi Pops via RDelicious Kitchen @rdkitchen
Fruit is one of my favorite desserts in the summer time. I’ve been finding myself grabbing a toothpick and poking into the frozen fruit in my freezer for a little sweet treat after dinner. I’ve never tried frozen kiwi before, so I thought it would be fun to give it a try! Plus, chocolate – how will this not be delicious?!
Verdict – love these! I found that the kiwi tasted even sweeter when it was frozen and they are easily customizable depending what extra little toppings you may want to add.

Print
clock clock iconcutlery cutlery iconflag flag iconfolder folder iconinstagram instagram iconpinterest pinterest iconfacebook facebook iconprint print iconsquares squares iconheart heart iconheart solid heart solid icon
Dark Chocolate Covered Kiwi Pop on parchment paper

Chocolate Covered Kiwi Pops

  • Author: Julie @ RDelicious Kitchen
  • Yield: 4

Ingredients

Scale
  • 2 kiwis, peeled and sliced
  • 46 oz. dark chocolate
  • (optional toppings) coconut flakes, walnuts, sprinkles, etc.

Instructions

  1. Insert popsicle sticks into the kiwi slices far enough to hold the fruit without piercing through the other end. Freeze until firm.
  2. Melt chocolate in a double broiler.
  3. Dip kiwi slices into melted chocolate, and rest over wax paper or cooling rack.
  4. Add desired toppings. After chocolate has hardened, eat and enjoy,
  5. Store leftovers in the refrigerator or freezer

Recipe Card powered byTasty Recipes

Connect more with Zespri Kiwifruit
-> Website
-> Twitter
-> Facebook
-> Instagram
-> Pinterest
Need even more SunGold kiwifruit inspiration? Scroll down to check out what other Recipe ReDuxer’s created.
Chocolate Covered Kiwi Pops via RDelicious Kitchen @rdkitchen

Raspberry Lime Chia Jam

Skip the jarred stuff and make your own sweet and tangy Raspberry Lime Chia Jam. It’s great to spread on toast, stir in yogurt, or top on waffles in place of syrup.
Raspberry Lime Chia Jam via RDelicious Kitchen @rdkitchenIt’s peanut butter jelly raspberry lime chia jam time! Maybe we should stick to the original phrase, but I definitely encourage you to think outside the box and try this raspberry lime chia jam. It has a sweet and tangy flavor your tastebuds will love, plus an extra boost of fiber from the chia seeds.
Raspberry Lime Chia Jam via RDelicious Kitchen @rdkitchen

Raspberry Lime Chia Jam via RDelicious Kitchen @rdkitchenI was at the diner with my friends and I ordered my favorite omelette with mushrooms, spinach, tomatoes, and feta cheese with rye toast (dry) on the side. Along with my toast came the selection of jellies, jams, and marmalades which brought up the question – what’s the difference between each of them?
Jam – Jam is made of crushed fruits that are then cooked with sugar, pectin, and acid until the fruits reach a spreadable consistency. Jam has an organic shape to it, and often has chunks of fruit in it, which also can contain seeds if they fruit has them. In addition to being a spread, jams are also good for fillings.
Jelly – The fruit contained in the form of jelly is the fruit’s juice. The fruit is crushed and cooked so the juice can be extracted. It is more gelatinous and easier to spread. It’s main ingredients are fruit juice, pectin, an acid, and sugar. Jellies can also be made from ingredients other than fruit, such as herbs, tea, wine, liqueurs, flowers, and vegetables.
Marmalade – The word marmalade is french, meaning “citrus preserves”. Marmalades are cooked with the fruit’s peel and pulp for a long time, and traditionally do not use pectin. Marmalades are usually made with citrus fruits, like oranges, lemons, limes, or grapefruits, and are often used as spreads or glazes.
Raspberry Lime Chia Jam via RDelicious Kitchen @rdkitchenA homemade jam like this can be a great addition to sweeten up meals/snacks with wholesome fruit and to help trim back on added sugars.
– Opt for plain yogurt, instead of flavored yogurt, and add a tablespoon of jam to sweeten it up
– Warm up a tablespoon of jam and drizzle over pancakes or waffles in place of syrup
– Opt for plain oatmeal and stir in a tablespoon of jam
– Simply spread jam on a piece of whole wheat toast
Raspberry Lime Chia Jam via RDelicious Kitchen @rdkitchen

Print
clock clock iconcutlery cutlery iconflag flag iconfolder folder iconinstagram instagram iconpinterest pinterest iconfacebook facebook iconprint print iconsquares squares iconheart heart iconheart solid heart solid icon
raspberry lime chia jam on rye bread

Raspberry Lime Chia Jam

  • Author: Julie @ RDelicious Kitchen
  • Cook Time: 8 mins
  • Total Time: 8 mins
  • Yield: 16 1x

Ingredients

Scale
  • 2 cups raspberries (fresh or frozen)
  • 2 limes, juiced and zested
  • 2 tablespoons chia seeds
  • (optional) 1 tablespoon coconut sugar

Instructions

  1. In a small pot combine the raspberries, lime juice, and coconut sugar (if using). Cook over low heat until the raspberries start to break down, stirring occasionally.
  2. With the back of a wooden spoon, mash the raspberries. Add the chia seeds and cook for another 1-2 minutes until the jam begins to thicken.
  3. Remove from heat. Stir in the zest.
  4. Let cool and spread on toast, stir in oatmeal, or top on waffles/pancakes.

Recipe Card powered byTasty Recipes

Signature

Tropical Wild Blueberry Smoothie

Add a boost of flavor and nutrition with a Tropical Wild Blueberry Smoothie.
Tropical Wild Blueberry Smoothie via RDelicious Kitchen @rdkitchenBy posting this recipe I am entering a recipe contest sponsored by the Wild Blueberry Association of North America and I am eligible to win prizes associated with the contest. I was not compensated for my time.
It dropped to 2 degrees here in NJ this past weekend.. BRRR. Simple tasks like running errands was brutal in the cold. I kept envisioning a getaway to a warm tropical island.
Tropical Wild Blueberry Smoothie via RDelicious Kitchen @rdkitchenSadly, there were no tropical island trips planned in the near future, so I had to improvise. Instead I created a tropical wild blueberry smoothie.
You may think I’m contradicting myself for wanting to get away to a warm place and then make a cold smoothie, but smoothies are a staple in my kitchen year round, no matter what the temperature is. Why? Because smoothies are so easy to pack in a ton of nutrition with a variety of healthy foods coming from all food groups.
Plus, smoothies are so easy to customize with various combinations, so you’ll never get bored! I always like to experiment in the kitchen with new combinations and new ingredients. One new ingredient I tried in this smoothie recipe are wild blueberries. Wild Blueberries have twice (2x) the antioxidant capacity of larger cultivated blueberries. A growing body of research shows the potential health benefits of Wild Blueberries including gut health, diabetes, cancer and brain health.
Tropical Wild Blueberry Smoothie via RDelicious Kitchen @rdkitchen

Tropical Wild Blueberry Smoothie via RDelicious Kitchen @rdkitchenI often find that certain fruit flavors, like blueberries, get lost when getting mixed into a smoothie because other strong fruit flavors take over.
Wild blueberries are a little extra special than your regular cultivated blueberries. Wild blueberries have a more intense flavor than regular blueberries. Wild Blueberry plants grow wild and are genetically diverse with thousands of interlocking plants spreading naturally across fields called barrens. It’s this diversity that gives Wild Blueberries their complex and delicious flavor — an extraordinary mix of tart and sweet.
Tropical Wild Blueberry Smoothie via RDelicious Kitchen @rdkitchenSmoothie Tip: Use frozen fruit when making smoothies. This will chill the smoothie plus thicken it without using ice, which can water down the flavor.
The Wild Blueberry crop (99% of it) is frozen. These potent little berries are individually quick frozen (IQF) at harvest locking in their nutrition and taste. It’s nature’s pause button.

Print
clock clock iconcutlery cutlery iconflag flag iconfolder folder iconinstagram instagram iconpinterest pinterest iconfacebook facebook iconprint print iconsquares squares iconheart heart iconheart solid heart solid icon
Tropical Wild Blueberry Smoothie in two short glasses

Tropical Wild Blueberry Smoothie

  • Author: Julie @ RDelicious Kitchen
  • Prep Time: 5 mins
  • Total Time: 5 mins
  • Yield: 2

Description

#WildYourSmoothie with a tropical twist


Ingredients

Scale
  • 1 banana
  • 1 cup frozen Wild Blueberries
  • 1/2 cup frozen pineapple
  • 2 tablespoons unsweetened coconut flakes
  • 2 tablespoons flaxseed
  • 1/2 cup cottage cheese
  • 1 cup unsweetened coconut milk (or milk of your choice)

Instructions

  1. Simply add the banana, wild blueberries, pineapple, coconut flakes, flaxseed, cottage cheese, and coconut milk in to a blender. Blend until smooth.
  2. For a thicker consistency, add ice. For a thinner consistency, add water.
  3. Top with additional wild blueberries, coconut, or pineapple.

Recipe Card powered byTasty Recipes

Thank you Kara Lydon, on behalf of the Wild Blueberry Association of North America, inviting me to participate in a smoothie recipe contest for dietitians and healthy living bloggers.
Check out all of the #RDapproved wild blueberry smoothie creations using #WildYourSmoothie.  Or you can head on over to the Wild Blueberry Association’s website and follow them on Facebook, Twitter, Instagram, and Pinterest to discover even more Wild Blueberry recipes.
Signature

Mocha Latte

You don’t have to get out of your pajamas and wait on line at Starbucks to enjoy lattes anymore. Learn how simple it is to make your own latte at home. This Mocha Latte tastes indulgent without breaking the bank.

Mocha Latte in a color mug with biscotti

Disclosure: I was asked to participate in the @CocoaVia #HeartMonth campaign as a member of the Healthy Aperture Blogger Network. I was compensated for my time.

I’m from New Jersey and in NJ people feel very strongly about their coffee. Dunkin vs. Starbucks. When I say people feel very strongly about their coffee, they will openly tell you why they like their choice and how you should too.

Dunkin or Starbucks?

I don’t often get coffee out, as I prefer to make it at home, but when I want to grab a quick cup of coffee I’ll stop at Dunkin. For more of the specialty drinks, like lattes, I prefer Starbucks, so you could say I’m the rare NJ coffee drinker. I don’t pick sides.

Mocha Latte in a colorful mug with a biscotti

I’m the type of morning person where coffee must be present during my morning routine. I don’t want to have to wait until I’m already out the door to get my caffeine fix. Coffee beverages, like lattes, can be part of a healthy diet. An average latte contains one full serving of dairy.

When I found this little milk frother gadget, I realized how easy it was to make lattes at home and get that perfect amount of foam like if a barista was making you a latte right in your own kitchen.

Mocha Latte with biscotti

There is just something about sipping on a warm coffee in the morning that makes me happy. Skip the chocolate syrup for a mocha latte and try using a packet of unsweetened dark chocolate CocoaVia® cocoa extract supplement, a daily cocoa extract supplement that delivers the highest concentration of cocoa flavanols, which are scientifically proven to promote a healthy heart by supporting healthy blood flow†.

Mocha Latte


Chocolate is a fabulous treat, but it’s not a reliable way to get sufficient quantities of cocoa flavanols. Traditional cocoa processing, which includes drying, fermenting and roasting of beans, destroys many of the flavanols naturally present in the cocoa bean. CocoaVia® supplement isolates the “good stuff” in chocolate in a convenient, versatile form, without all the calories and fat.

Print
clock clock iconcutlery cutlery iconflag flag iconfolder folder iconinstagram instagram iconpinterest pinterest iconfacebook facebook iconprint print iconsquares squares iconheart heart iconheart solid heart solid icon
Mocha Latte with biscotti

Mocha Latte

  • Author: Chef Julie Harrington, RD
  • Yield: 1

Description

Cozy up to a delicious mocha latte that you can make right at home!


Ingredients

Scale
  • 1 teaspoon instant espresso powder
  • 2 tablespoons hot water
  • 8 ounces low-fat milk
  • 1 packet CocoaVia® unsweetened dark chocolate packet
  • (optional) 1/4 teaspoon coconut sugar (or sweetener of your choice)

Instructions

  1. Prepare instant espresso by stirring instant espresso powder with hot water in a coffee mug.
  2. In a small pot over low-medium heat, warm the almond milk, just until tony bubbles begin to surface. Remove from heat and use an electric milk frother to create foam.
  3. Slowly pour the warmed milk over the prepared espresso using a large spoon to hold back the milk foam. Spoon as much foam as you desire on top.
  4. Stir in one CocoaVia® unsweetened dark chocolate packet and coconut sugar (if using).
  5. Serve immediately.

Notes

CocoaVia® cannot be baked or heated, as the process will destroy the cocoa flavanols; It can be poured into hot milk or other liquid

Recipe Card powered byTasty Recipes

Healthy Cookie Dough Bites

Calling all cookie dough lovers. This recipe is for you.
Healthy Cookie Dough Bites - Calling all cookie dough lovers. This recipe is for you. Have your "cookie dough" and eat it too, with a healthy twist using chickpeas as the base.A few months ago, on a whim, I made a cookie dough dip. This was actually a simplified version of a “dessert hummus” recipe I created that was published in a cookbook I developed recipes for in a previous job.
Healthy Cookie Dough Bites - Calling all cookie dough lovers. This recipe is for you. Have your "cookie dough" and eat it too, with a healthy twist using chickpeas as the base.This past weekend, being snowed in from winter storm Jonas, there was not much else to do (in between all the shoveling) but cook and bake all day! I was going to make the cookie dough dip again, but this cake pop video popped up on my facebook and inspired me to turn the dip into bite-size treats.
Healthy Cookie Dough Bites - Calling all cookie dough lovers. This recipe is for you. Have your "cookie dough" and eat it too, with a healthy twist using chickpeas as the base.

Healthy Cookie Dough Bites - Calling all cookie dough lovers. This recipe is for you. Have your "cookie dough" and eat it too, with a healthy twist using chickpeas as the base.I followed the same recipe, but in order to have them thick enough to roll in a ball and hold it’s shape I added some flour – oat flour to be exact. I’m sure any flour would work, but I find oat flour is easy to work with and makes it a great addition to add whole grains to a recipe.
Healthy Cookie Dough Bites - Calling all cookie dough lovers. This recipe is for you. Have your "cookie dough" and eat it too, with a healthy twist using chickpeas as the base.In true cake pop fashion, I added a chocolate coating. You can make them like a cake pop by simply adding a popsicle or leave them as little bite-size treats. Either way, they are perfectly portioned for a little sweet treat.
Healthy Cookie Dough Bites - Calling all cookie dough lovers. This recipe is for you. Have your "cookie dough" and eat it too, with a healthy twist using chickpeas as the base.

Print

clock clock iconcutlery cutlery iconflag flag iconfolder folder iconinstagram instagram iconpinterest pinterest iconfacebook facebook iconprint print iconsquares squares iconheart heart iconheart solid heart solid icon
Healthy Cookie Dough Bites coated with chocolate on a white plate

Healthy Cookie Dough Bites

  • Author: Chef Julie Harrington, RD
  • Prep Time: 25
  • Total Time: 25 minutes
  • Yield: 12 1x
  • Category: Dessert
  • Method: No-Cook

Ingredients

Scale
  • 1 (15 oz.) can chickpeas, drained and rinsed
  • 2 tablespoon peanut butter
  • 1 tablespoon maple syrup
  • 3 tablespoons oat flour
  • 3 tablespoons mini chocolate chips
  • 1/3 cup dark chocolate
  • 1 teaspoon coconut oil
  • (optional) sprinkles

Instructions

  1. In a food processor (or high powered blender) combine chickpeas, peanut butter, maple syrup, and oat flour. (if you find the batter is still too “wet” add an additional tablespoon of oat flour)
  2. Remove the mixture from the food processor into a bowl and fold in chocolate chips. Scoop about a tablespoon size of the dough into small balls and place on a plate lined with parchment paper. Leave as is, or add popsicle sticks into the balls. Put in the freezer for about 10-15 minutes to harden.
  3. Meanwhile, in a microwave safe bowl, add dark chocolate and coconut oil. Stir until silky smooth.
  4. Dip each cookie dough ball into the dark chocolate and dip until fully coated. Transfer back to the plate lined with parchment paper. Top with sprinkles. Place in the refrigerator until chocolate has completely hardened.

Keywords: dessert, cookie dough, bite size, chickpeas

Recipe Card powered byTasty Recipes

Chef Julie Harrington, RD - Culinary Nutrition Consultant of chefjulierd.comHealthy Cookie Dough Bites - Calling all cookie dough lovers. This recipe is for you. Have your "cookie dough" and eat it too, with a healthy twist using chickpeas as the base.


Savory “Cheesy” Popcorn

Switch up your snack routine with Savory “Cheesy” Popcorn!

Vegan cheesy popcorn in a bowl

Have you recently bought a new ingredient that is sitting in your pantry just because you really don’t know really how to use it? I bought nutritional yeast for one recipe and it’s been sitting in my pantry ever since.

Savory "Cheesy" Popcorn made with nutritional yeast

Did you know… National Popcorn Day is January 19th? I wanted to celebrate with a delicious new popcorn recipe! Popcorn is one of my favorite snacks. Many people don’t realize, but popcorn is a whole grain. The white part that puffs up is the endosperm, the flakey part is the bran, and the part that usually gets stuck in your teeth is the germ.

Popping popcorn at home is very simple. Bonus – there is the flexibility to play around with different toppings.

nutritional yeast

What is nutritional yeast?

Nutritional yeast is made from a single-celled organism, Saccharomyces Cerevisiae, which is grown on molasses and then harvested, washed, and dried with heat to kill or “deactivate” it. Because it’s inactive, it doesn’t grow like baking yeast does so it has no leavening ability. Yeasts are members of the fungi family, like mushrooms. (source)

Savory "Cheesy" Popcorn with a colorful napkin

The golden flakes of nutritional yeast have a nutty aroma and well known cheesy flavor, making it a go-to vegan substitute for Parmesan cheese. (Hence the quotes in the recipe title “cheesy”) If you like this recipe and don’t have or want to use nutritional yeast, simply swap with Parmesan cheese.


Using nutritional yeast is a great alternative for those with lactose intolerance or who are vegan. Plus, nutritional yeast is rich in Thiamin, Riboflavin, Niacin, Vitamin B6, Folate and Vitamin B12.

Flavor combinations

Sprinkle nutritional yeast on popcorn and call it a day, or add a few extra spices to kick it up a notch. I added salt, garlic powder, cayenne pepper, and smoked paprika for an overall savory flavor profile.

Print
clock clock iconcutlery cutlery iconflag flag iconfolder folder iconinstagram instagram iconpinterest pinterest iconfacebook facebook iconprint print iconsquares squares iconheart heart iconheart solid heart solid icon
Savory Cheesy Popcorn in bowl

Savory “Cheesy” Popcorn

  • Author: Chef Julie Harrington, RD
  • Cook Time: 5
  • Total Time: 5 minutes
  • Yield: 8
  • Category: snack
  • Method: stove top
  • Cuisine: american

Ingredients

Scale
  • 1 tablespoon canola oil
  • 1/4 cup popcorn kernels
  • olive oil spray
  • 2 tablespoons nutritional yeast
  • 1/8 teaspoon salt
  • 1/2 teaspoon garlic powder
  • 1/4 teaspoon cayenne pepper
  • 1/2 teaspoon smoked paprika

Instructions

  1. Heat oil in a large pot over medium heat. Add a few pieces of popcorn – if the corn slowly spins in the oil then the oil is hot enough.
  2. Add remaining popcorn and cover with a lid. Once the popcorn starts popping, shake the pot gently to have the oil evenly coat the kernels.
  3. Remove from heat when the popping stops (when you can count to 3 between pops) and transfer to a large bowl.
  4. Combine the nutritional yeast, salt, garlic powder, cayenne pepper and smoked paprika in a small bowl and mix to combine.
  5. Get a large serving bowl and place half of the popcorn in it. Spray generously with olive oil then sprinkle over half of the spice mix. Add the remaining popcorn and repeat once more. Toss to coat and serve.

Keywords: popcorn, nutritional yeast, vegan, snack

Recipe Card powered byTasty Recipes

other recipes you may enjoy


Vegetable Lentil Soup

Warm-up this winter with a warm bowl of Vegetable Lentil Soup. This vegan-friendly soup will be sure to help meet your daily recommendations of veggies for the day!

Vegetable Lentil Soup in a white decorative bowl

Dare I say it’s actually starting to feel like winter here in New Jersey. Usually, in December I’m beginning to make my favorite soups, but this year was just so warm. I’m hoping I’m not jinxing myself and all of a sudden we are going to get a blizzard. If so, I do have this big batch of vegetable lentil soup to warm up with!

vegetable lentil soup in a decorative white bowl

One of my favorite things at work is teaching cooking classes. A few months ago I taught a class called “Soups and Stocks”. My goal for the class was to show how making soup at home can be simple, nutritious, and delicious. The biggest complaints I heard from customers is when they tried making it at home, their soups “tasted bland, watered down, and boring”. The key to a flavorful soup is the base: stock. Due to the process, Progresso’s chefs use to simmer the real bones, Progresso Cooking Stocks have rich, meaty flavor and are full of body, making them ideal for adding deep, complex flavor to many dishes including soups, stews, sauces, and gravies.

lentil soup in a decorative white bowl

What’s the difference between stock and broth?

The foundation of any great soup of stew is a flavorful broth or stock. Often the terms stock and broth are used interchangeably, but there are three important differences: ingredients, cook time, and seasoning.

Stock is made by simmering a combination of bones, mirepoix (carrots, celery, and onion), and aromatics in water for two to six hours. Gelatin from the bones is an essential part of the stock that is created when the connective tissue in meat breaks down, giving stock its body; the gelatin is what causes a stock to gel when chilled.

Broth is typically made by simmering meat, mirepoix, and aromatics for a shorter amount of time, typically between 1 and 2 hours. It is also often more heavily seasoned than stock.

Bone broth is a hybrid of broth and stock. It is cooked for a long period of time and the goal is not only to extract the gelatin from the bones (like in a stock), but also to release the nutritious compounds and minerals (namely collagen, but also glucosamine, amino acids, electrolytes, calcium, and more). 

Print
clock clock iconcutlery cutlery iconflag flag iconfolder folder iconinstagram instagram iconpinterest pinterest iconfacebook facebook iconprint print iconsquares squares iconheart heart iconheart solid heart solid icon
Vegetable Lentil Soup on a white wooden board

Vegetable Lentil Soup

  • Author: Chef Julie Harrington, RD
  • Prep Time: 20
  • Cook Time: 40
  • Total Time: 1 hour
  • Yield: 8
  • Category: Soup

Description

Warm up this winter with a warm bowl of Vegetable Lentil Soup. This vegan soup will be sure to help meet your daily recommendations of veggies for the day!


Ingredients

Scale
  • 2 tablespoons olive oil
  • 1 small onion, diced
  • 2 large carrots, peeled and chopped
  • 5 cloves garlic, minced
  • 2 teaspoons cumin
  • 1/2 teaspoon dried thyme
  • 2 (15 oz) cans fire roasted diced tomatoes
  • 1 (15 oz) can chickpeas, drained and rinsed
  • 1 cup green lentils
  • 1 (1 quart) box Progresso vegetable cooking stock
  • 3 cups water
  • 1 teaspoon salt
  • 1 teaspoon pepper
  • 1/2 teaspoon red pepper flakes
  • 2 cups kale, ribs removed and chopped

Instructions

  1. Heat olive oil in a large stock pot over medium heat. Add the onions and carrots, cook stirring often, until onion becomes tender and translucent.
  2. Add the garlic, cumin, and thyme. Cook until fragrant. Add fire roasted tomatoes and chickpeas.
  3. Add the lentils, then pour in Progresso vegetable cooking stock and water. Season with salt, pepper and red pepper flakes. Bring soup to a boil, then turn down to a gentle simmer. Cook for 30 minutes, until the lentils are tender.
  4. Transfer 3 cups of soup into a blender or food processor (make sure to get an even mixture of veggies and broth). Puree mixture until smooth. Add pureed soup back into the pot and add kale. Cook until wilted.

Keywords: lentil, vegan, vegetarian, soup, plant-based

Recipe Card powered byTasty Recipes

Disclosure: By posting this recipe I am entering a recipe contest sponsored by Progresso and am eligible to win prizes associated with the contest. I was not compensated for my time.

Other recipes you may enjoy

Lemon Parsley Chickpeas

Adding more plant-based proteins into a healthy diet, like chickpeas, can reduce the risk of heart disease. Chickpeas are a versatile legume in the kitchen and with a few simple ingredients, you’ll get hooked on these Lemon Parsley Chickpeas!
Lemon Parsley Chickpeas via RDelicious Kitchen @rdkitchenI’m on a total chickpea kick lately. These lemon parsley chickpeas, hummus, and Banza pasta.. I can’t get enough.
Did you know.. Chickpeas, also called Garbanzo Beans, are the most widely consumed legume in the world?Lemon Parsley Chickpeas via RDelicious Kitchen @rdkitchenChickpeas are a great balance of carbohydrates, protein, and fiber. With the new USDA guidelines, along with many other beneficial improvements now encourages healthy eating patterns to include:

A variety of protein foods, including seafood, lean meats and poultry, eggs, legumes such as beans and peas, soy products, and nuts and seeds.

The typical American diet is so “meat-based” when it comes to the protein food group. Adding variety of plant-based protein is beneficial for many reasons including it’s high fiber content, providing adequate protein for growth and repair, and low in saturated fat which can reduce the risk of heart disease.
Chickpeas are a great plant-based protein to start incorporating into a healthy diet!
Lemon Parsley Chickpeas via RDelicious Kitchen @rdkitchen

Lemon Parsley Chickpeas via RDelicious Kitchen @rdkitchen

Print

clock clock iconcutlery cutlery iconflag flag iconfolder folder iconinstagram instagram iconpinterest pinterest iconfacebook facebook iconprint print iconsquares squares iconheart heart iconheart solid heart solid icon
lemon parsley chickpeas in a white bowl

Lemon Parsley Chickpeas

  • Author: Julie @ RDelicious Kitchen

Ingredients

Scale
  • 2 (15 oz.) cans chickpeas, drained and rinsed
  • 1 tbsp olive oil
  • 2 tbsp garlic, minced
  • 2 tbsp lemon juice
  • 2 tbsp fresh parsley, chopped

Instructions

  1. Add olive oil to a large saute pan over medium heat.
  2. Add garlic, saute for 1 minute, until it begins to become fragrant. Add chickpeas and toss with garlic and olive oil until evenly coated.
  3. Stir in lemon juice and simmer until reduced by half, tossing chickpeas occasionally.
  4. Remove from heat and stir in chopped parsley.

Recipe Card powered byTasty Recipes

Signature