Peanut Butter Chocolate Chip (Chickpea) Cookies

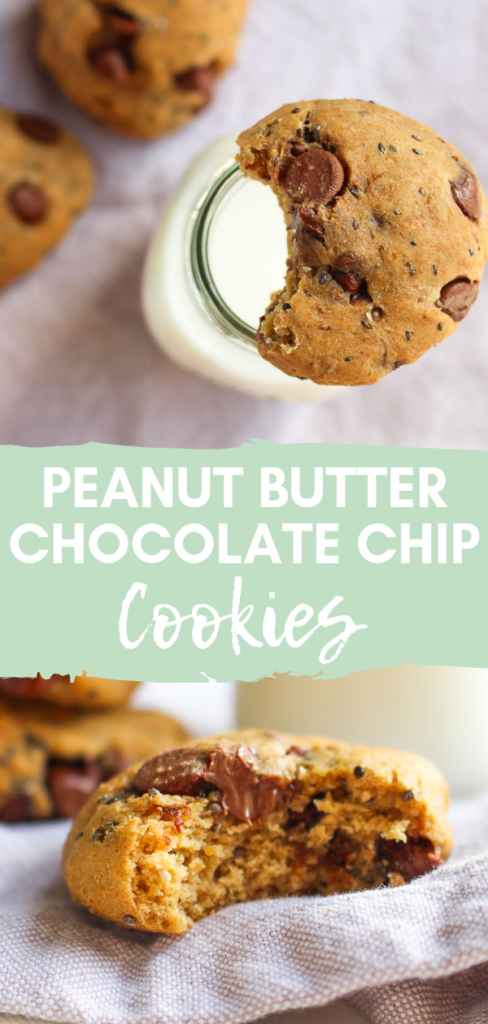
Baking in the kitchen brings back so many great memories. Growing up, my favorite recipe I would make with my mom is chocolate chip cookies. Over the years I’ve been tweaking that original recipe and have come up with a few alternatives over the years. My latest creation are these Peanut Butter Chocolate Chip (Chickpea) Cookies.
Peanut Butter Chocolate Chip (Chickpea) Chia Cookies - A healthy twist to a classic - Peanut Butter Chocolate Chip (Chickpea) Cookies Do you have a favorite family recipe? My mom’s classic chocolate chip cookie recipe is a tried and true recipe in our family. The recipe is typed up on (note: from a typewriter) paper is all torn and there are food spills and stains all over it. That’s what makes it so nostalgic.
Peanut Butter Chocolate Chip (Chickpea) Chia Cookies - A healthy twist to a classic - Peanut Butter Chocolate Chip (Chickpea) Cookies These cookies are always made when guests are over for any holiday or celebration. It has become a dessert staple in our house. But they are not the healthiest (hello butter-flavored shortening and sugar!). I’m all for sweets in treats in moderation, but it’s fun to recreate a classic with a healthier twist.

Peanut Butter Chocolate Chip (Chickpea) Chia Cookies - A healthy twist to a classic - Peanut Butter Chocolate Chip (Chickpea) Cookies 
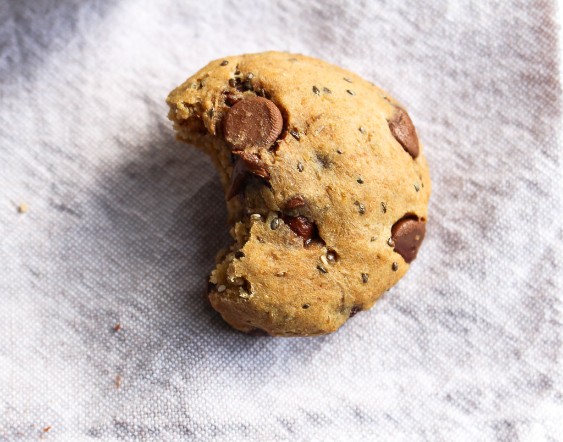
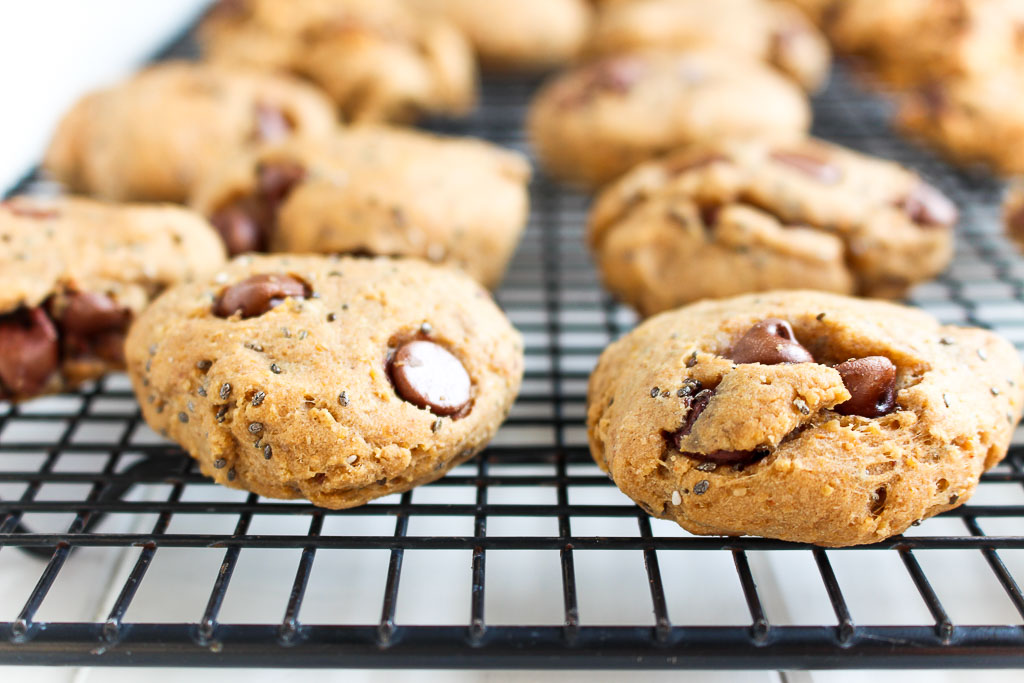
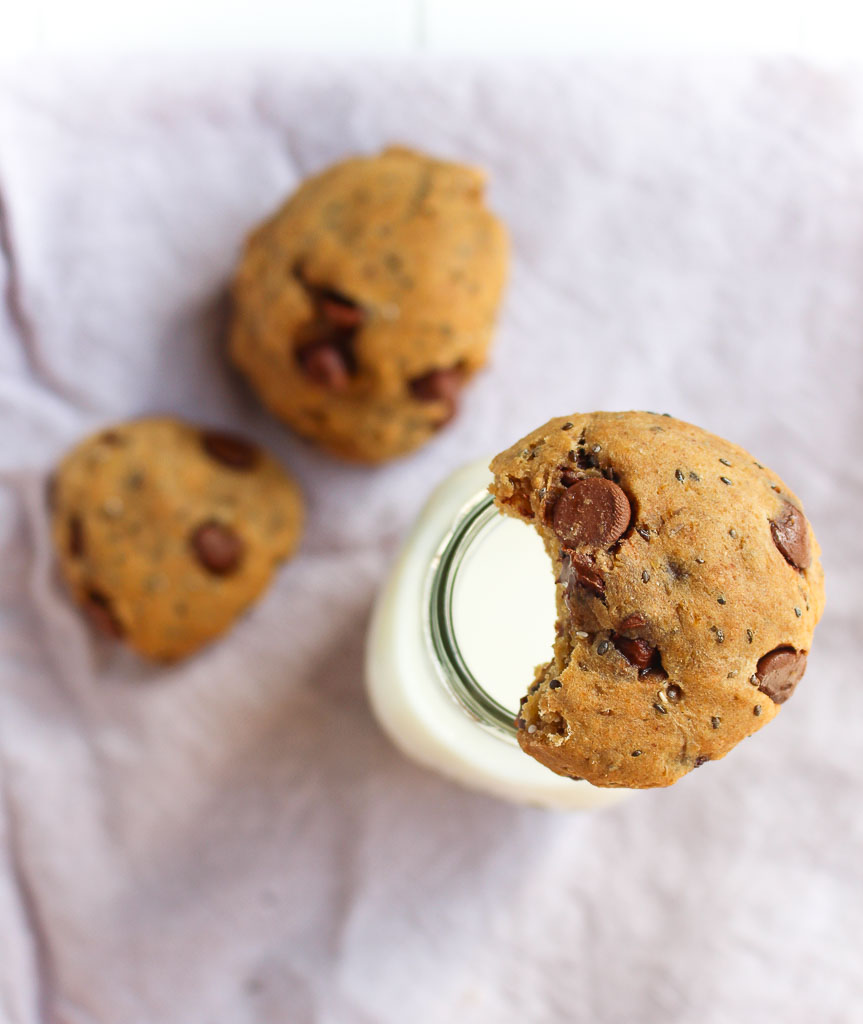
Beans have been sneaking into more and more baked goods lately because 1) it can help reduce the amount of flour 2) beans can add a boost of protein and fiber. I used chickpeas since they have a very neutral taste and they match the color of chocolate chip cookies best.

Of course, I had to add peanut butter because peanut butter and chocolate is my favorite combo. And just for fun, I added some chia seeds. I really enjoy the added texture it gives to these cookies.
Peanut Butter Chocolate Chip (Chickpea) Chia Cookies - A healthy twist to a classic - Peanut Butter Chocolate Chip (Chickpea) Cookies 
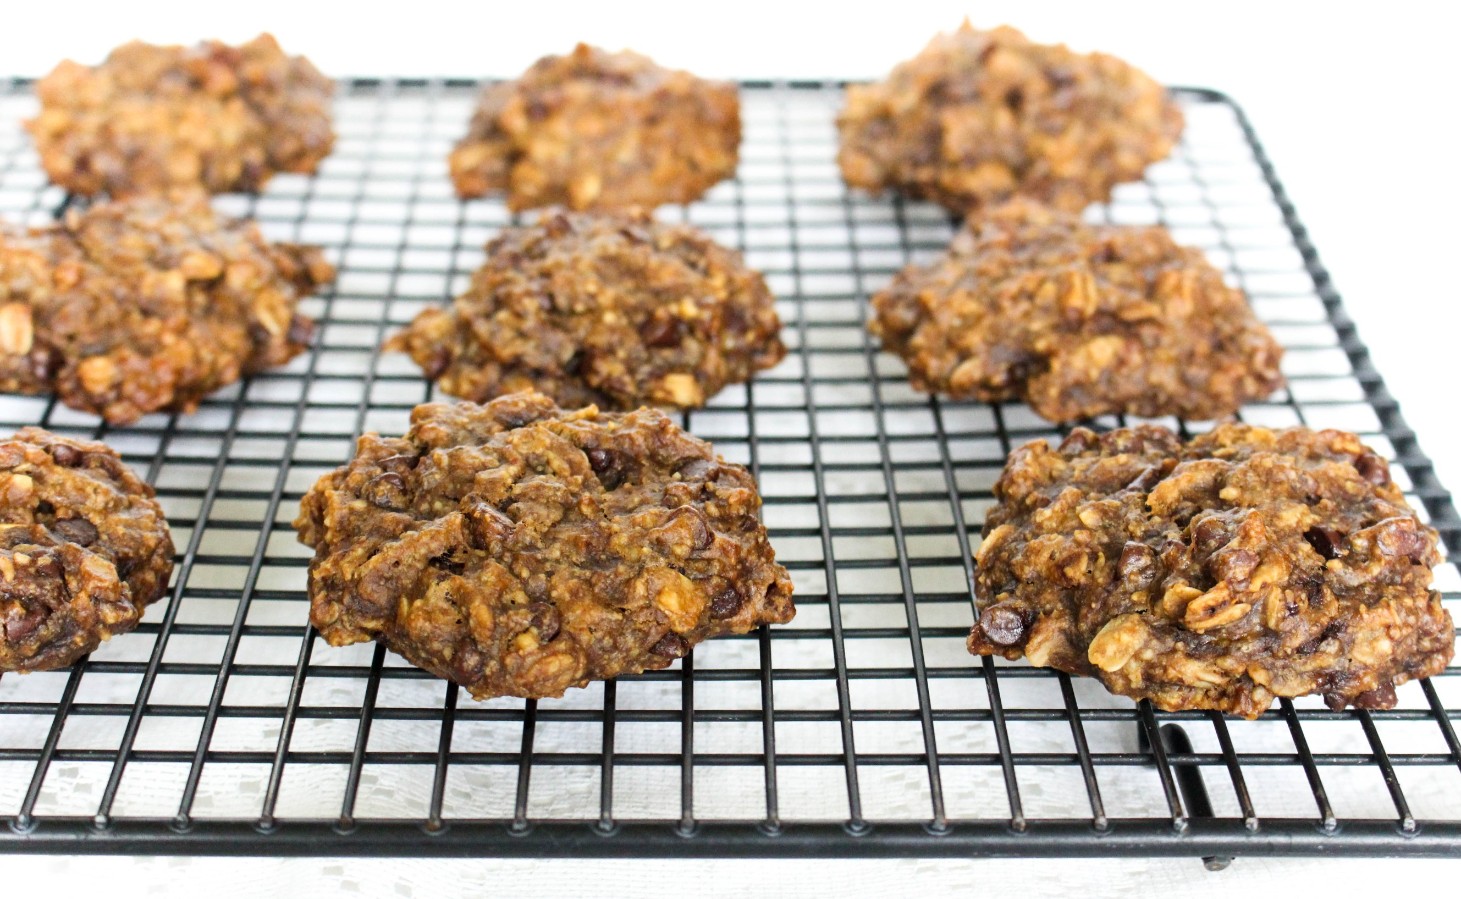
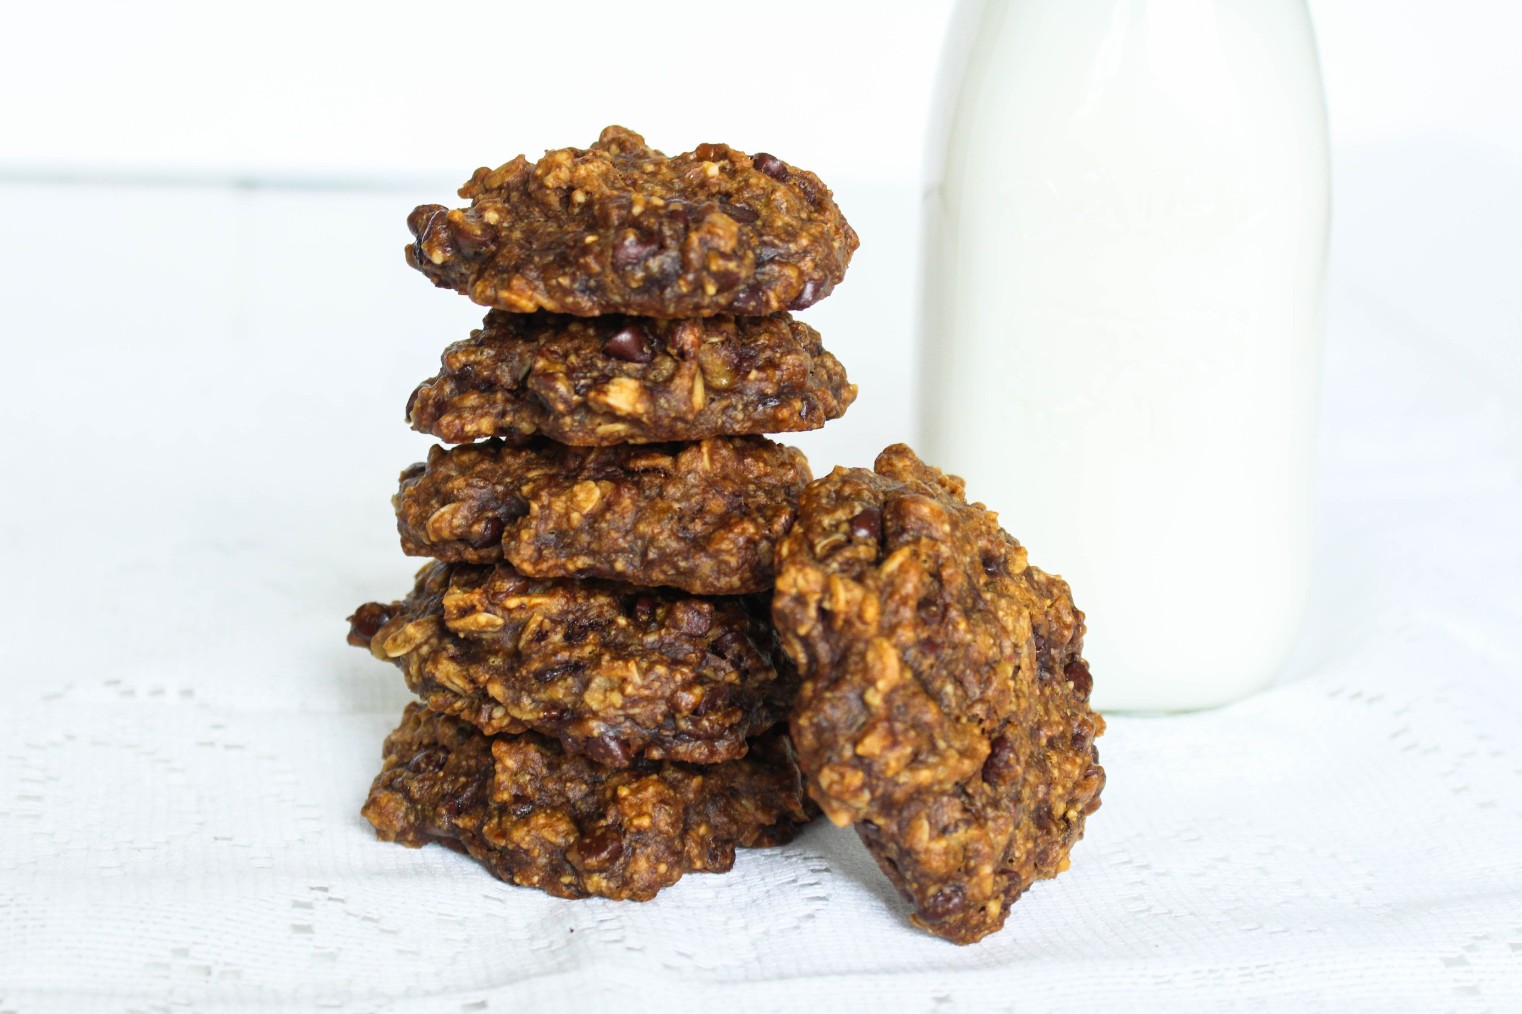
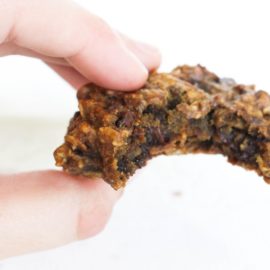
These cookies are a little more dense than your typical chocolate chip cookies. Whip up a batch of these when you are looking for a little treat midweek.

Print
clock clock iconcutlery cutlery iconflag flag iconfolder folder iconinstagram instagram iconpinterest pinterest iconfacebook facebook iconprint print iconsquares squares iconheart heart iconheart solid heart solid icon
chocolate peanut butter chickpea cookies with a bite on a glass of milk

Peanut Butter Chocolate Chip (Chickpea) Chia Cookies

  • Author: Chef Julie Harrington, RD
  • Prep Time: 15
  • Cook Time: 12
  • Total Time: 27 minutes
  • Yield: 15 1x

Ingredients

Scale
  • 1 (15-ounce) can chickpeas, drained and rinsed
  • 1 cup whole wheat pastry flour
  • 1/4 cup chia seeds
  • 1/2 tsp baking soda
  • 1/4 tsp salt
  • 1/2 cup peanut butter
  • 1/4 cup brown sugar
  • 1/4 cup unsweetened applesauce
  • 1 tbsp vanilla extract
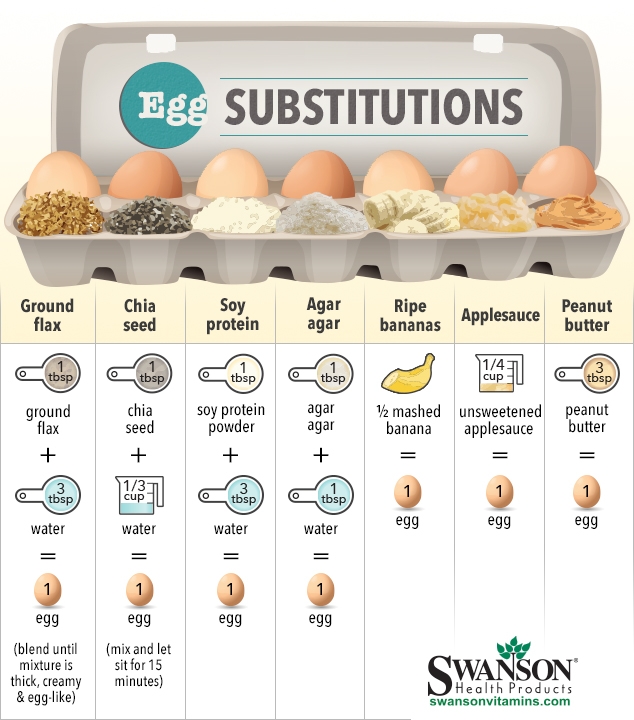
  • 2 eggs
  • 1/2 cup chocolate chips

Instructions

  1. Preheat the oven to 375 degrees. Spray 2 large baking sheets with cooking spray or parchment paper.
  2. In a food processor, puree the chickpeas until smooth, set aside.
  3. In a medium sized bowl, mix together the whole wheat pastry flour, chia seeds, baking soda, and salt. Set aside.
  4. In a large bowl, beat together the peanut butter, brown sugar, and applesauce until smooth. Add in the chickpeas, vanilla extract, and eggs. Beat until smooth.
  5. Slowly mix in the dry ingredients with a spatula until just combined. Mix in the chocolate chips. (Batter will be thick)
  6. Scoop the cookie dough batter (about 2 ounces each) onto the prepared baking sheets about 1 inch apart. Bake 10-12 minutes, until golden brown. Transfer the cookies to a wire rack to completely cool.

Keywords: cookie, chocolate chip cookie, chia seeds, healthy dessert, dessert, chickpeas

Recipe Card powered byTasty Recipes

Chef Julie Harrington, RD - Culinary Nutrition Consultant of chefjulierd.com
Peanut Butter Chocolate Chip (Chickpea) Chia Cookies - A healthy twist to a classic - Peanut Butter Chocolate Chip (Chickpea) Cookies

Baba Ganoush (Roasted Eggplant Dip)

Looking for a new dip for your veggies? Try baba ganoush – a signature Middle Eastern roasted eggplant puree enriched with tahini and seasoned with lemon juice and lots of garlic.
Baba Ganoush (Roasted Eggplant Dip) via RDelicious Kitchen @rdkitchenBaba Ganoush (Roasted Eggplant Dip) via RDelicious Kitchen @rdkitchen

My favorite part of this dip is the smokiness that the dish brings when roasting the eggplant. I additionally roasted the garlic for this dip too. Have you ever roasted garlic before? It adds that same smokiness but also a subtle sweet flavor. Simply add cloves of garlic (you can even do the whole head of garlic at once!) in a little tin foil pouch, drizzle with some olive oil and sprinkle a little salt and pepper. Seal up the foil and roast along with the eggplant. This will also help incorporate the garlic flavor throughout the dip because it is much easier to blend since it is softer when you puree the dip.

Baba Ganoush (Roasted Eggplant Dip) via RDelicious Kitchen @rdkitchenI picked up a bunch of eggplant at my last farmer’s market visit. It’s been sitting in my refrigerator because I just couldn’t decide what to make. I had so many recipe ideas running through my head. #foodbloggerproblems
Baba Ganoush (Roasted Eggplant Dip) via RDelicious Kitchen @rdkitchenMy extended family decided this year to do a big fantasy football draft. It was pretty entertaining. One thing about our family is that we are all very loud. So all of in the room trying to have an organized fantasy draft = chaos. Everyone was just talking over each other, but once we figured everything out, everyone picked their teams. Wish me luck this season!

Baba Ganoush (Roasted Eggplant Dip) via RDelicious Kitchen @rdkitchenBaba ganoush is very similar to hummus, but instead of chickpeas being the base, roasted eggplant is. Don’t skimp on the tahini (ground sesame seeds). It really adds that extra boost of flavor, plus heart healthy unsaturated fats.
Baba Ganoush (Roasted Eggplant Dip) via RDelicious Kitchen @rdkitchen
You can use baba ganoush like in any application where you would use hummus. Spread it on a sandwich instead of mayo. Swirl it in to mashed potatoes or mashed cauliflower to kick it up with some flavor. Or just simply dunk with your favorite veggies or pita chips.

Baba Ganoush (Roasted Eggplant Dip) via RDelicious Kitchen @rdkitchen

Print
clock clock iconcutlery cutlery iconflag flag iconfolder folder iconinstagram instagram iconpinterest pinterest iconfacebook facebook iconprint print iconsquares squares iconheart heart iconheart solid heart solid icon
Baba Ganoush (Roasted Eggplant Dip) in a white bowl

Baba Ganoush (Roasted Eggplant Dip)

  • Author: Julie @ RDelicious Kitchen
  • Prep Time: 15 mins
  • Cook Time: 35 mins
  • Total Time: 50 mins

Ingredients

Scale
  • 2 tablespoons olive oil, divided
  • 1 large eggplant
  • 4 cloves garlic
  • 2 tablespoons tahini
  • 1 lemon, juiced
  • 1 tablespoon parsley
  • salt and pepper, to taste

Instructions

  1. Preheat the oven to (high) broil.
  2. Slice eggplant into 1/4 inch rounds and place on a large baking sheet. Drizzle with 1 tablespoon olive oil and sprinkle with salt and pepper.
  3. On a small piece of tin foil, add the garlic cloves, drizzle over 1/2 tablespoon of olive oil and sprinkle with salt and pepper. Loosely wrap the foil around the garlic. Place the wrapped garlic on the baking sheet with the eggplant.
  4. Broil for 5 minutes, turn eggplant and broil for an additional 5 minutes. Turn broiler off, but do not remove eggplant from the oven. Heat oven to 350 degrees and roast for an additional 25 minutes.
  5. Remove from pan, wrap the rounds in foil to lock in moisture; let sit for about 5 minutes.
  6. Peel away most of the skin of the eggplant and add flesh to a food processor. It should be soft and tender and the skin should come off easy. Add the roasted garlic tahini, lemon juice, remaining 1 tablespoon olive oil, and parsley. Process until smooth and creamy. Season with salt and pepper.
  7. Garnish with additional parsley. Serve with pita chips and veggies.

Recipe Card powered byTasty Recipes

Baba Ganoush (Roasted Eggplant Dip) via RDelicious Kitchen @rdkitchen

Double Layer Chocolate Peanut Butter Fudge

Chocolate fudge or peanut butter fudge – which one is your favorite? If you can’t decide like me, layer them together to make delicious creamy fudge.
Double Layer Chocolate Peanut Butter Fudge via RDelicious Kitchen @rdkitchenThe Recipe ReDux is challenging members this month to take a trip down memory lane with recreating a fun vacation memory recipe.

A Vacation-Inspired Recipe:
Start unpacking your favorite vacation memories. Think about a trip you took state-side or internationally and create a healthy recipe from an unforgettable meal you enjoyed. Or, create a recipe from a native ingredient you saw or tasted on your travels.

Double Layer Chocolate Peanut Butter Fudge via RDelicious Kitchen @rdkitchenWhen I was younger, my family used to go down to Wildwood, NJ every summer. I was recently reminiscing about our Wildwood vacations with my mom and the one place that we HAD to stop by was Fudge Kitchen. They make the silkiest fudge that just melts in your mouth. Plus, they had so many flavors to choose from, it was so hard to decide which one to get.
Double Layer Chocolate Peanut Butter Fudge via RDelicious Kitchen @rdkitchenWe used to get combo boxes of fudge because everyone in my family wanted different flavors. My two favorite were the classic chocolate and peanut butter fudge. So why not get the best of both flavors and layer them! Now, I know fudge is a treat, but hey when you’re on vacation it’s okay to indulge a little.
Double Layer Chocolate Peanut Butter Fudge via RDelicious Kitchen @rdkitchenTo lighten up this fudge I swapped out the sugar and sweetened it with a little maple syrup and a banana. The only problem with this fudge is you have to be patient. Since there are two layers you have a waiting time in the middle for the chocolate layer to harden before you can add the peanut butter layer.

Print
clock clock iconcutlery cutlery iconflag flag iconfolder folder iconinstagram instagram iconpinterest pinterest iconfacebook facebook iconprint print iconsquares squares iconheart heart iconheart solid heart solid icon
Double Layer Chocolate Peanut Butter Fudge stacked on top of each other

Double Layer Chocolate Peanut Butter Fudge

  • Author: Julie @ RDelicious Kitchen

Ingredients

Scale
  • 1 tablespoon cocoa powder
  • 1/4 cup dark chocolate chips
  • 3/4 cup natural peanut butter
  • 1 medium banana
  • 1 teaspoon vanilla extract
  • 2 tablespoons coconut oil
  • 2 tablespoons pure maple syrup

Instructions

  1. In a small pot over low heat, combine 1/4 peanut butter, 1/2 teaspoon vanilla extract, 1 tablespoon coconut oil, 1 tablespoon maple syrup, and 1/4 cup dark chocolate chips; until melted. Let cool slightly.
  2. In a food processor or blender combine 1/2 banana and chocolate mixture and blend until smooth.
  3. Pour into an 8×8 pan lined with wax paper; spread evenly.
  4. Place in the freezer for 1 hour to harden.
  5. In a small pot over low heat, combine remaining 1/2 cup peanut butter, 1/2 teaspoon vanilla extract, 1 tablespoon coconut oil, and 1 tablespoon maple syrup; until melted. Let cool slightly.
  6. In a food processor or blender combine 1/2 banana and peanut butter mixture and blend until smooth. Pour peanut butter mixture over the chocolate layer; spread evenly. Return back to the freezer for an hour or until fudge hardens.
  7. (Store in the freezer)

Recipe Card powered byTasty Recipes

Signature
Double Layer Chocolate Peanut Butter Fudge via RDelicious Kitchen @rdkitchen

Dark Chocolate Covered Kiwi Pops

Have you heard of SunGold kiwifruit? It’s not like your typical kiwi, with its smooth skin and bright yellow flesh. Learn some more about these vitamin C packed fruit and try a delicious Dark Chocolate Covered Kiwi Pop treats.
Chocolate Covered Kiwi Pops via RDelicious Kitchen @rdkitchenI received free samples of Zespri SunGold Kiwifruit mentioned in this post. By posting this recipe, I am entering a recipe contest sponsored by Zespri Kiwifruit and am eligible to win prizes associated with the contest. I was not compensated for my time.
SunGold kiwifruit is popping up throughout grocery stores (June-October), since being one of the new fastest growing fruits globally.

So, I never really knew that kiwifruit was one word until recently… oops. I was typing it a text and it kept autocorrecting it to one word. Don’t worry, you won’t even have to type it anymore now that a fun kiwifruit emoji is coming!
Chocolate Covered Kiwi Pops via RDelicious Kitchen @rdkitchen
Anytime I am teaching a cooking class or doing a cooking demo I always like to throw out fun facts about the food I’m cooking with. I would sweep a food category in jeopardy.
Five surprising facts about SunGold Kiwifruit:
1. Not all kiwifruit is “fuzzy” on the outside.
Zespri SunGold kiwifruit have a smooth, hairless skin. SunGold is also yellow on the inside, which is a surprise in and of itself because Americans are more familiar with the green kiwifruit variety with the fuzzy skin. Zespri SunGold kiwis have, a juicy, yellow flesh, and a tropical-sweet taste.
2. You don’t peel kiwifruit.
Kiwifruit is the perfect portable snack because it is easy to eat! Just cut in half with a knife and scoop with a spoon. That’s it – just cut, scoop, and enjoy!
3. Kiwifruit is a good meat tenderizer.
Both green and SunGold kiwifruit contain an enzyme called actinidin that helps break down protein. Actinidin occurs only in kiwifruit and improves digestive comfort by increasing the breakdown of proteins and facilitating digestion and emptying of the stomach. The actinidin can serve as a meat tenderizer: just peel and mash a kiwifruit and spread over meat or make a kiwifruit marinade. Actinidin will also break down protein in dairy so recipes with dairy should be consumed right away.
4. You can “measure” the taste of SunGold.
Zespri growers achieve the best-tasting kiwifruit through a measure called the brix. The higher the brix, the sweeter the fruit. The dry matter content (where all water is removed) indicates how high the brix will be once the fruit is ripe. A higher dry matter means the better quality the kiwifruit will be- it stores better and tastes better. Not all kiwifruit brands put so much focus on the brix and that’s why not all kiwifruit is created equal. With Zespri, you can really taste the difference!
Chocolate Covered Kiwi Pops via RDelicious Kitchen @rdkitchen
Now that you know a little bit more about the Zespri SunGold kiwifruit, how do you pick the prefect one to enjoy? To tell if a SunGold kiwifruit is ripe – hold the kiwifruit in the palm of your hand and squeeze gently.  It should yield to slight pressure when ripe. SunGold’s get softer and sweeter as they ripen.


This little fruit has quite the nutrition credentials to go along with is delicious taste, including

  • an excellent source of vitamin C, containing 2x more vitamin C than oranges
  • provides as much potassium as a banana
  • and a good source of the antioxidant vitamin E

Chocolate Covered Kiwi Pops via RDelicious Kitchen @rdkitchen
Fruit is one of my favorite desserts in the summer time. I’ve been finding myself grabbing a toothpick and poking into the frozen fruit in my freezer for a little sweet treat after dinner. I’ve never tried frozen kiwi before, so I thought it would be fun to give it a try! Plus, chocolate – how will this not be delicious?!
Verdict – love these! I found that the kiwi tasted even sweeter when it was frozen and they are easily customizable depending what extra little toppings you may want to add.

Print
clock clock iconcutlery cutlery iconflag flag iconfolder folder iconinstagram instagram iconpinterest pinterest iconfacebook facebook iconprint print iconsquares squares iconheart heart iconheart solid heart solid icon
Dark Chocolate Covered Kiwi Pop on parchment paper

Chocolate Covered Kiwi Pops

  • Author: Julie @ RDelicious Kitchen
  • Yield: 4

Ingredients

Scale
  • 2 kiwis, peeled and sliced
  • 46 oz. dark chocolate
  • (optional toppings) coconut flakes, walnuts, sprinkles, etc.

Instructions

  1. Insert popsicle sticks into the kiwi slices far enough to hold the fruit without piercing through the other end. Freeze until firm.
  2. Melt chocolate in a double broiler.
  3. Dip kiwi slices into melted chocolate, and rest over wax paper or cooling rack.
  4. Add desired toppings. After chocolate has hardened, eat and enjoy,
  5. Store leftovers in the refrigerator or freezer

Recipe Card powered byTasty Recipes

Connect more with Zespri Kiwifruit
-> Website
-> Twitter
-> Facebook
-> Instagram
-> Pinterest
Need even more SunGold kiwifruit inspiration? Scroll down to check out what other Recipe ReDuxer’s created.
Chocolate Covered Kiwi Pops via RDelicious Kitchen @rdkitchen

Guacamole Shrimp Wonton Cups

Guacamole Shrimp Wonton Cups are a crowd-pleasing appetizer to share at your next gathering. Layered with guacamole, mango salsa, and shrimp, these flavors are the perfect little bite for entertaining! 

Guacamole Shrimp Wonton Cups

We eat with our eyes first. This appetizer definitely catches your eye and the secret is – they are so easy to make!

Some recipes are more of an assemble kind of recipe vs. cooking everything from scratch and guess what.. that’s okay! It makes prep time much shorter saving you time in the kitchen. For this recipe, I used prepared guacamole and mango salsa. Feel free to create your version from scratch.

hand holding shrimp wonton cup appetizer

How to make wonton cups

Tip: Wonton wrappers are often found in the produce section of the grocery store.

  • Preheat oven to 350 F. Lightly coat a 24-cup mini muffin tin with nonstick spray.
  • Press wonton wrappers into each of the muffin tins, to create a cup shape.
  • Place into oven and bake for 10-12 minutes, or until golden brown.

Bonus: For extra flavor, brush the wontons with olive oil and sprinkle additional seasonings to the wonton wrappers before baking.

Skip this step: Don’t feel like making the wonton cups? Stack the layers of guacamole, mango salsa, and shrimp in a “scoop” chip.

Guacamole Shrimp Wonton Cups on a dark board

Nutrition Benefits of Ingredients

How do these Guacamole Shrimp Wonton Cups stack up nutritionally?

  • Homemade wonton cups: less sodium that pre-made chips
  • Guacamole: the base of guacamole is avocado – one-third of a medium avocado (50 g) has 80 calories and contributes nearly 20 vitamins and minerals, making it a great nutrient-dense food choice
  • Mango-salsa: mangos are an excellent source of vitamin C, 50% DV, which plays an important role in immune function and skin health
  • Shrimp: provides a high amount of protein and healthy fats, in addition to a variety of vitamins and minerals
Print
clock clock iconcutlery cutlery iconflag flag iconfolder folder iconinstagram instagram iconpinterest pinterest iconfacebook facebook iconprint print iconsquares squares iconheart heart iconheart solid heart solid icon
Guacamole Shrimp Wonton Cups

Guacamole Shrimp Wonton Cups

  • Author: Chef Julie Harrington, RD
  • Prep Time: 15
  • Cook Time: 10
  • Total Time: 25 minutes
  • Yield: 24 1x

Ingredients

Scale
  • 24 wonton wrappers
  • 24 medium shrimp, peeled and deveined
  • 1 tablespoon olive oil
  • 1 teaspoon garlic powder
  • 1/4 teaspoon paprika
  • 1/4 teaspoon onion powder
  • 1/4 teaspoon cayenne pepper
  • 1/4 teaspoon oregano
  • 1/4 teaspoon pepper
  • 1 cup guacamole
  • 1 cup mango salsa

Instructions

  1. Preheat oven to 350 F. Lightly coat a 24-cup mini muffin tin with nonstick spray.
  2. Press wonton wrappers into each of the muffin tins, to create a cup shape.
  3. Place into oven and bake for 10-12 minutes, or until golden brown.
  4. In a medium bowl, combine shrimp, olive oil, garlic powder, paprika, onion powder, cayenne pepper, oregano, and black pepper.
  5. Coat a large pan with cooking spray and place over medium-high heat. Add shrimp, cook, flipping once, until pink and opaque, about 2 minutes on each side. (or place on skewers and grill)
  6. Fill each wonton with 1 tablespoon guacamole, 1 tablespoon mango salsa, then 1 shrimp.
  7. Serve immediately.

Recipe Card powered byTasty Recipes

Chocolate Chia Espresso Chip Cookies

Do you find baking relaxing? There is a reason why! Unwind and bake these Chocolate Chia Espresso Chip Cookies.
Chocolate Chia Espresso Chip Cookies via RDelicious Kitchen @rdkitchen
After a super long day, I came home and wanted to bake. Baking is so relaxing to me. Is it because “stressed is desserts backwards” or is there a reason why there was a connection between baking and relieving stress?

According to the Massachusetts Public Health Blog, baking is a way to nurture our creative side – something we don’t do enough of. When feeling stressed or anxious, there’s something relaxing about losing yourself in the process of stirring, mixing, and kneading and at the end, treating yourself and others to something made from the soul. Doing something with your hands can be relaxing, similar to squeezing a stress ball or knitting. It helps take your mind off of your troubles, and releases negative energy that’s stored – channeling it into something creative. For some people, the repetitive motion of chopping is calming. Baking is a creative outlet that allows for experimentation. For some, baking is a coping skill to deal with life’s challenges, and a positive one at that – another one to add to your toolbox.
Chocolate Chia Espresso Chip Cookies via RDelicious Kitchen @rdkitchen
As I was getting creative in the kitchen, I noticed I had used the last of my eggs when I made my favorite Swiss Chard and Mushroom Quiche the day before. Now worries, there are plenty of egg substitutions to use. I love the guide below as some really great egg free alternatives.
In a typical recipe for baked goods, eggs play the role of a binder or a leavening agent. A binder helps hold the recipe together, while a leavening agent helps your baked goodies to rise.

Chocolate Chia Espresso Chip Cookies via RDelicious Kitchen @rdkitchen(source)

I went with the “chia egg”. I notice this method works best with cookies and brownies. The chia egg keeps the cookies soft and gooey, plus add a boost of fiber and omega-3’s.

Chocolate Chia Espresso Chip Cookies via RDelicious Kitchen @rdkitchenWhat egg free alternative have you tried in a baking recipe?

Print

clock clock iconcutlery cutlery iconflag flag iconfolder folder iconinstagram instagram iconpinterest pinterest iconfacebook facebook iconprint print iconsquares squares iconheart heart iconheart solid heart solid icon
hand holding a Chocolate Chia Espresso Chip Cookie

Chocolate Chia Espresso Chip Cookies

  • Author: Julie @ RDelicious Kitchen
  • Yield: 15 cookies 1x

Ingredients

Scale
  • 1 tablespoon chia seeds
  • 1/3 cup hot water
  • 1 medium ripe banana
  • 1/4 cup natural peanut butter
  • 1/2 tablespoon melted coconut oil
  • 1/2 teaspoon vanilla extract
  • 2 tablespoons maple syrup
  • 3/4 cup rolled oats
  • 1/4 cup oat flour
  • 1/4 cup garbanzo bean flour
  • 1/2 tsp baking powder
  • 1/2 tsp baking soda
  • 1/8 teaspoon salt
  • 1 tablespoon espresso powder
  • 1/3 cup mini chocolate chips

Instructions

  1. Preheat the oven to 350 degrees F. In a small bowl, combine the chia seeds and hot water. Let sit for 15 minutes, stirring occasionally. Mixture will gel up and thicken.
  2. In a large bowl, mash the banana with a fork. Mix in the peanut butter, coconut oil, vanilla extract, maple syrup, and chia seeds, until combined.
  3. Add the rolled oats, oat flour, garbanzo bean flour, baking powder, baking soda, salt, and espresso powder. Mix until just combined.
  4. Gently fold in the chocolate chips.
  5. Scoop cookie dough by the tablespoonful onto a prepared baking sheet, sprayed with non stick spray, or lined with parchment or a silicone mat.
  6. Bake for 15-20 minutes until golden brown.

Recipe Card powered byTasty Recipes

Signature
Chocolate Chia Espresso Chip Cookies via RDelicious Kitchen @rdkitchen

Citrus Beet Salad with Champagne Vinaigrette Dressing

Add a pop of color and fresh flavors with this Citrus Beet Salad with a Champagne Vinaigrette Dressing.
Citrus Beet Salad with Champagne Vinaigrette Dressing via RDelicious Kitchen @rdkitchenOne summer in high school, I worked for this catering company and they had this citrus salad on the menu that majority of customers ordered. One busy weekend, there a bunch of catering events scheduled and I was working the prep station, segmenting hundreds of citrus. I became pretty speedy at the process. By segmenting citrus away from the connective membrane makes it more tender and visually appealing, especially for a salad.
Citrus Beet Salad with Champagne Vinaigrette Dressing via RDelicious Kitchen @rdkitchenBeets have a very distinct earthy flavor. By adding something acidic, like citrus fruit, it offsets it by giving the beets a sweeter note.
Beets contain two important nutrients that can help lower blood pressure: potassium and nitrate. Potassium works with sodium to maintain the volume of blood in circulation steady. More sodium in the body means more water, more blood volume and higher blood pressure. Consuming more potassium helps flush sodium out of our system, lowering blood pressure.
Citrus Beet Salad with Champagne Vinaigrette Dressing via RDelicious Kitchen @rdkitchen

I just love the bright colors the ingredients in this salad bring. More colors, more nutrients!
Citrus Beet Salad with Champagne Vinaigrette Dressing via RDelicious Kitchen @rdkitchen

Print

clock clock iconcutlery cutlery iconflag flag iconfolder folder iconinstagram instagram iconpinterest pinterest iconfacebook facebook iconprint print iconsquares squares iconheart heart iconheart solid heart solid icon
Citrus Beet Salad with Champagne Vinaigrette Dressing on a white platter

Citrus Beet Salad with Champagne Vinaigrette Dressing

  • Author: Julie @ RDelicious Kitchen
  • Yield: 4

Ingredients

Scale
  • 3 beets, greens and stems removed
  • 1 grapefruit, cut into segments
  • 1 orange, cut into segments, reserving 1 tablespoon of juice and the zest
  • 1 tablespoon olive oil
  • 1 tablespoon champagne vinegar
  • 1/2 tablespoon honey
  • pinch of salt and pepper
  • 2 cups arugula
  • 1/4 cup toasted walnuts

Instructions

  1. Preheat oven to 425 degrees. Scrub beets clean under cold water. Wrap each beet in tin foil. Place on a baking sheet; bake until beets are slightly soft to the touch, 45 minutes to 1 hour depending on their size. Cool beets in packets, then rub off skins (use a paring knife for tough spots). Quarter each beet.
  2. In a small bowl, whisk together olive oil, champagne vinegar, honey, orange juice, salt, and pepper.
  3. In a large bowl, combine the beets and arugula. Drizzle half the vinaigrette over the beet arugula mixture and toss to combine.
  4. Top with grapefruit segments, orange segments, and walnuts. Drizzle the remaining vinaigrette on top. Garnish with orange zest.

Notes

Time-saving tip: Use Love Beets (See Supermarket RD’s Picks), which are already cooked and steamed.

Recipe Card powered byTasty Recipes

Signature

Raspberry Lime Chia Jam

Skip the jarred stuff and make your own sweet and tangy Raspberry Lime Chia Jam. It’s great to spread on toast, stir in yogurt, or top on waffles in place of syrup.
Raspberry Lime Chia Jam via RDelicious Kitchen @rdkitchenIt’s peanut butter jelly raspberry lime chia jam time! Maybe we should stick to the original phrase, but I definitely encourage you to think outside the box and try this raspberry lime chia jam. It has a sweet and tangy flavor your tastebuds will love, plus an extra boost of fiber from the chia seeds.
Raspberry Lime Chia Jam via RDelicious Kitchen @rdkitchen

Raspberry Lime Chia Jam via RDelicious Kitchen @rdkitchenI was at the diner with my friends and I ordered my favorite omelette with mushrooms, spinach, tomatoes, and feta cheese with rye toast (dry) on the side. Along with my toast came the selection of jellies, jams, and marmalades which brought up the question – what’s the difference between each of them?
Jam – Jam is made of crushed fruits that are then cooked with sugar, pectin, and acid until the fruits reach a spreadable consistency. Jam has an organic shape to it, and often has chunks of fruit in it, which also can contain seeds if they fruit has them. In addition to being a spread, jams are also good for fillings.
Jelly – The fruit contained in the form of jelly is the fruit’s juice. The fruit is crushed and cooked so the juice can be extracted. It is more gelatinous and easier to spread. It’s main ingredients are fruit juice, pectin, an acid, and sugar. Jellies can also be made from ingredients other than fruit, such as herbs, tea, wine, liqueurs, flowers, and vegetables.
Marmalade – The word marmalade is french, meaning “citrus preserves”. Marmalades are cooked with the fruit’s peel and pulp for a long time, and traditionally do not use pectin. Marmalades are usually made with citrus fruits, like oranges, lemons, limes, or grapefruits, and are often used as spreads or glazes.
Raspberry Lime Chia Jam via RDelicious Kitchen @rdkitchenA homemade jam like this can be a great addition to sweeten up meals/snacks with wholesome fruit and to help trim back on added sugars.
– Opt for plain yogurt, instead of flavored yogurt, and add a tablespoon of jam to sweeten it up
– Warm up a tablespoon of jam and drizzle over pancakes or waffles in place of syrup
– Opt for plain oatmeal and stir in a tablespoon of jam
– Simply spread jam on a piece of whole wheat toast
Raspberry Lime Chia Jam via RDelicious Kitchen @rdkitchen

Print

clock clock iconcutlery cutlery iconflag flag iconfolder folder iconinstagram instagram iconpinterest pinterest iconfacebook facebook iconprint print iconsquares squares iconheart heart iconheart solid heart solid icon
raspberry lime chia jam on rye bread

Raspberry Lime Chia Jam

  • Author: Julie @ RDelicious Kitchen
  • Cook Time: 8 mins
  • Total Time: 8 mins
  • Yield: 16 1x

Ingredients

Scale
  • 2 cups raspberries (fresh or frozen)
  • 2 limes, juiced and zested
  • 2 tablespoons chia seeds
  • (optional) 1 tablespoon coconut sugar

Instructions

  1. In a small pot combine the raspberries, lime juice, and coconut sugar (if using). Cook over low heat until the raspberries start to break down, stirring occasionally.
  2. With the back of a wooden spoon, mash the raspberries. Add the chia seeds and cook for another 1-2 minutes until the jam begins to thicken.
  3. Remove from heat. Stir in the zest.
  4. Let cool and spread on toast, stir in oatmeal, or top on waffles/pancakes.

Recipe Card powered byTasty Recipes

Signature

Avocado (Waffle) Toast

Break out of breakfast boredom and try sprucing up your breakfast with this Avocado (Waffle) Toast that will gear you up for the day ahead.
Avocado (Waffle) Toast via RDelicious Kitchen @rdkitchen
I love breakfast. I love food. I love breakfast food. I was excited to see this month’s Recipe ReDux‘s theme was to “break out of breakfast boredom”. I’ve been cooking up a lot of breakfast recipes here lately, well because I love breakfast!
Avocado (Waffle) Toast via RDelicious Kitchen @rdkitchen


Avocado (Waffle) Toast via RDelicious Kitchen @rdkitchen
I just don’t understand how people skip breakfast in the morning. Come on people, breakfast food is the best! I just love the versatility of breakfast. You can go either sweet or savory and it’s one of the easiest meals where all food groups can perfectly fit.
Avocado (Waffle) Toast via RDelicious Kitchen @rdkitchen
For me, breakfast is best when it has the perfect balance, both nutritionally and flavor-wise. I like to practice what I preach and aim for at least 3 food groups per meal, one food group being a fruit or vegetable. This avocado (waffle) toast is packed with lean protein, whole grains, healthy fats, and fiber.
Avocado (Waffle) Toast via RDelicious Kitchen @rdkitchen
But let’s get real, this kind of breakfast is not always on the regular, especially on the mornings where I am running out the door sipping on my coffee in my travel mug on my commute. Don’t worry, I have plenty of other breakfast options that might work too!
Protein Pancakes (these taste delicious reheated too!)
2 minute (microwave) Oatmeal Muffin (single serving!)
Tropical Wild Blueberry Smoothie (perfect for on the go!)
Frozen Single Serve Pumpkin Steel Cut Oatmeal (make ahead recipe!)
Swiss Chard and Mushroom Quiche (make ahead recipe!)
Protein Smoothie (without using protein powder!)
The Best Overnight Oatmeal (make ahead recipe!)

Print

clock clock iconcutlery cutlery iconflag flag iconfolder folder iconinstagram instagram iconpinterest pinterest iconfacebook facebook iconprint print iconsquares squares iconheart heart iconheart solid heart solid icon
waffle with tomato avocado and fried egg

Spruced Up Avocado (Waffle) Toast

  • Author: Julie @ RDelicious Kitchen
  • Yield: 1

Description

Simplicity is sometimes the most delicious! Fuel up with a breakfast that will keep you full an satisfied all morning.


Ingredients

Scale
  • 1 whole wheat frozen waffle
  • 1 slice tomato
  • 1/4 avocado thinly sliced
  • 1 egg
  • sprinkle of pepper, sea salt, and red pepper flakes

Instructions

  1. Toast waffle according to package directions.
  2. Top with tomato slice and avocado slices.
  3. In a small pan coated with cooking spray, cook egg sunny side up until desired doneness. Add on top of tomato and avocado slices.
  4. Sprinkle with pepper, sea salt, and red pepper flakes.

Recipe Card powered byTasty Recipes

SignatureLooking for more breakfast ideas? Check out what other Recipe ReDux members created this month too!

Tropical Wild Blueberry Smoothie

Add a boost of flavor and nutrition with a Tropical Wild Blueberry Smoothie.
Tropical Wild Blueberry Smoothie via RDelicious Kitchen @rdkitchenBy posting this recipe I am entering a recipe contest sponsored by the Wild Blueberry Association of North America and I am eligible to win prizes associated with the contest. I was not compensated for my time.
It dropped to 2 degrees here in NJ this past weekend.. BRRR. Simple tasks like running errands was brutal in the cold. I kept envisioning a getaway to a warm tropical island.
Tropical Wild Blueberry Smoothie via RDelicious Kitchen @rdkitchenSadly, there were no tropical island trips planned in the near future, so I had to improvise. Instead I created a tropical wild blueberry smoothie.
You may think I’m contradicting myself for wanting to get away to a warm place and then make a cold smoothie, but smoothies are a staple in my kitchen year round, no matter what the temperature is. Why? Because smoothies are so easy to pack in a ton of nutrition with a variety of healthy foods coming from all food groups.
Plus, smoothies are so easy to customize with various combinations, so you’ll never get bored! I always like to experiment in the kitchen with new combinations and new ingredients. One new ingredient I tried in this smoothie recipe are wild blueberries. Wild Blueberries have twice (2x) the antioxidant capacity of larger cultivated blueberries. A growing body of research shows the potential health benefits of Wild Blueberries including gut health, diabetes, cancer and brain health.
Tropical Wild Blueberry Smoothie via RDelicious Kitchen @rdkitchen

Tropical Wild Blueberry Smoothie via RDelicious Kitchen @rdkitchenI often find that certain fruit flavors, like blueberries, get lost when getting mixed into a smoothie because other strong fruit flavors take over.
Wild blueberries are a little extra special than your regular cultivated blueberries. Wild blueberries have a more intense flavor than regular blueberries. Wild Blueberry plants grow wild and are genetically diverse with thousands of interlocking plants spreading naturally across fields called barrens. It’s this diversity that gives Wild Blueberries their complex and delicious flavor — an extraordinary mix of tart and sweet.
Tropical Wild Blueberry Smoothie via RDelicious Kitchen @rdkitchenSmoothie Tip: Use frozen fruit when making smoothies. This will chill the smoothie plus thicken it without using ice, which can water down the flavor.
The Wild Blueberry crop (99% of it) is frozen. These potent little berries are individually quick frozen (IQF) at harvest locking in their nutrition and taste. It’s nature’s pause button.

Print

clock clock iconcutlery cutlery iconflag flag iconfolder folder iconinstagram instagram iconpinterest pinterest iconfacebook facebook iconprint print iconsquares squares iconheart heart iconheart solid heart solid icon
Tropical Wild Blueberry Smoothie in two short glasses

Tropical Wild Blueberry Smoothie

  • Author: Julie @ RDelicious Kitchen
  • Prep Time: 5 mins
  • Total Time: 5 mins
  • Yield: 2

Description

#WildYourSmoothie with a tropical twist


Ingredients

Scale
  • 1 banana
  • 1 cup frozen Wild Blueberries
  • 1/2 cup frozen pineapple
  • 2 tablespoons unsweetened coconut flakes
  • 2 tablespoons flaxseed
  • 1/2 cup cottage cheese
  • 1 cup unsweetened coconut milk (or milk of your choice)

Instructions

  1. Simply add the banana, wild blueberries, pineapple, coconut flakes, flaxseed, cottage cheese, and coconut milk in to a blender. Blend until smooth.
  2. For a thicker consistency, add ice. For a thinner consistency, add water.
  3. Top with additional wild blueberries, coconut, or pineapple.

Recipe Card powered byTasty Recipes

Thank you Kara Lydon, on behalf of the Wild Blueberry Association of North America, inviting me to participate in a smoothie recipe contest for dietitians and healthy living bloggers.
Check out all of the #RDapproved wild blueberry smoothie creations using #WildYourSmoothie.  Or you can head on over to the Wild Blueberry Association’s website and follow them on Facebook, Twitter, Instagram, and Pinterest to discover even more Wild Blueberry recipes.
Signature