This post may contain affiliate links. Read my privacy policy.
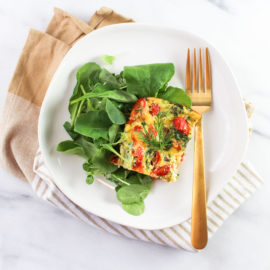
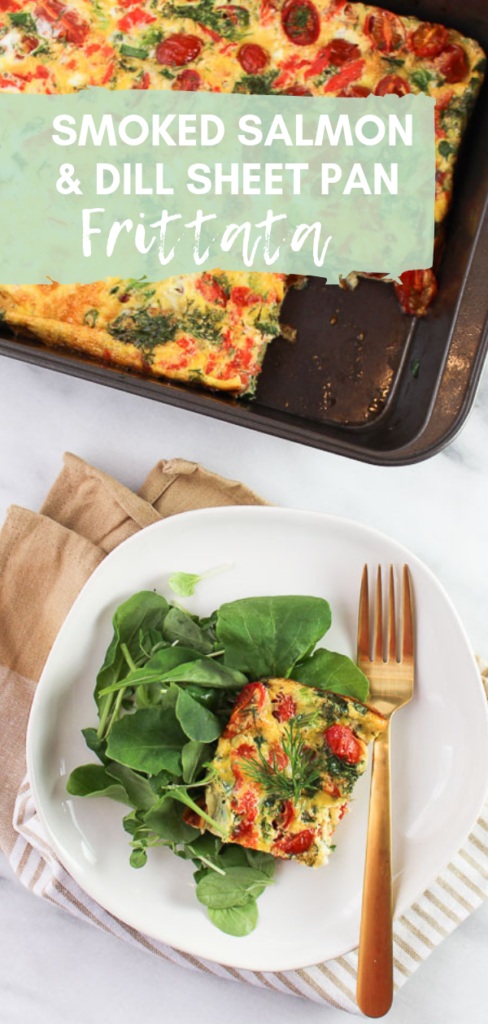
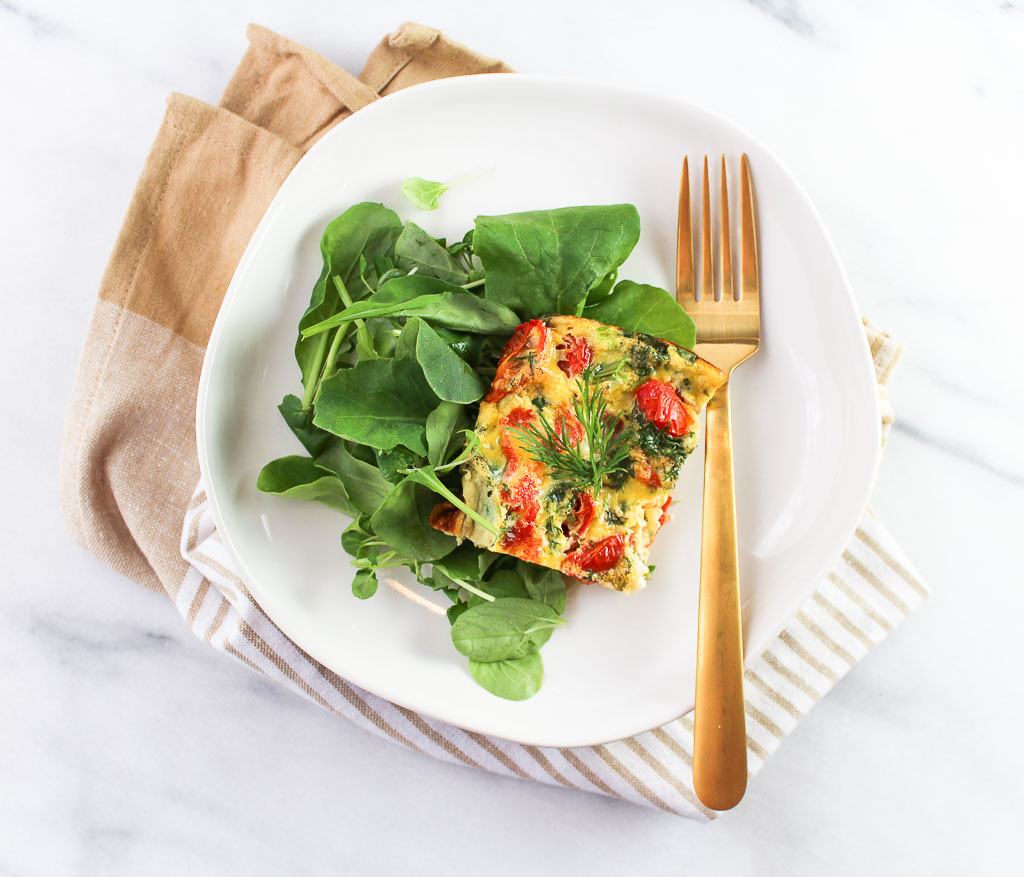
Serve eggs family-style with this Smoked Salmon and Dill Sheet Pan Frittata that will kick your breakfast or brunch up a notch. Way back when one of my first jobs was at a bagel shop. It was one of my favorite jobs. I worked with my friends and got to enjoy endless bagels and coffee. The only downside was getting to work at 5:00 am on a weekend. Now, I love enjoying a leisurely brunch on the weekend. One thing the bagel shop introduced me to was smoked salmon or also known as lox. I still remember this one customer who always ordered – an everything bagel with cream cheese, lox, tomato, red onion, and capers. Of course, I had to try it.
That’s when my smoked salmon love affair began. It is now a staple at my brunches. I love the addition of the smoked salmon in this frittata. Plus, baking it in the sheet pan makes it so easy to serve! Often times the term lox and smoked salmon are used interchangeably, but there is a difference. Lox was traditionally only made from the belly of salmon. The salmon is salt-cured or brined but never cooked or even smoked. It has a very smooth silky texture. Smoked salmon is a much more generic term than lox. Smoked salmon can be made from any part of the fish, and it starts with salt curing or brining, just as in lox.
This post may contain affiliate links. Read my privacy policy.
A jar of quick pickled onions in your refrigerator gives you last-minute, tangy addition to many dishes.
My fiance LOVES red onion. In my opinion a little too much. Now every time he makes tuna salad, I need to supervise because the last time he made it I think there was more red onion then actual tuna. It should have been called a red onion salad.
While I do enjoy onions, raw onions are not always my favorite. I sometimes feel like they overpower a dish. Have you ever tried pickled onions instead? I now have been adding these tangy slices into my dishes to get more of a tangy red onion flavor instead that sharp and pungent red onion flavor that can take over the whole dish.
There are so many uses for pickled onions. Add to sandwiches, use as a condiment to top tacos or egg salad, or toss them into grain salads. Their tart and tangy flavor and their bright pink color will perk up any dish.
As the pickled onions continue to brine in the refrigerator, they will turn to vibrant pink in color. Make sure to store your pickled onions in a glass container (I used a mason jar). Most metals will react with vinegar and plastic will absorb the flavors. Plus, being able to see them is always a little reminder when I open my refrigerator to top my dishes with them.
In a mason jar, combine the apple cider vinegar, sugar, salt, and water. Close the lid and shake until sugar and salt have dissolved. (Or can be whisked in a bowl)
Add the onions to the mason jar, making sure all the onions are submerged. Let sit at room temperature for at least 2 hours. (see notes for the make ahead version)
Drain onions before using.
Notes
MAKE AHEAD: Can be made 2 weeks ahead. Cover and chill.
This post may contain affiliate links. Read my privacy policy.
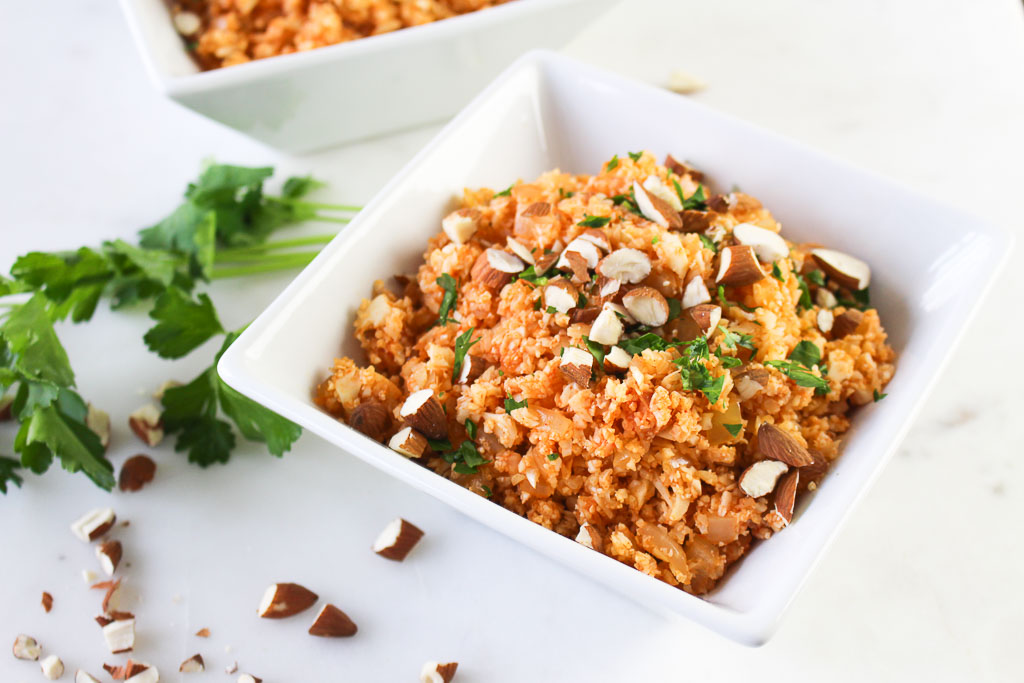
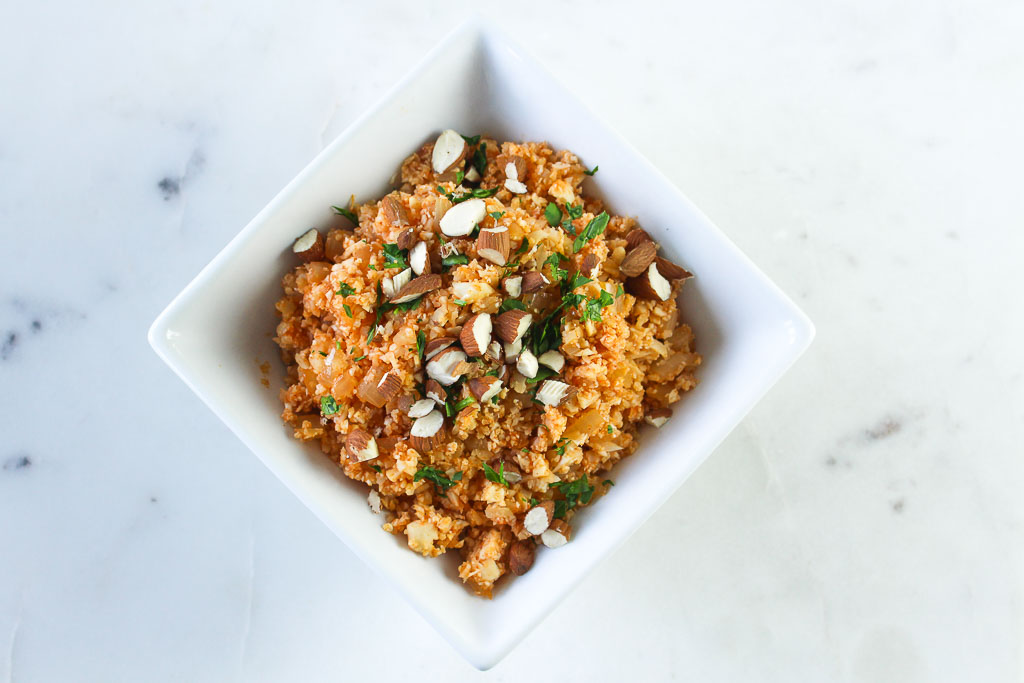
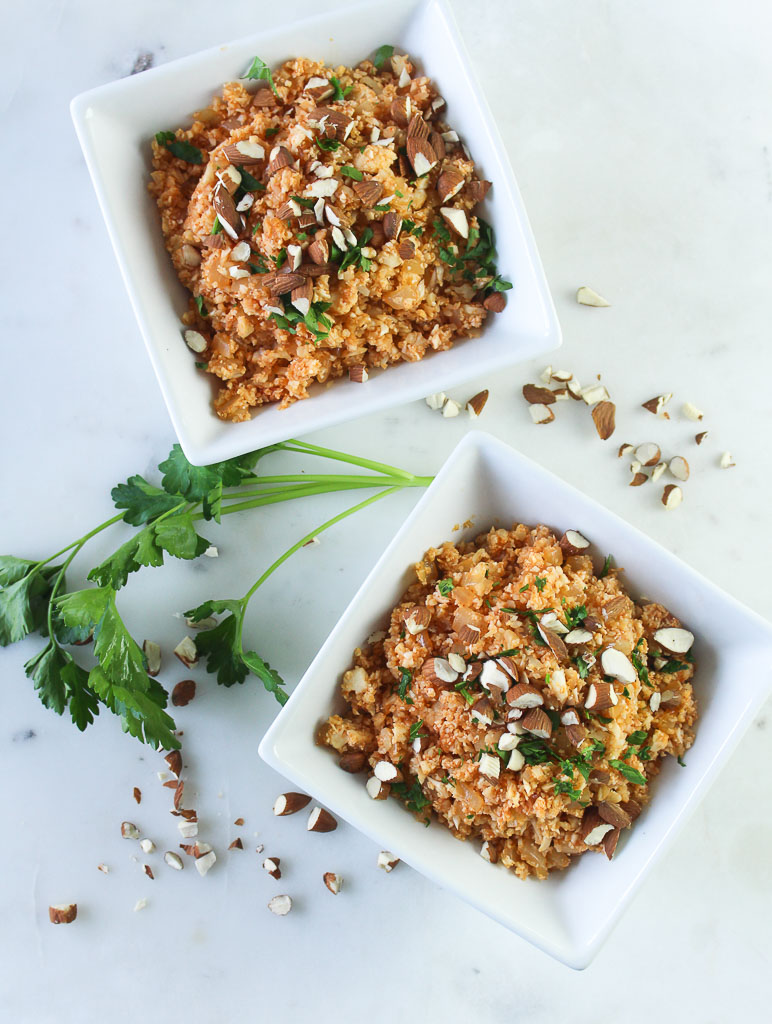
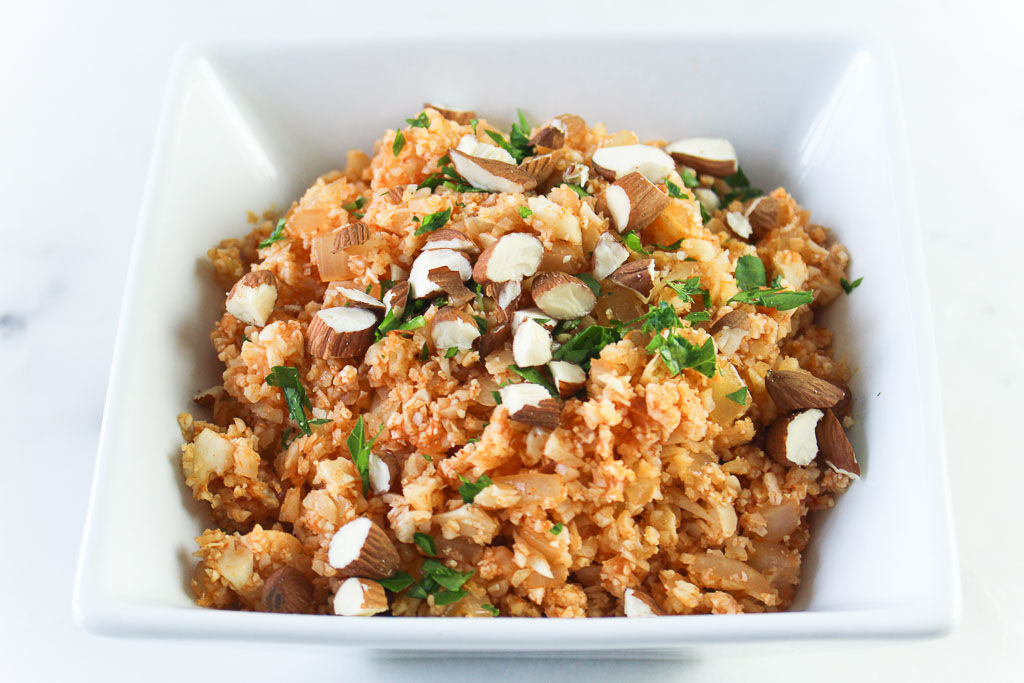
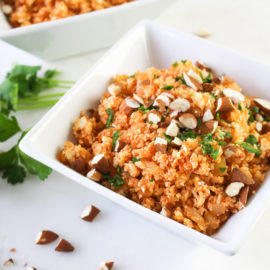
Cauliflower rice can replace rice in any recipe for a low-carb option. Try this Spanish-Style Cauliflower Rice inspired by traditional Spanish flavors.
My fiance’s family is originally from Spain and over the years of us dating, I’ve really come to learn about Spanish cuisine and now love using certain spices that are common in traditional Spanish dishes. One spice that is commonly used is smoked paprika.
What is smoked paprika?
Smoked paprika is a Spanish cousin to the more widely used sweet Hungarian paprika. It’s made from pimiento peppers that have been dried and smoked over an oak fire, then ground into a fine powder. It has a deep red color and a smoky aroma.
Cauliflower rice has become one of my favorite side dishes because it cooks up so quickly, plus it adds a full serving+ of vegetables to a meal.
Cauliflower is a member of the cruciferous vegetable (or Brassicaceae) family- along with broccoli, cabbage, kale, Brussel sprouts, and some other less common varieties.
2 medium heads cauliflower, cored and riced (see tips in the note section)
1 tablespoon coconut oil
1 onion, finely chopped
3 cloves garlic, minced
¾ teaspoon smoked paprika
¾ teaspoon ground cumin
½ cup low-sodium chicken broth
2 tablespoons tomato paste
salt and pepper, to taste
¼ cup raw almonds, chopped
¼ cup parsley, finely chopped
Instructions
Heat coconut oil in a large skillet over medium-high heat. Add the onion and garlic, until the onion begins to turn translucent and is fragrant. Add the cauliflower and cook, stirring occasionally, for about 5 minutes, until cauliflower is tender. (Be sure to not overcook, or cauliflower will become mushy) Add paprika and cumin. Sauté for an additional minute.
In a small bowl, whisk together the chicken broth and tomato paste until smooth. Add to the skillet and stir to incorporate into the cauliflower rice. Cook for 2-3 minutes until liquid has absorbed and evaporated.
Season with salt and pepper. Sprinkle with almonds and parsley.
Notes
recipe adapted from Paleo magazine
To rice the cauliflower:
option 1: Take a box grater and grate the cauliflower into rice in a bowl
option 2: Place cauliflower florets in a food processor pulse until reach desired rice consistency.
option 3: Buy the pre-riced cauliflower, often found fresh in the produce section or frozen at your local grocery store.
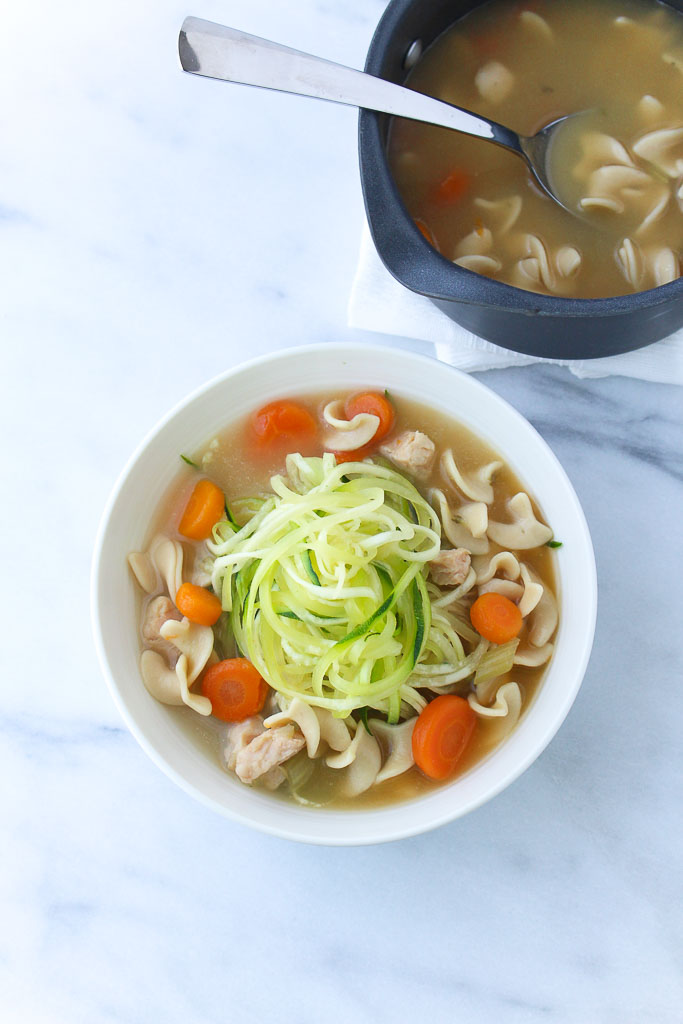
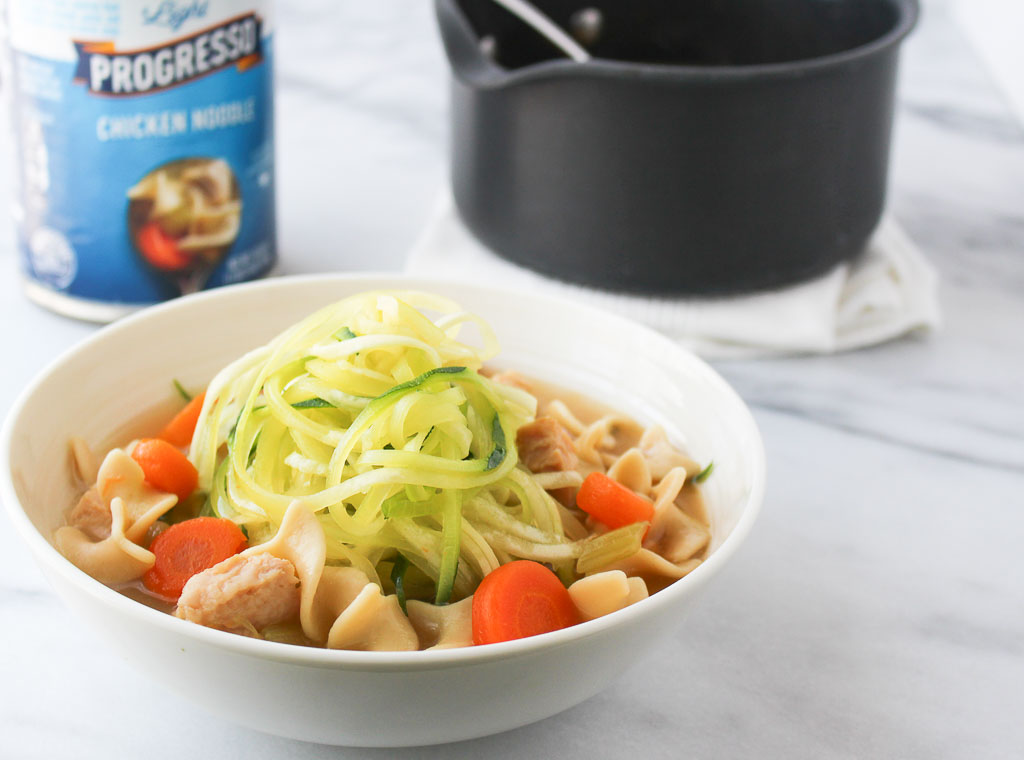
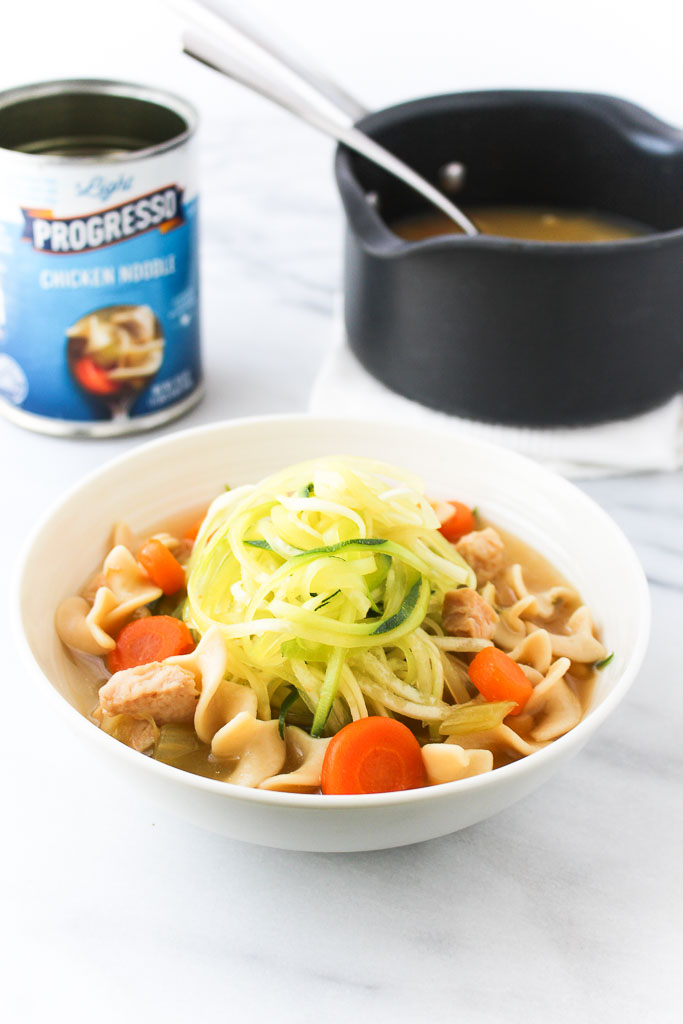
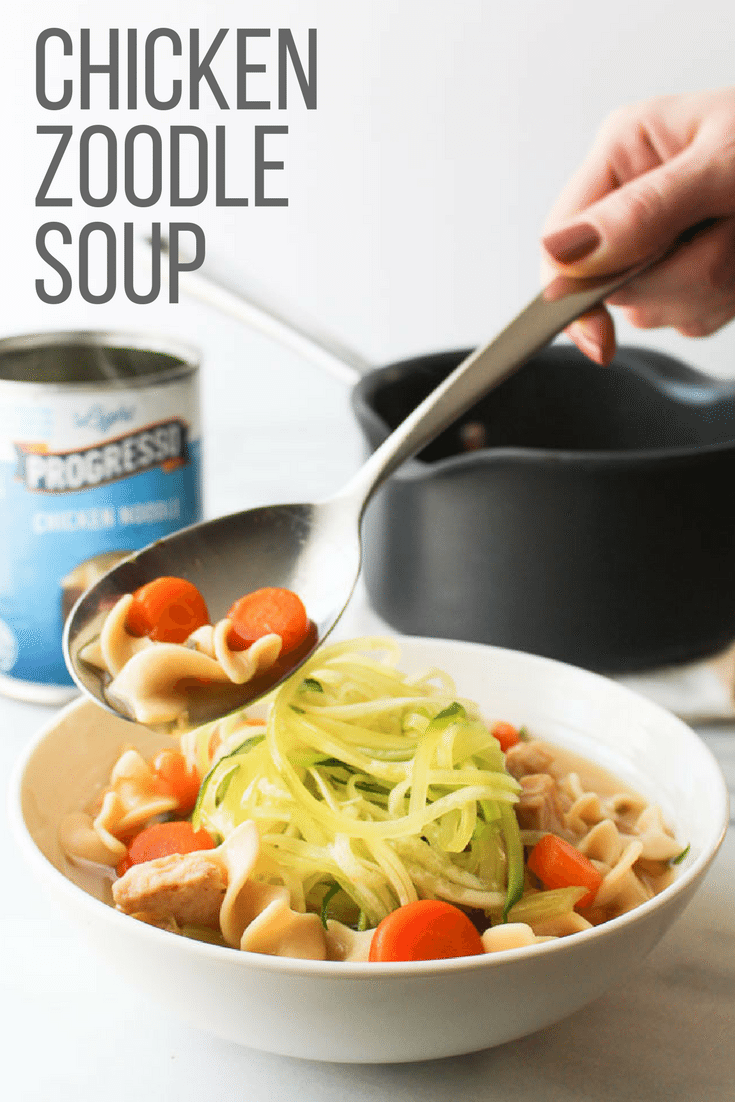
Soups on! Did you know February is Soup Season? I am kicking off Soup Season with this Chicken Zoodle Soup.This post is sponsored by the General Mills Bell Institute of Health and Nutrition on behalf of ProgressoTM and ReganMillerJones, Inc. I received free samples of the soup mentioned and was compensated for my time, but as always, opinions are my own! Thank you for supporting brands that make RDelicious Kitchen possible!
During this time of year, soup becomes almost an everyday staple for me. There is nothing better than cozying up to a warm bowl of soup on a cold winter day. If it is a soup from scratch or from a can or package, my goal is to bump up the veggies. I get a lot of questions about canned soup from clients. Canned soup is quick & easy. It’s convenience in a can! Whether you’re cooking for one or a family, prep a meal in minutes. There is a whole aisle dedicated to just soup at my local grocery store, so it can be challenging to decide which one would be the best choice.
First, check your ingredient list. ProgressoTM is now serving White Meat Chicken With No Antibiotics. Ever! They do not include any artificial colors or flavors.
Then, check the serving size. You may be surprised, in a can of soup there is usually more than 1 serving per container. In one can of ProgressoTM Light Chicken Noodle Soup there are 2 servings. By adding zoodles, this one can of soup turned into 4 servings, which now cuts the sodium in half per serving.
Have #SoupYourWay by pairing with zoodles, a side salad, or a sandwich.
By adding more veggies, it adds an extra punch of nutrition and flavor, helps stretch your dollar, which in turn will create more servings to also help lower the sodium content.ProgressoTM is out to prove that “vegetables” and “flavors” can co-exist.
Simply pour the hot soup over the zoodles and enjoy. It can’t get much simpler than that!
If you have leftovers, make sure you are cooling down and storing properly. Leftover soup can last in the refrigerator for three days and up to one month in the freezer. Follow these steps to store soups for later use.
Refrigerators and freezers cannot cool soups quickly enough for food safety protocols. Speed up the cooling process by placing the pot of soup in a bath of ice water in the sink. Stir soup to help release the heat.
Label and date large ziplock plastic bags. To help pour soup in the bag, place bag in the bowl and cuff the bag over the edges. Ladle soup into each bag, let out excess air and seal.
Lay bags flat in a single layer in the freezer. When completely frozen, stack bags to save space in the freezer.
Thaw overnight in the refrigerator. Reheat over medium-low heat, stirring occasionally.
This post may contain affiliate links. Read my privacy policy.
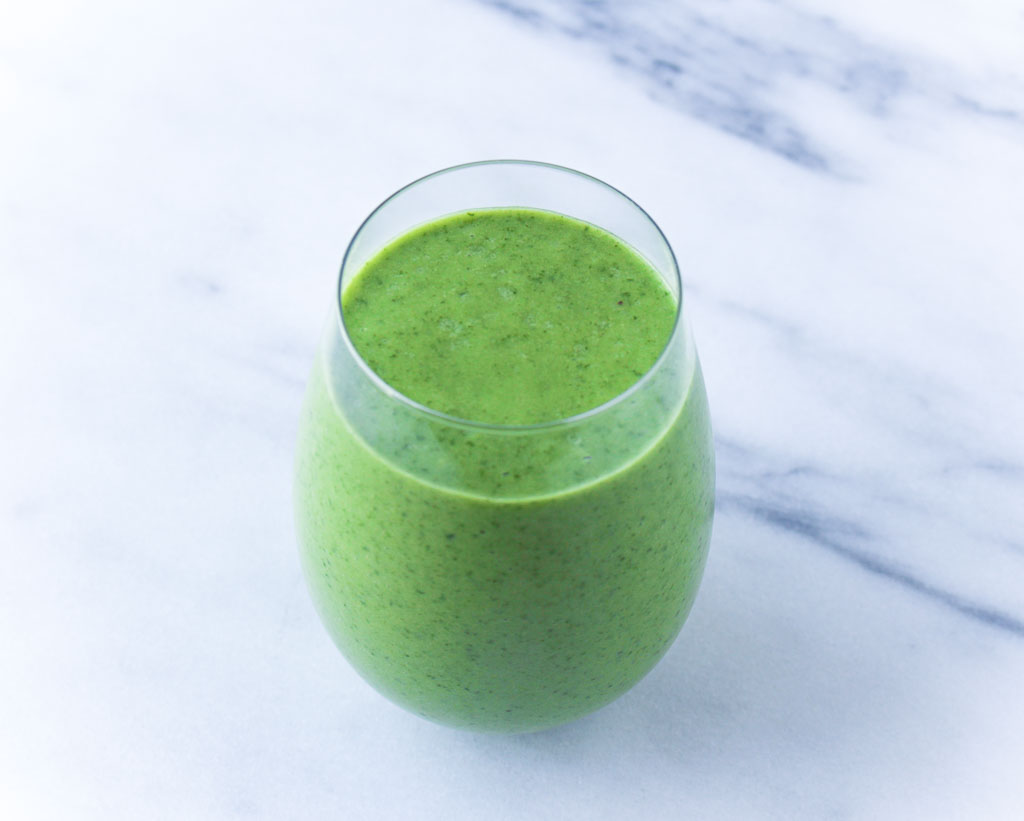
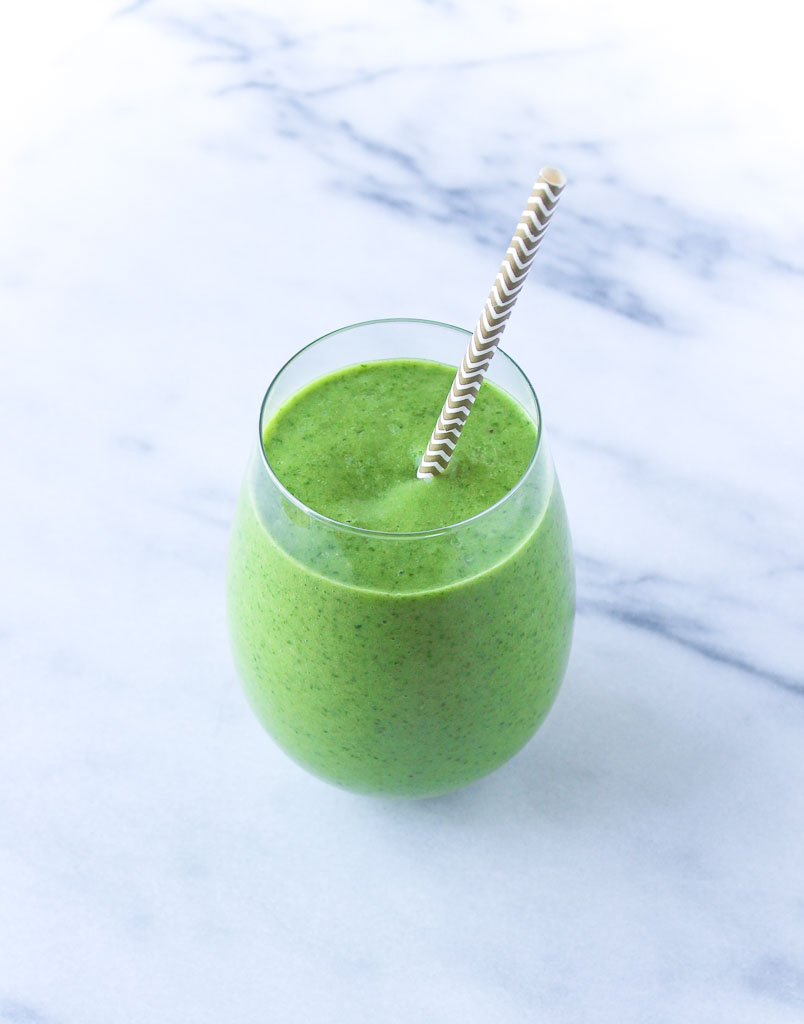
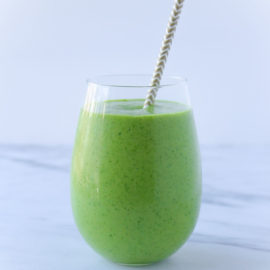
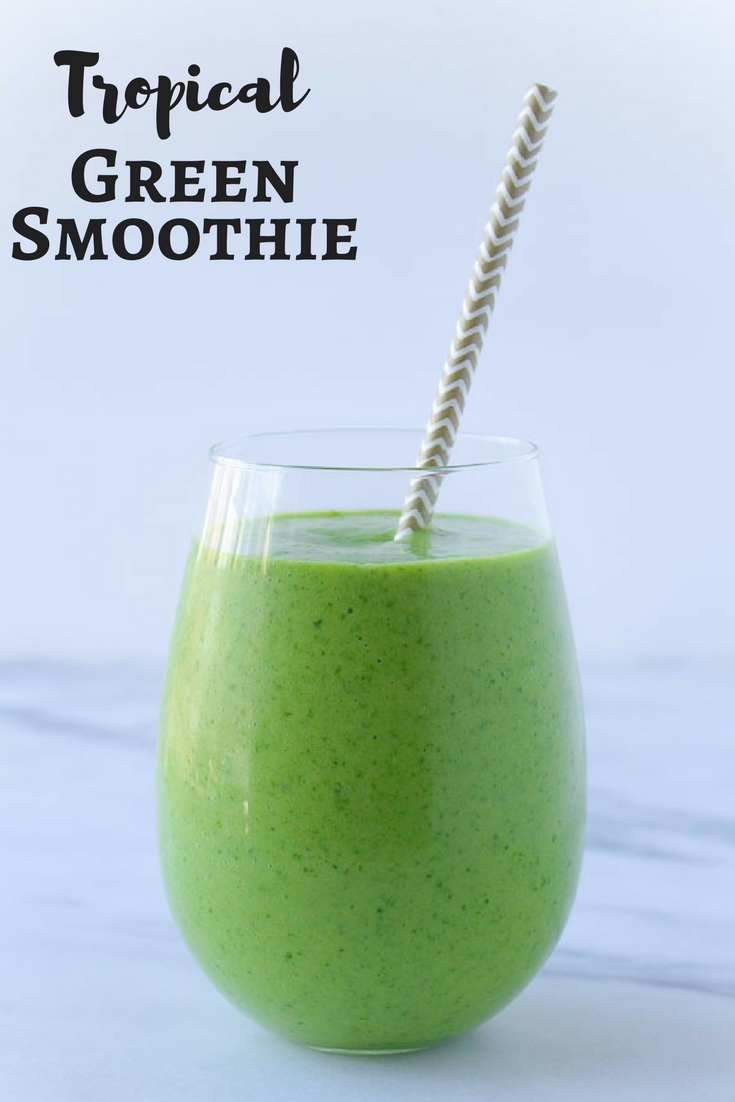
Trying to add more fruits and veggies to your daily eating habits? Add both first thing in the morning with this Tropical Green Smoothie. It’s February 1st – how is everyone doing on their New Year’s Resolutions so far? I saw a funny post on instagram that January was just a “practice round”. The problem setting big resolutions or goals, is you have to refine them in the beginning and make small habit forming changes to help you get to your end goal.
One goal that I have been discussing a lot lately this path month is simply including more fruit and vegetables within meals and snacks. Just simply go back to the basics. Are you really getting in the minimum recommendation of 5 fruits and vegetables a day? If the answer is no, this should be your starting point.
If eating healthier or maintaining a healthy weight is your goal for 2017, start here. Try to add a serving of fruit and/or vegetables at every meal and snack. If you are typically consuming 3 meals and 2 snacks per day (and now you are adding a fruit and/or vegetable to each) – BAM! You just reached the minimum daily recommendation for fruits and vegetables for the day. Smoothies are a fantastic way to add both fruit and vegetables in one meal! The secret to this smoothie is the frozen avocados. Now, of course, you can freeze them yourself, but now Welch’s prepackages them in the frozen aisle. Now, you won’t have to worry about the other portion of your avocado turning too quickly. The frozen avocado makes this smoothie so creamy, almost like a consistency of a milkshake.
This post may contain affiliate links. Read my privacy policy.
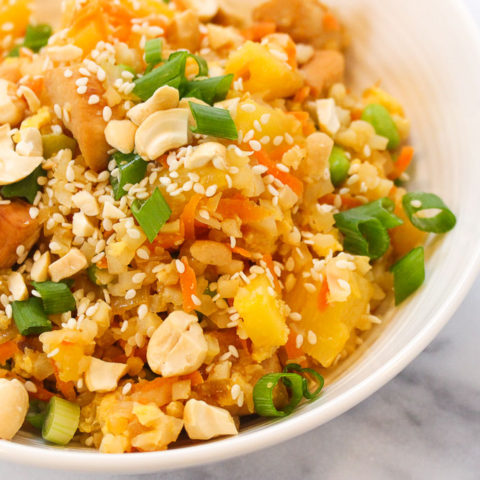
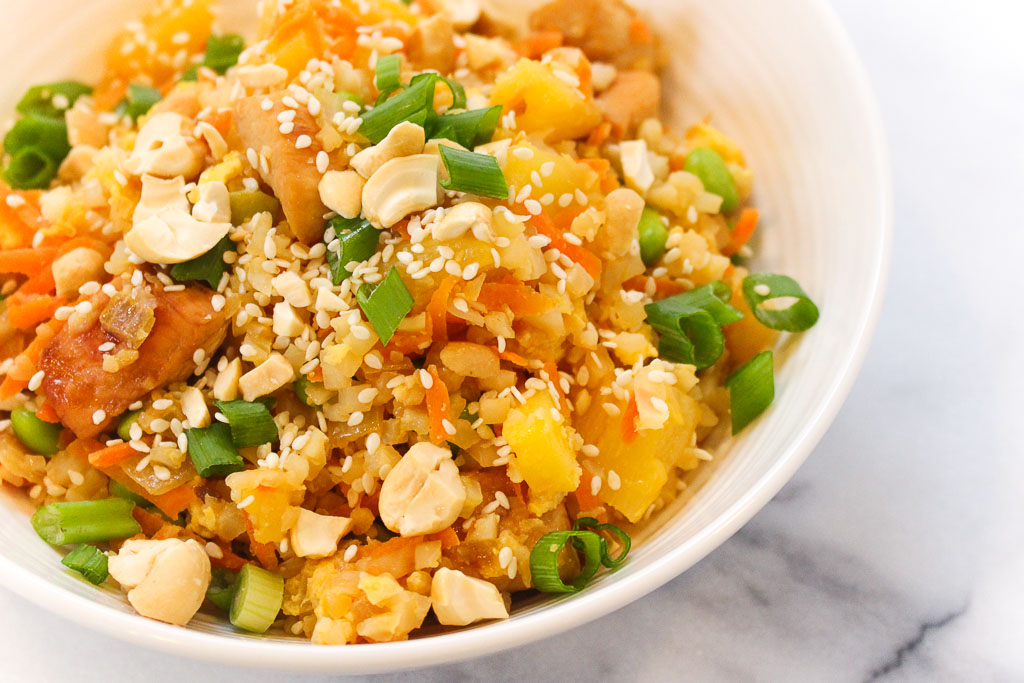
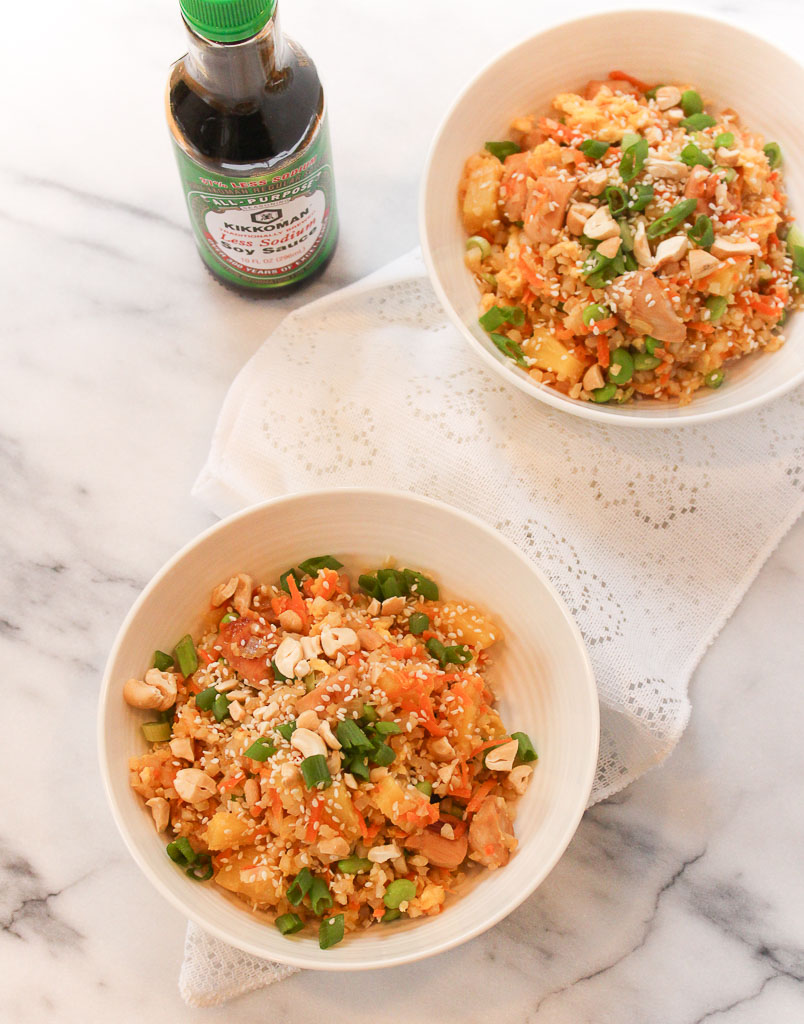
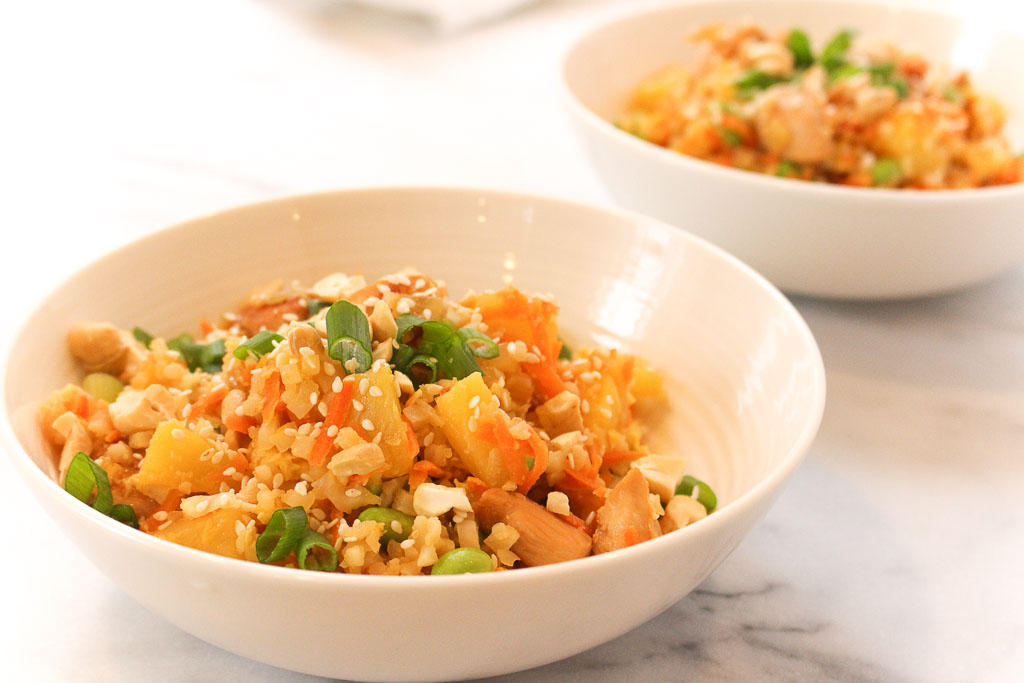
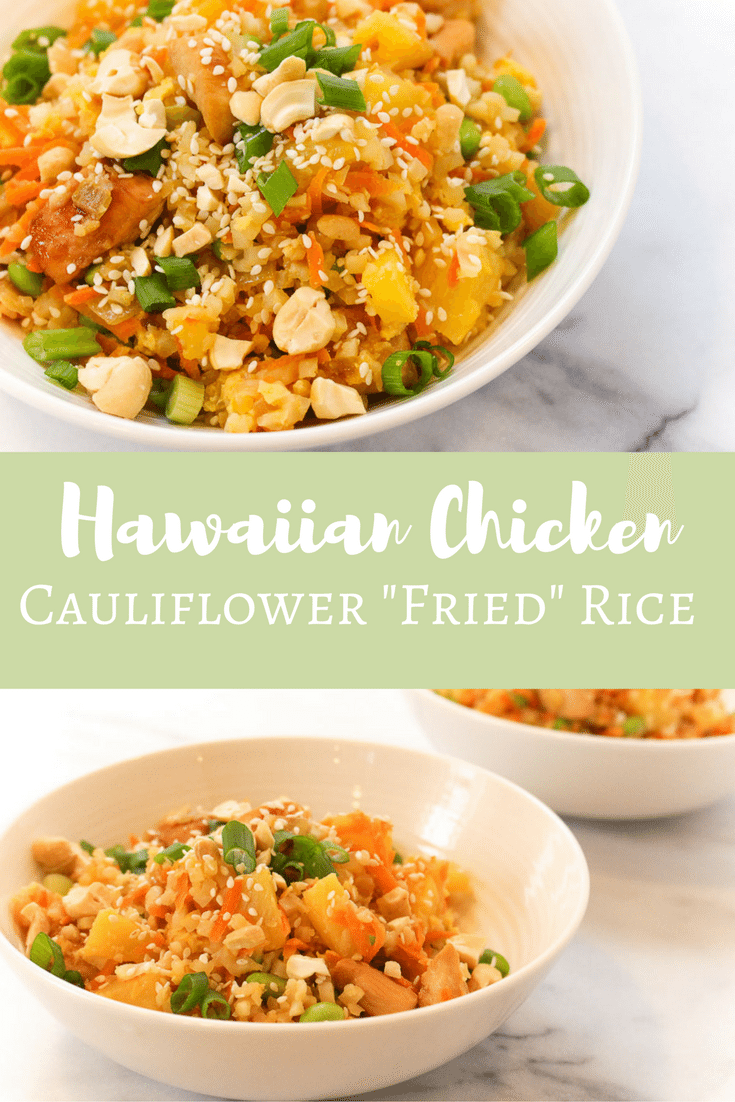
Skip take-out and make your own delicious fried rice, with this healthy twist. Try swapping out rice for cauliflower rice and creating this flavor packed Hawaiian Chicken Cauliflower “Fried” Rice. I received a free sample of Kikkoman soy sauce mentioned in this post. By posting this recipe I am entering a recipe contest sponsored by Kikkoman and am eligible to win prizes associated with the contest. I was not compensated for my time.
Have you jumped on board the cauliflower rice trend? This is one trend that I love because it adds more veggies to your meal! Many also opt into this ingredient swap idea because it is a lower carb option.
Your typical fried rice take-out may be packed with excess sodium, but by adding Kikkoman’s Traditionally Brewed Less Sodium Soy Sauce in this recipe can actually help reduce the amount of sodium in this dish. Soy sauce is often associated with being high in sodium, but culinary research indicates it’s an ingredient that can actually help reduce sodium in recipes. How? Soy sauce is rich in umami, a savory taste that helps round out the overall flavor of a dish and enhances the palatability of a wide variety of foods. In fact, a study published in the Journal of Food Science revealed that swapping soy sauce for salt reduces the sodium by up to 50% without decreasing consumer acceptance.
As you’ll see there is no additional source of sodium from any other ingredients in this recipe. By using 1/2 tsp. Kikkoman Soy Sauce in place of 1/2 tsp. table salt, the sodium content of the recipe is cut by 1000 mg. This isn’t just any cauliflower rice. I added a little tropical twist. As I am typing this recipe, I am dreaming of being on a tropical island away from the NJ snow. The addition of pineapple, not only adds that tropical flavor, but also the enzyme found in pineapple, bromelain, digests protein, softening the tissues in meat before cooking it, creating tender pieces of chicken. Looking to add more umami flavor to your recipes? Kikkoman offers a variety of less sodium products: Less Sodium Soy Sauce, 50% Less Sodium Gluten-Free Tamari Soy Sauce, Less Sodium Teriyaki Marinade & Sauce, and 50% Less Sodium Gluten-Free Teriyaki Marinade & Sauce.
1/4 cup + 3 tablespoons Kikkoman Traditionally Brewed Less Sodium Soy Sauce, divided
3 tablespoons honey, divided
1 (12 oz.) bag riced cauliflower (or 1 medium-sized head of cauliflower riced)
2 carrots, peeled and shredded
2 tablespoons + 1 teaspoon sesame oil, divided
1/2 medium onion, diced
1 cup frozen and shelled edamame, thawed
2 eggs, beaten
6 scallions, sliced
2 tablespoons, cashews, crushed
1 teaspoon sesame seeds
Instructions
In a bowl, combine 3 garlic cloves (minced), 1/4 cup pineapple juice, 1/4 cup soy sauce, and honey. Add the cubed chicken; stir to combine. Let marinade in the refrigerator for at least 1 hour.
Remove chicken from marinade. Discard marinade. Heat 1 tablespoon sesame oil in a large skillet over medium-high heat. Add chicken and cook for about 5 minutes, until internal temperature reaches 165 degrees F. Remove chicken from pan and set aside.
In a small bowl combine remaining pineapple juice, 3 tablespoons soy sauce, 1 tablespoon honey and 1 teaspoon sesame oil; set aside.
Heat 1 tablespoon of sesame oil in the same pan over medium-high heat. Add the onions and carrots. Saute for about 2 minutes; then add garlic; saute for another minute. Add the cauliflower and edamame. Saute until cauliflower is soft (but not mushy).
Turn pan down to low-medium heat. Make a well in the center of the pan and add the eggs. Stir gently in the center until starting to cook, then incorporate into the rest of the veggies. Stir in soy sauce mixture, scallions, pineapple chunks and chicken.
Top with cashews and sesame seeds before serving.
Recipe Card powered by
Don’t forget to check out all the other recipes that are slashing sodium with soy sauce!
This post may contain affiliate links. Read my privacy policy.
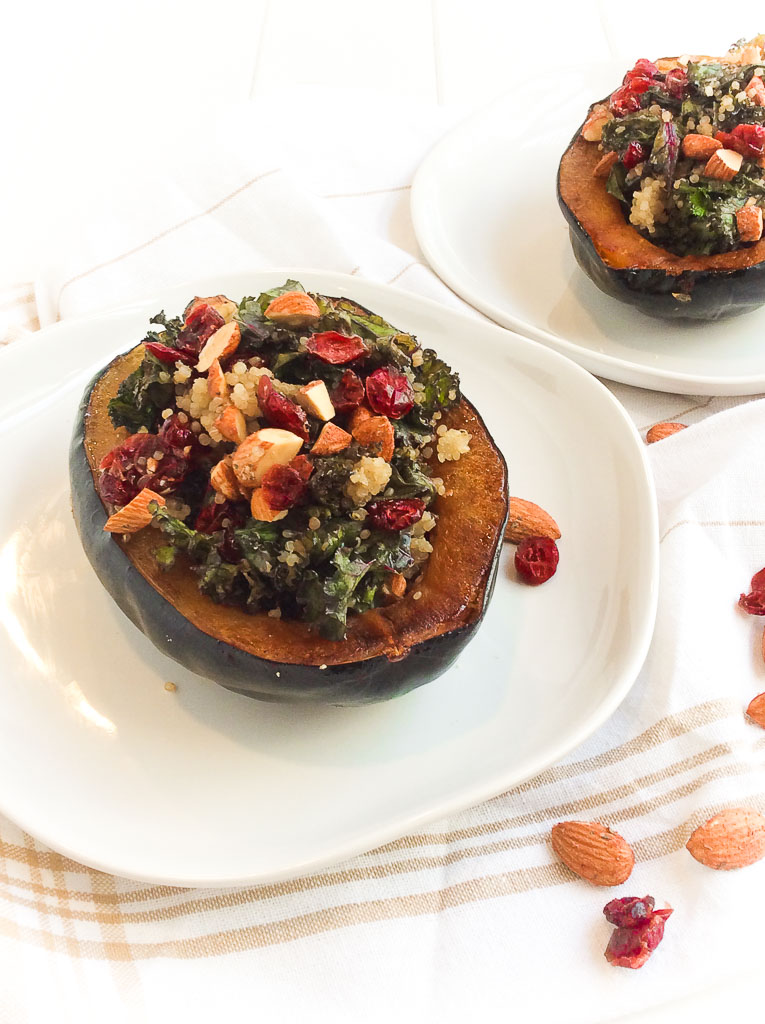
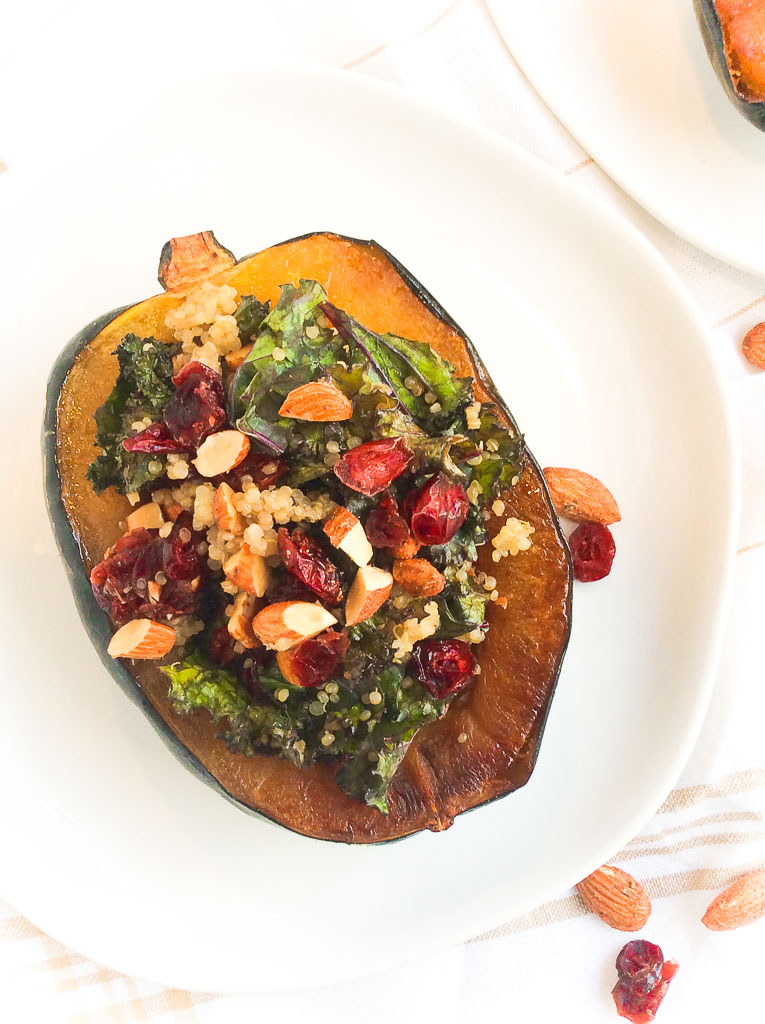
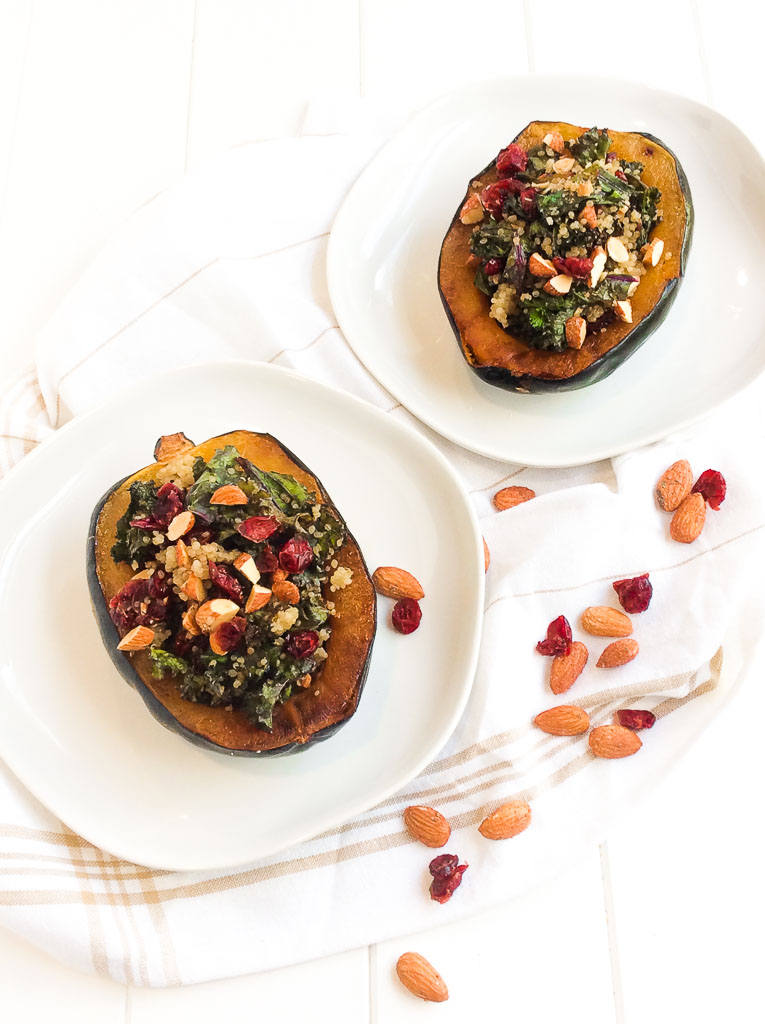
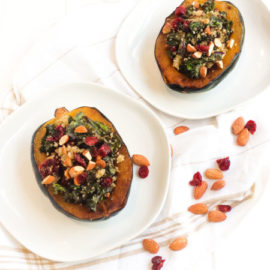
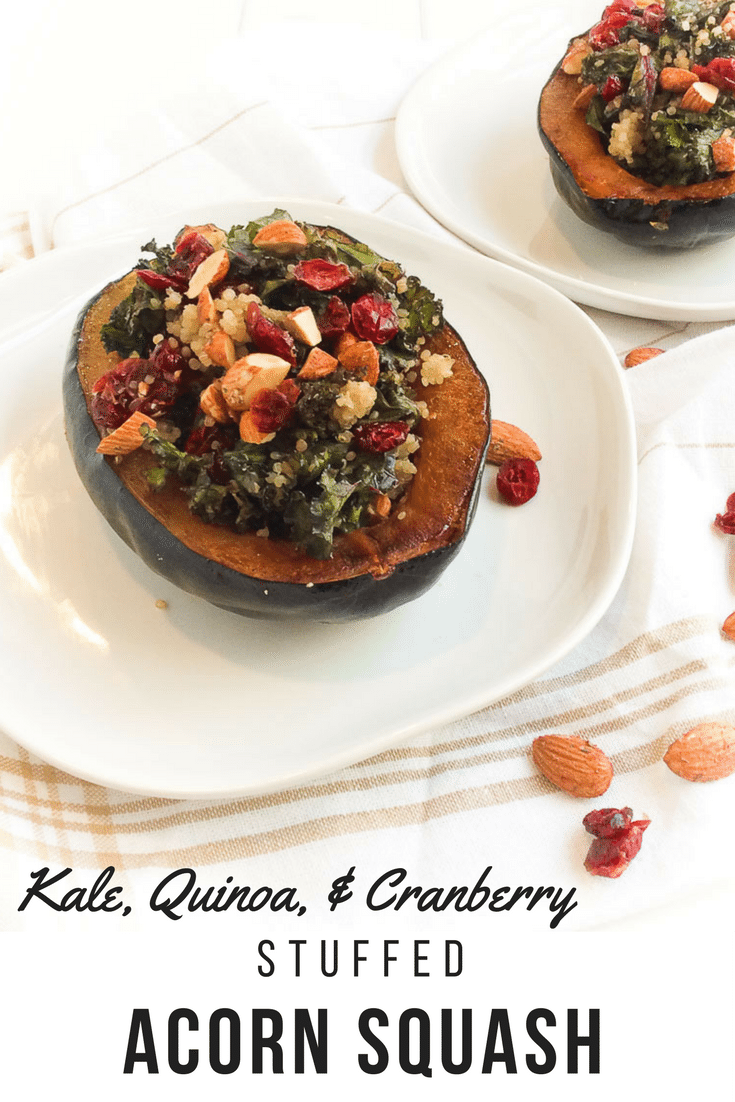
Sometimes dinner time turns into an episode of Chopped right in your own kitchen. This Kale, Quinoa, and Cranberry Stuffed Acorn Squash can easily be customized with ingredients you have in your refrigerator and pantry for a simple, wholesome meal.
The holiday season can be stressful at times. Considering I haven’t even started any of my holiday shopping, let alone even figuring out what I am getting anyone, that is adding a little stress to my plate these days. Things have been very busy here at RDelicious Kitchen, so I like to escape to my happy place and stress reliever – the kitchen.
There is something so soothing about chopping, stirring, and the aroma in the kitchen. With my days being jam packed it has been leaving little time for simple things, like grocery shopping. This recipe was inspired as I was in my imaginary world of being on an episode of Chopped. When you haven’t gone grocery shopping in a little while, you have to get creative!
Time-saving tip: Whenever I make a batch of quinoa, I always make extra and freeze the rest. This whole grain freezes well and easily heats up so you don’t have to start from scratch every time you are making quinoa.
My kale was on its last legs in my fridge, so in the saute pan it goes! Kale is one of those leafy greens that even after washing and trimming can last long in the refrigerator. When it begins to wilt, that’s when I throw that kale in my smoothies or saute pan – no waste!
When building a recipe, look to add different textures to the dish. I added almonds (my balsamic roasted almonds, to be exact) which adds that crunch factor, but also adds heart-healthy fats, fiber, and protein!
Slice acorn squash in half, lengthwise. Scoop out the seeds. Place squash on a baking sheet coated with cooking spray, flesh side down. Roast squash until for tender, about 30-50 minutes. (Exact roasting time will depend on the size and variety of your squash.
In a large skillet over medium-high heat, add the olive oil to the pan. Add kale and cook until slightly wilted. Add the balsamic vinegar and let cook for an additional 2 minutes.
Stir in the quinoa, dried cranberries, and almonds, and cook until warmed through.
Full acorn squash with kale, quinoa, and kale mixture and serve.
Notes
*for an extra kick of balsamic, add balsamic roasted almonds
This post may contain affiliate links. Read my privacy policy.
This past September I traveled to California for the first time. I was so fortunate that California Almond Board invited me on an amazing trip to the almond orchards in Lodi, California with a group of amazing Registered Dietitians and food bloggers. We learned a wealth of information of all things almonds, including sustainability, growing methods, almond life cycles and nutrition research. Disclosure: I was provided with free travel and accommodations to the California Almond Orchard experience. I was not additionally compensated for my time or to write this post.
Ever wonder where those almonds that are in your trail mix, granola bars, and cereals are from? The almond lifecycle has many stages before they end up in your kitchen cabinets.
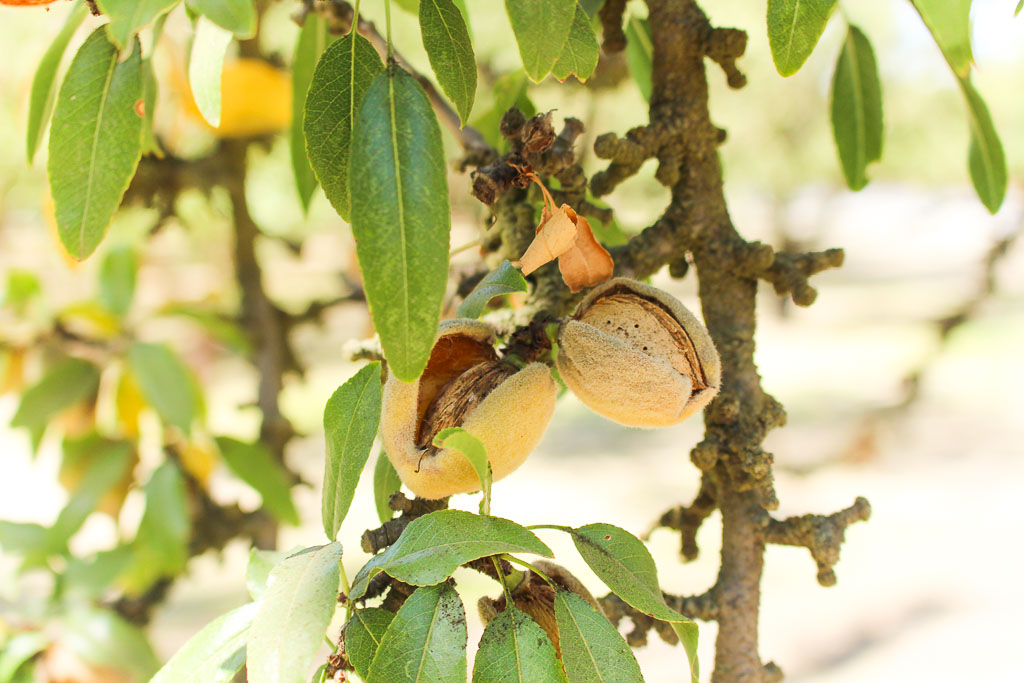
Did you know, there are more than 30 different varieties of almonds? 10 of them comprise the majority of almonds produced in California. 80% of the world’s almonds are produced in California, and from raw almonds and almond butter to almond flour, almond milk, and almond oil. The Central Valley of California is the perfect spot for almonds to grow due to their mild, wet winters and hot, dry summers. The Almond Lifecycle: November – February: Almond trees go through a period of dormancy when the cold weather lets them sit back, relax and store up almond nutrients for next year’s crop. Late February – early March: Almond tree buds burst into light pink and white blooms in preparation for pollination. Nonpareils are among the first to bloom, while other varieties, such as Carmel and Mission, bloom later.
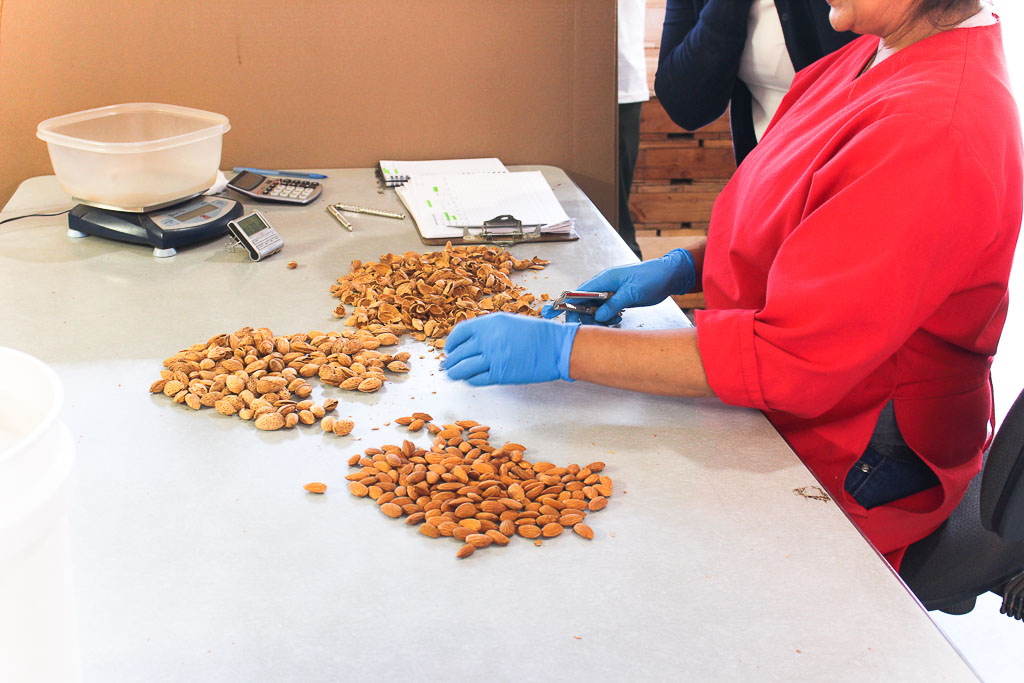
Many almond trees are not self-pollinating, so bees provide the missing piece of the puzzle. Populations of bees are brought to the orchard to carry pollen and initiate crop development. March – June: Almonds continue to mature, with the shell hardening and kernel forming. Also at this time, green almonds are harvested for various culinary uses.July – early August: Almond hulls begin to split open exposing the almond shell and allowing it to dry. Shortly before harvest, the hulls open completely. Mid-August through October: Mechanical tree “shakers” harvest the almonds by vigorously shaking them to the ground. The almonds then dry naturally for 8–10 days in the orchard before they are swept into rows and picked up by machine.After harvest, almonds go to a huller/sheller where the kernels pass through a roller to remove the hull, shell, and any remaining debris. Next stop: the handler for sizing, where the almond kernels drop into separate bins according to size.
After sizing, almonds are kept in controlled storage conditions to maintain quality until they’re either shipped or further processed into any variety of different almond forms for diverse culinary uses. (source: California Almonds)
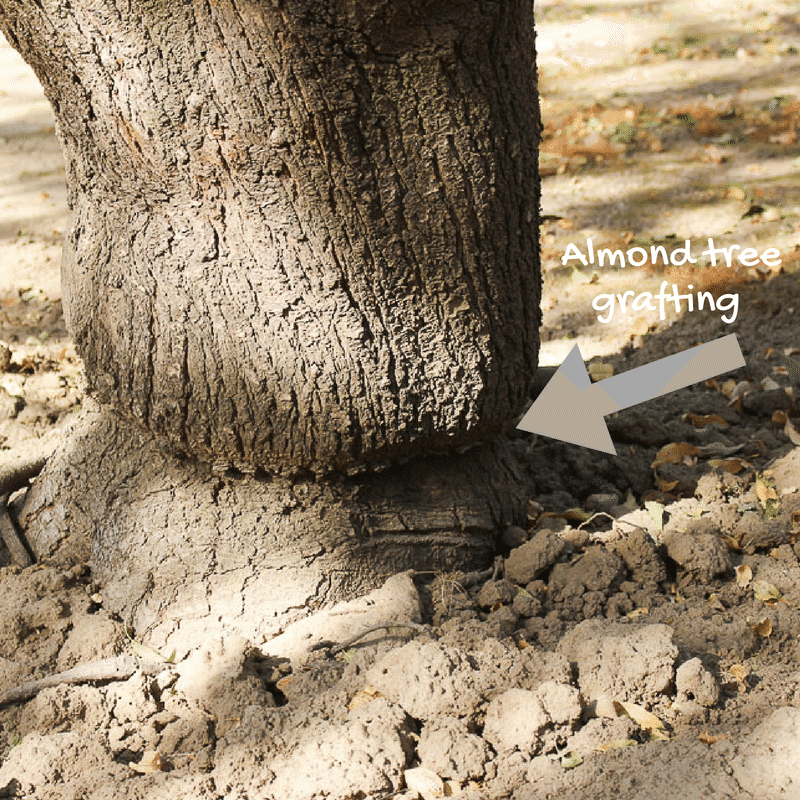
Did you know – Almond trees are grafted on the roots of peach or plum trees for a stronger root base. The almond trees are grown in a nursery, then grafted onto the root of a peach or plum tree to grow to maturity. Through the orchard you are able to see the point where they were grafted since they overlap each other. Did you know there are three parts to an almond? The hull, shell, and kernel make up this mighty little nut and all parts are used. The hull is the dry and fuzzy outer later. Hulls are sold as livestock feed, which reduces the amount of water used to grow other feed crops. The shells go to various alternative farming uses such as livestock bedding. The kernel, which most think of when thinking about almonds, is the nutrient-rich almond we eat. Each serving (28 g) contains 6 grams of energy-packed protein, 4 grams of hunger-fighting fiber, 13 grams of “good” unsaturated fat and only 1 gram of saturated fat.
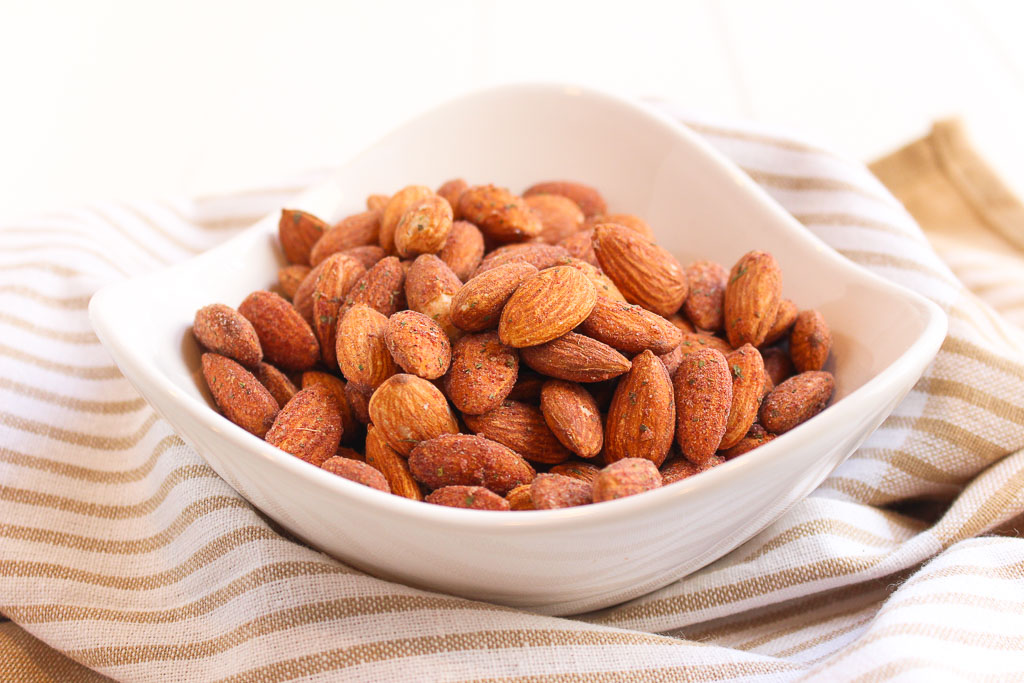
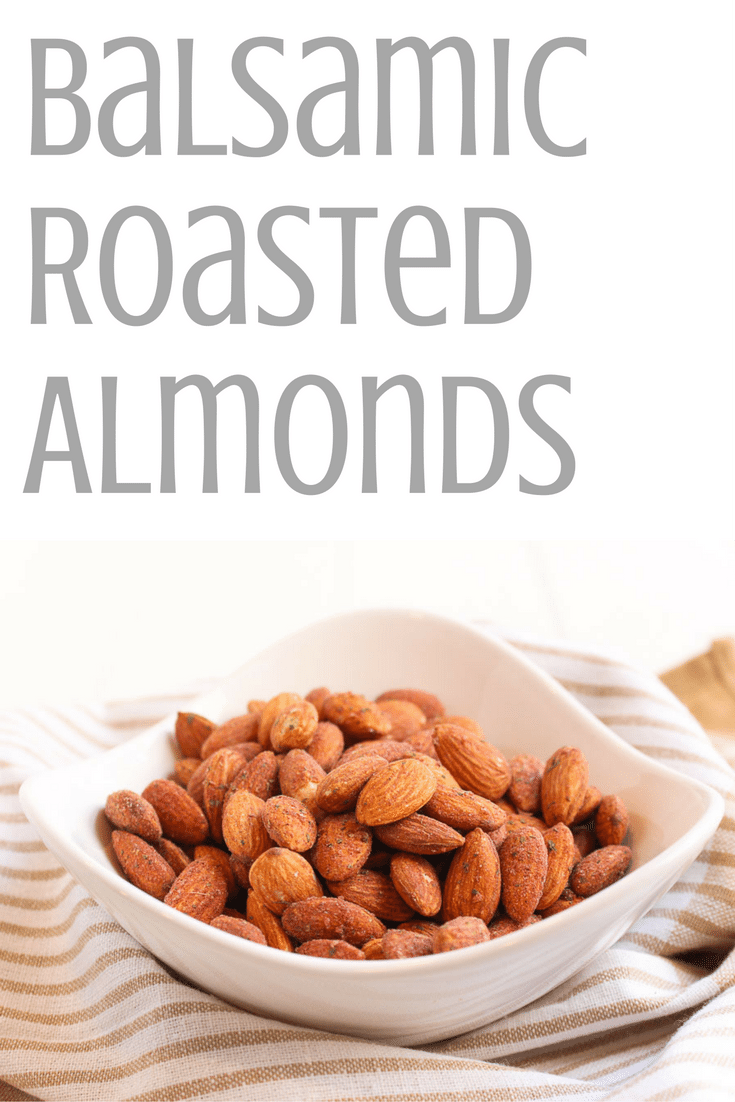
Now that I have you craving almonds, here is a delicious recipe to jazz up your almond snacks. Try these Balsamic Roasted Almonds. Just a few simple ingredients and snack time is jazzed up a little.
Warning: these almonds are addicting. The whole batch was gone in less than a week. Add them to salads, pair with a piece of fruit, the possibilities are endless. Be on the look out for another recipe soon using these almonds!
Place almonds in a small bowl. Pour the balsamic vinegar into the bowl, stir to coat the almonds. Let sit for one hour.
Pre-heat the oven to 350˚. Drain the vinegar from the almonds and pat almonds dry. Add sea salt and rosemary to the bowl and stir well to coat the almonds evenly. Spread almonds evenly onto a cookie sheet and bake for 8 minutes (stir the almonds halfway through cooking).
Remove from oven and let cool for 30 minutes. Store almonds in an airtight container.
Recipe Card powered by
Thank you California Almonds for this amazing experience! To learn more about California Almonds check out their website. They have great resources for health professionals!
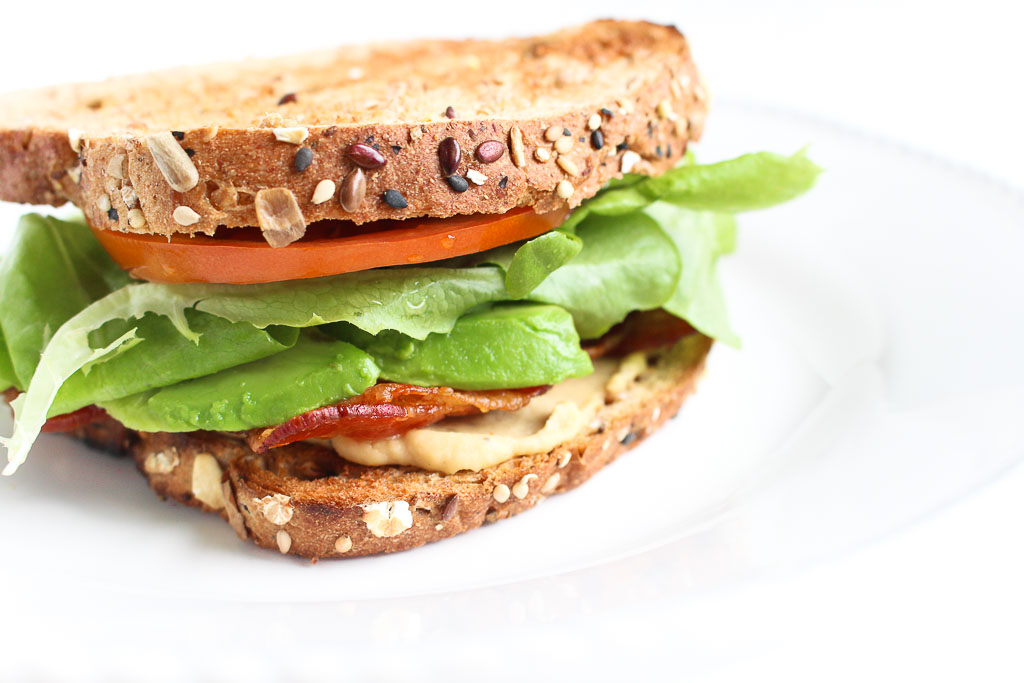
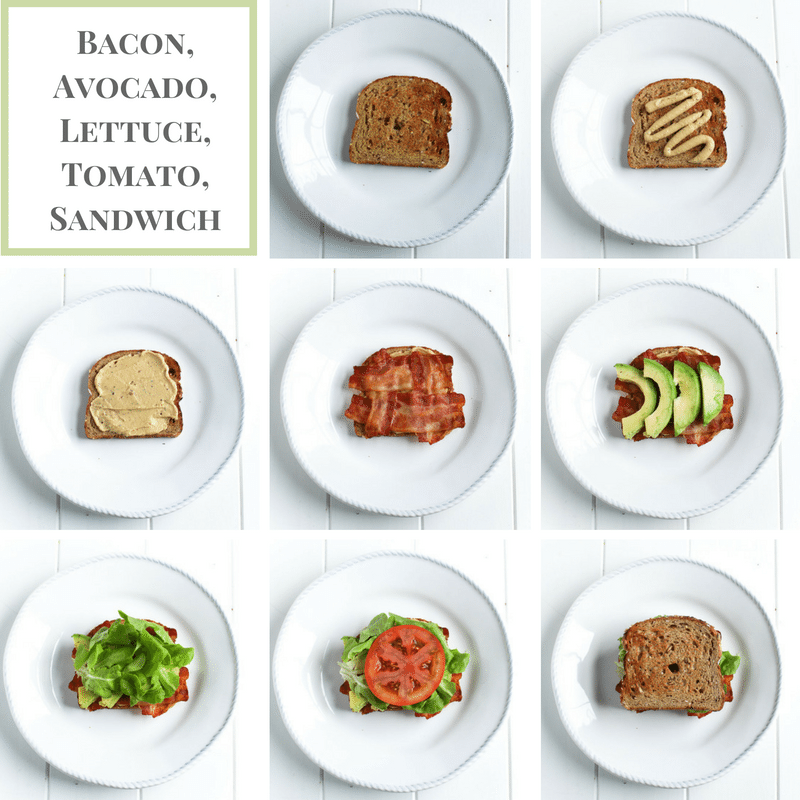
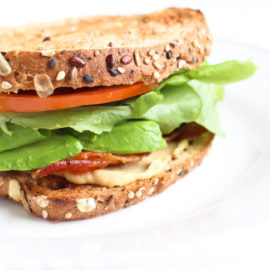
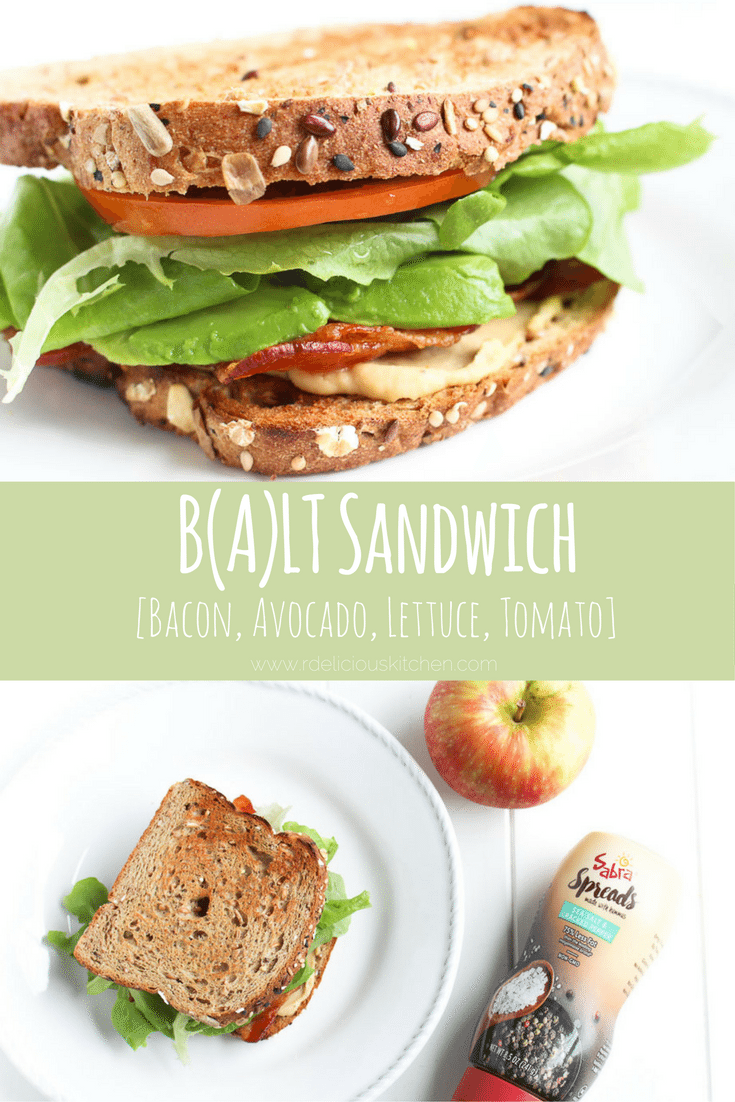
A classic B.L.T. with a little twist! Adding the “A” (avocado) and a creamy spread takes this average BLT up a notch. Don’t skip out on quality ingredients when you assemble this sandwich. I received free samples of Sabra Spreads mentioned in this post. By posting this recipe I am entering a recipe contest sponsored by Sabra and am eligible to win prizes associated with the contest. I was not compensated for my time.
Have you seen the new Sabra spreads hit the shelves at your local grocery store? I was excited when Sabra sent me all three flavors to experiment with in the kitchen. The flavors are honey mustard, garlic herb, and sea salt and cracked pepper. I had so many recipe ideas running through my head. These spreads will definitely be making an appearance here in the future. With these fresh ingredients and flavors the new Sabra spreads will become a staple condiment in my refrigerator. When it comes to a BLT, you need quality ingredients. I decided just a BLT just wouldn’t suffice and needed a little extra flavor. I turned it into a B.A.L.T. with slices of avocado. I love sandwiches when you can really taste all ingredients in every layer.
To build your perfect B.A.L.T. you have to start out with quality bread. I like a hearty whole wheat bread. Next, comes the bacon. Not all bacon is created equally. Look for pork shoulder bacon, it is a much leaner choice. Pork shoulder comes from a leaner part of the pig (the shoulder) which contains less fat than pork belly, which majority of bacon comes from. Then comes the avocado. You can mash it. I decided to keep it as slices. Whatever you like best! The lettuce I chose was a Boston bib lettuce. The leaves are tender. If you prefer more of a crunch, go for romaine. Of course, this jersey girl has to choose a juicy plump jersey tomato sliced on top.
The part that ties it all together is the Sabra spread. This is a much healthier choice than adding mayo as a condiment. The new Sabra spreads contain 75% less fat than mayo and are convenient for sandwiches now that it is in a squeeze bottle. Of course you can add any of the new flavors, but I wanted to keep it in the simple side and added the sea salt and cracked black pepper.
This post may contain affiliate links. Read my privacy policy.
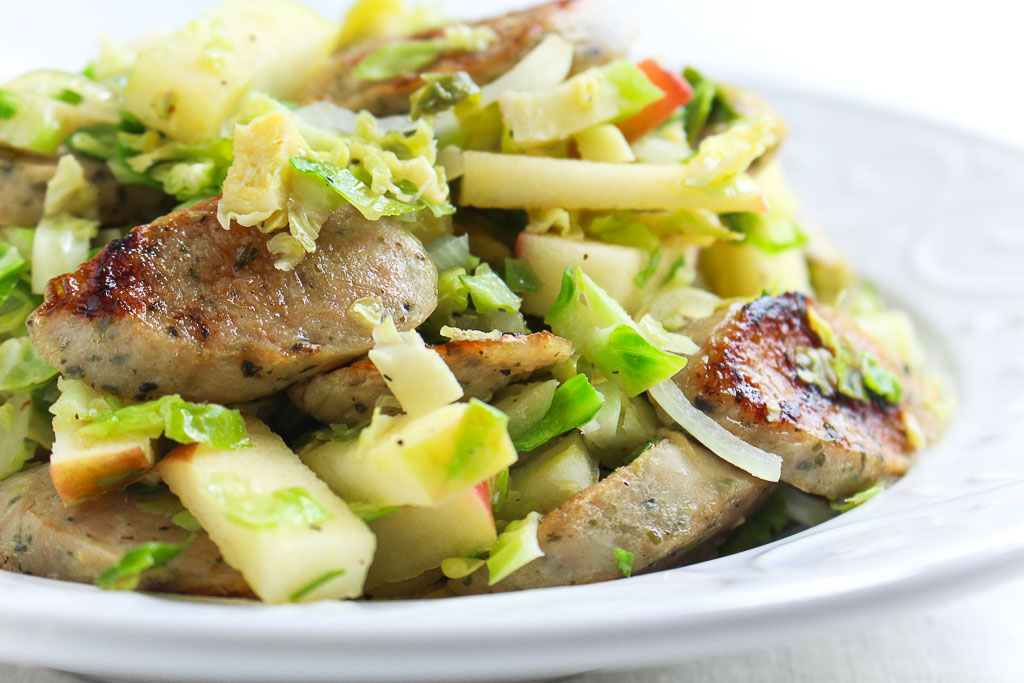
I feel like poor Brussels sprouts have always had bad reputation. Don’t turn up your nose to nutritious Brussel sprouts. Cook them in flavorful ways like these Sautéed Brussels Sprouts with Apples and Chicken Sausage. Growing up did your parents tell you to “eat your Brussel sprouts!”? Some still cringe when they hear that. I would guess 9/10 times those people were eating boring, unflavored, under seasoned sprouts.
I find that with many vegetables. Try cooking veggies in a variety of cooking methods and season in different ways. I showcased this idea in a cooking class once, where we cooked cauliflower in 4 different ways: steaming, boiling, roasting, and mashing with a variety of spices and herbs. It was interesting to hear everyone’s views of which method they preferred. Just because you don’t like a vegetable one way, doesn’t mean you won’t like in another way.
Don’t count out Brussels sprouts just yet, until you try this Sautéed Brussels Sprouts with Apples and Chicken Sausage recipe! Brussels sprouts are part of the Brassica family of vegetables, which also includes cabbage, broccoli, kale, and collard greens. They are rich in many valuable nutrients. They are an excellent source of vitamin C and vitamin K. They are a very good source of numerous nutrients including folate, vitamin A, manganese, dietary fiber, potassium, vitamin B6 and thiamin (vitamin B1) and a good source of omega-3 fatty acids, iron, phosphorus, protein, magnesium, riboflavin (vitamin B2), vitamin E, calcium, and niacin. What is your favorite way to enjoy Brussels sprouts?
1 pound Brussels sprouts, shaved with a food processor or roughly chopped
2 tablespoons apple cider vinegar
1 honeycrisp apple, julienne
salt and pepper, to taste
Instructions
Slice the chicken sausage on a bias (or simply on an angle). In a large pan, heat 1/2 tablespoon olive oil and cook chicken sausage. Remove from pan and set aside.
Add remaining olive oil in the pan and sauté onions and garlic until caramelized. Add shredded Brussels sprouts and cook for an additional 2-3 minutes or until desired doneness. Add apple cider vinegar and cook for an additional minute.
Add apple slices and cook until just warmed through. Add the chicken sausage back in and toss until combined. Season with salt and pepper, to taste.
Recipe Card powered by
FREE Ebook
Get on the list and download my free Knife Basics & Skills Ebook!
This website uses cookies to improve your experience. We'll assume you're ok with this, but you can opt-out if you wish.AcceptRejectRead More
Privacy & Cookies Policy
Privacy Overview
This website uses cookies to improve your experience while you navigate through the website. Out of these, the cookies that are categorized as necessary are stored on your browser as they are essential for the working of basic functionalities of the website. We also use third-party cookies that help us analyze and understand how you use this website. These cookies will be stored in your browser only with your consent. You also have the option to opt-out of these cookies. But opting out of some of these cookies may affect your browsing experience.
Necessary cookies are absolutely essential for the website to function properly. This category only includes cookies that ensures basic functionalities and security features of the website. These cookies do not store any personal information.
Any cookies that may not be particularly necessary for the website to function and is used specifically to collect user personal data via analytics, ads, other embedded contents are termed as non-necessary cookies. It is mandatory to procure user consent prior to running these cookies on your website.

 Way back when one of my first jobs was at a bagel shop. It was one of my favorite jobs. I worked with my friends and got to enjoy endless bagels and coffee. The only downside was getting to work at 5:00 am on a weekend.
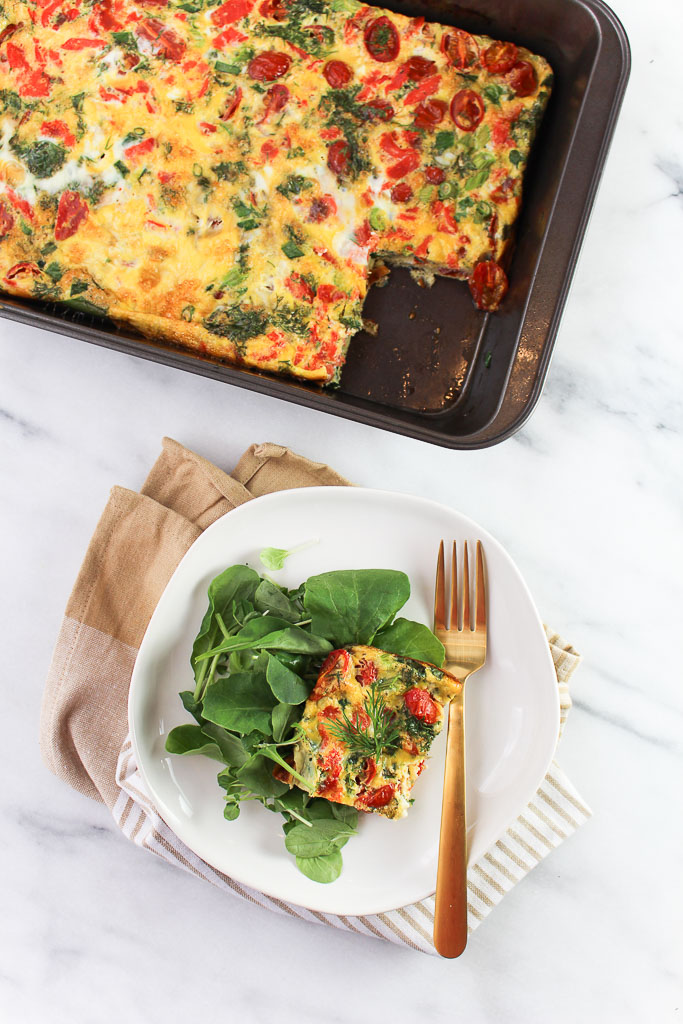 Now, I love enjoying a leisurely brunch on the weekend. One thing the bagel shop introduced me to was smoked salmon or also known as lox. I still remember this one customer who always ordered – an everything bagel with cream cheese, lox, tomato, red onion, and capers. Of course, I had to try it.
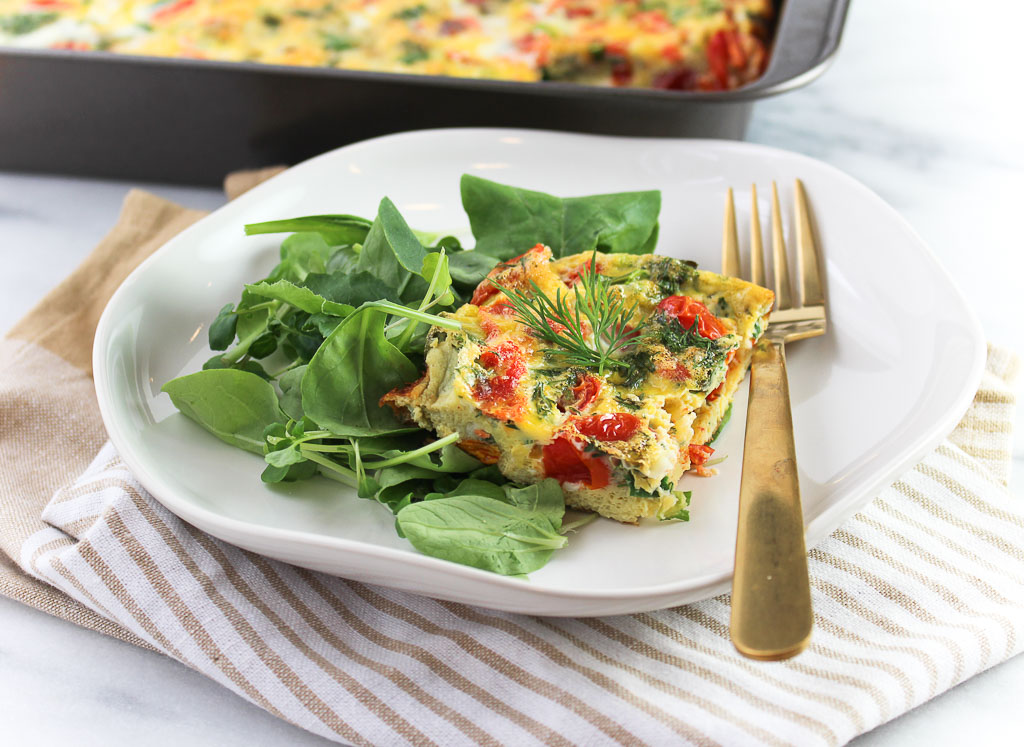 That’s when my smoked salmon love affair began. It is now a staple at my brunches. I love the addition of the smoked salmon in this frittata. Plus, baking it in the sheet pan makes it so easy to serve!
 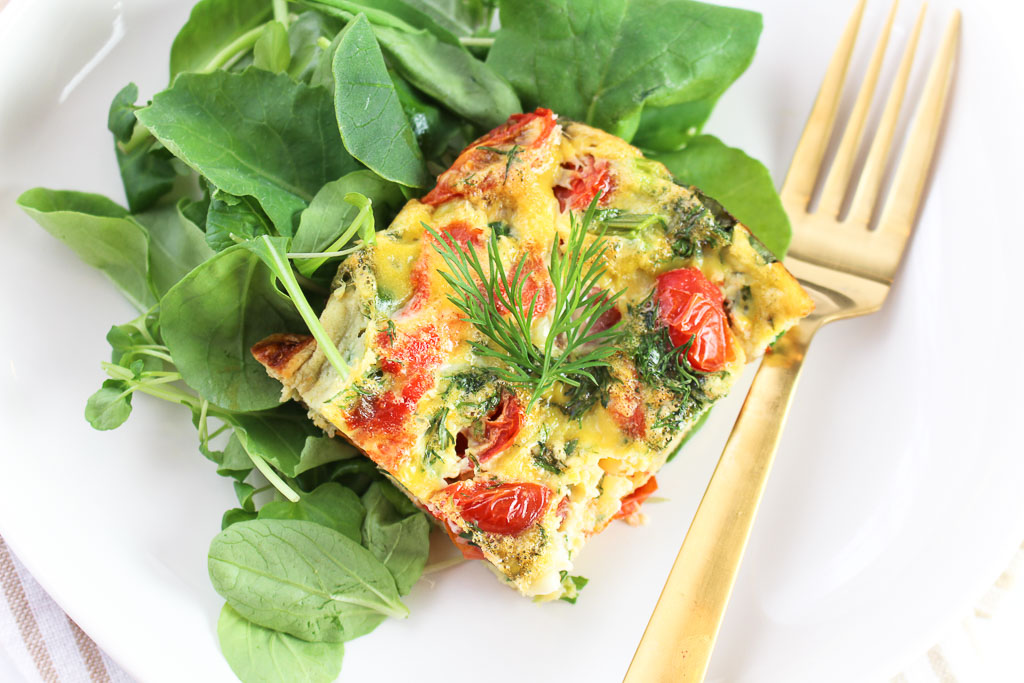 Often times the term lox and smoked salmon are used interchangeably, but there is a difference. Lox was traditionally only made from the belly of salmon. The salmon is salt-cured or brined but never cooked or even smoked. It has a very smooth silky texture. Smoked salmon is a much more generic term than lox. Smoked salmon can be made from any part of the fish, and it starts with salt curing or brining, just as in lox.