Cheesy Millet with Sautéed Vegetables and Fried Egg

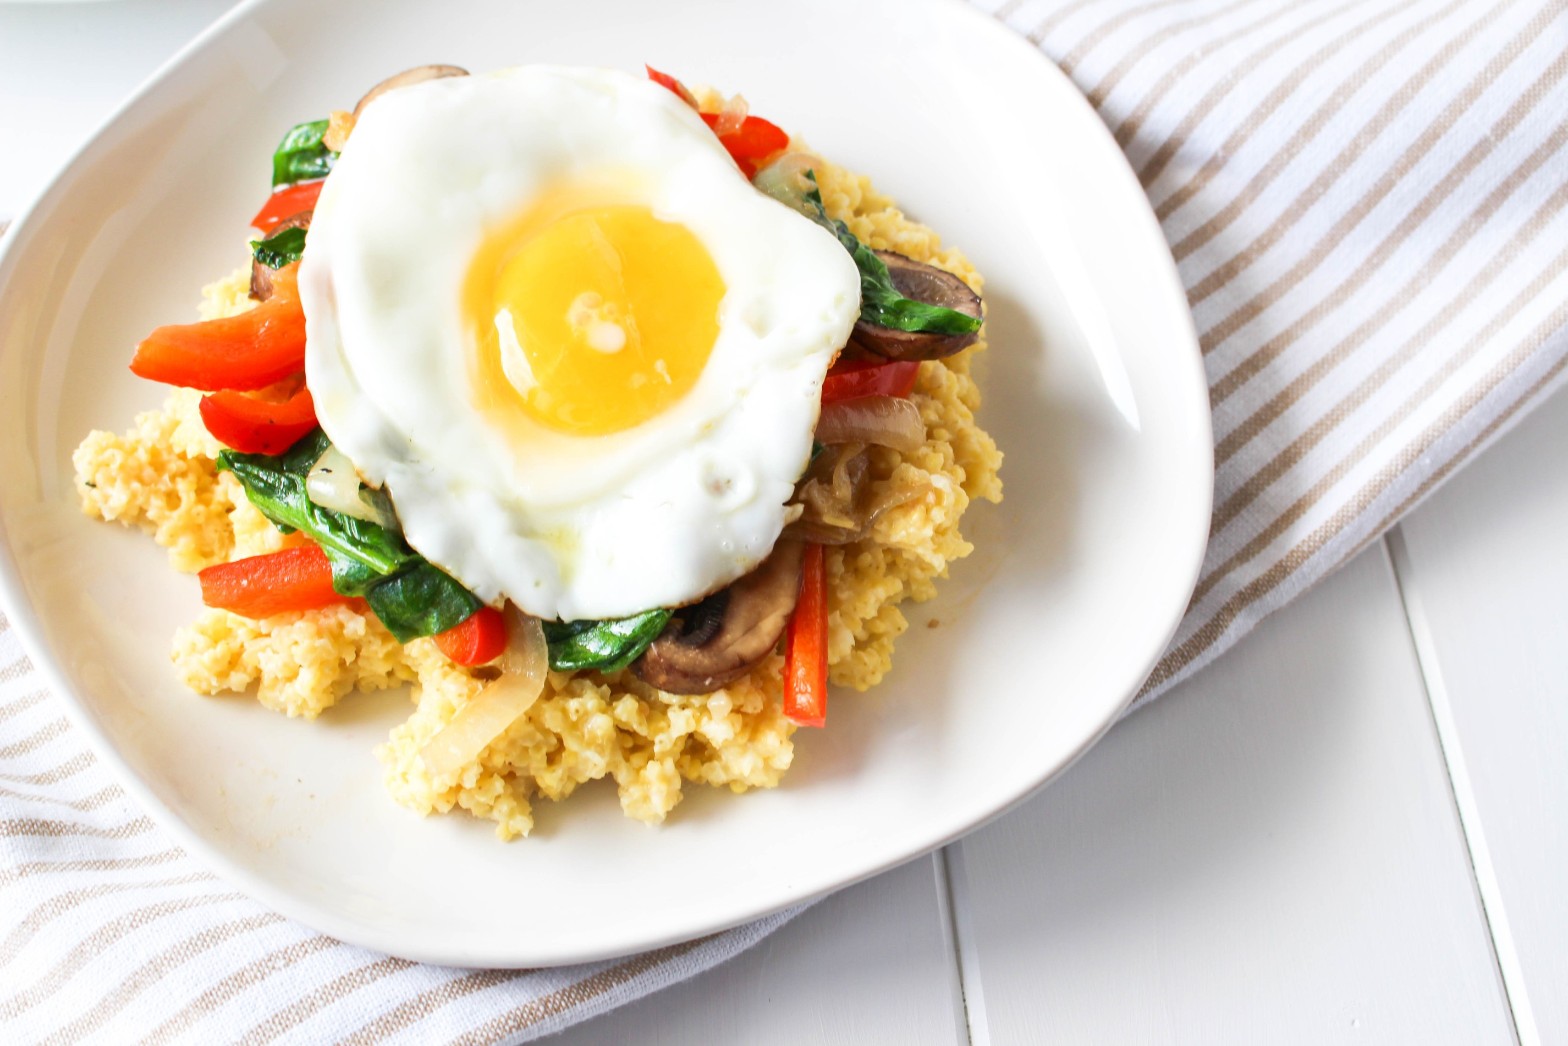
Enjoy for breakfast, lunch or dinner – This Cheesy Millet Sautéed Vegetables and Fried Egg is great at any meal! With whole grains, vegetables, and protein, this dish will keep you satisfied.

Cheesy Millet with Sautéed Vegetables and Fried Egg via RDelicious Kitchen @rdkitchenOn Thursday, I am heading to Maine for the Cabot Fit for the Beach to Beacon 10k race on Saturday. I’ve never been to Maine before and I am super excited to meet up with some blogger friends and make some new ones! I am still in complete shock that I was selected to be part of the Cabot Fit team.

Am I ready for this race? I’m as ready as I can be. Training didn’t necessarily go according to plan, but race day is a whole other ball game that I thrive on. No training run compares to the race day feeling. The positive vibe all around you with everyone cheering you is the absolute best feeling. I have no race time in mind. This is actually the first 10k distance I will be racing at. I have run 5k’s and three half marathons, but no 10k’s just yet. I’m really excited to see how I will do this weekend!

Cheesy Millet with Sautéed Vegetables and Fried Egg via RDelicious Kitchen @rdkitchen
Cabot Fit Team 2015

The team includes:
Anne // fANNEtastic Food
Deanna // Teaspoon of Spice
Whitney // Little Leopard Book
Kita // Pass the Sushi
Kelly // Kelly the Culinarian
Brianne // Cupcakes and Kale Chips
Diane // Cape Fear Nutrition
& Myself!

Cheesy Millet with Sautéed Vegetables and Fried Egg via RDelicious Kitchen @rdkitchenWith Cabot sponsoring this trip, it’s perfect timing to feature this cheesy delicious recipe. I’m obsessed with this recipe creation. Since shooting these photos, I’ve made it an additional 3 times.. not even kidding! It has Cabot cheddar cheese, and a fried egg on top, do you need anything more?

Cheesy Millet with Sautéed Vegetables and Fried Egg via RDelicious Kitchen @rdkitchenHave you ever had millet? It is a whole grain with comparable nutrition facts to quinoa with a good source of protein and fiber. Plus, millet is often a cheaper whole grain variety. With whole grains, vegetables, and protein, this is a well balanced meal that can keep you full and satisfied for hours.

Cheesy Millet with Sautéed Vegetables and Fried Egg via RDelicious Kitchen @rdkitchen
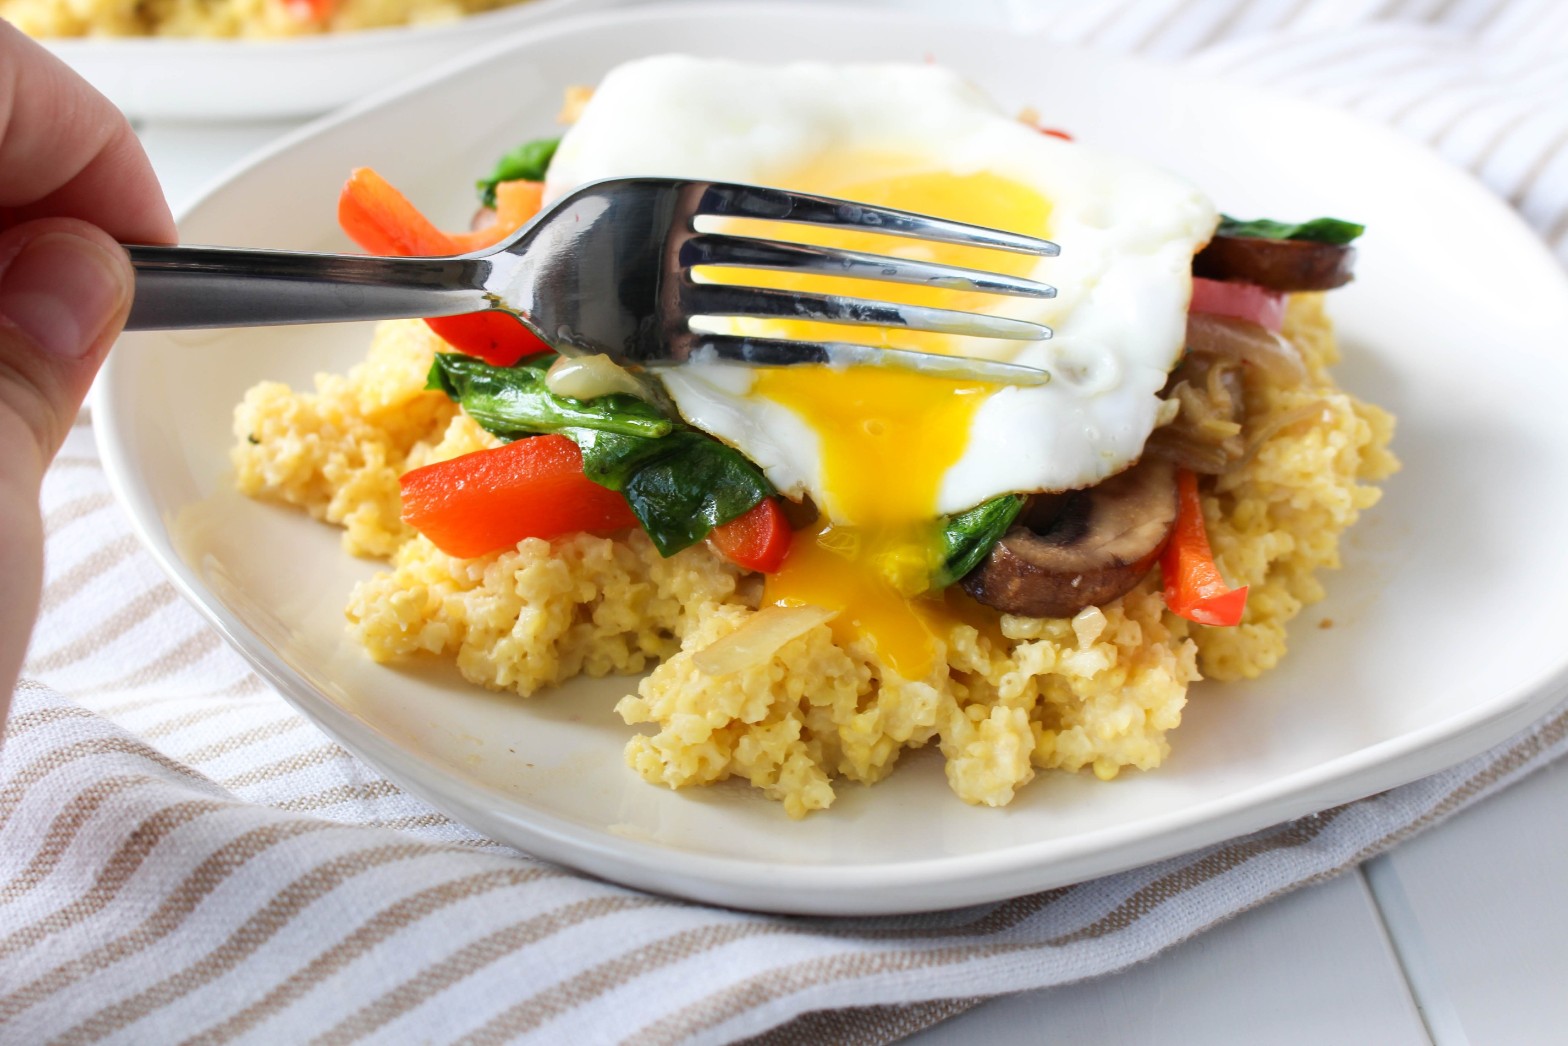
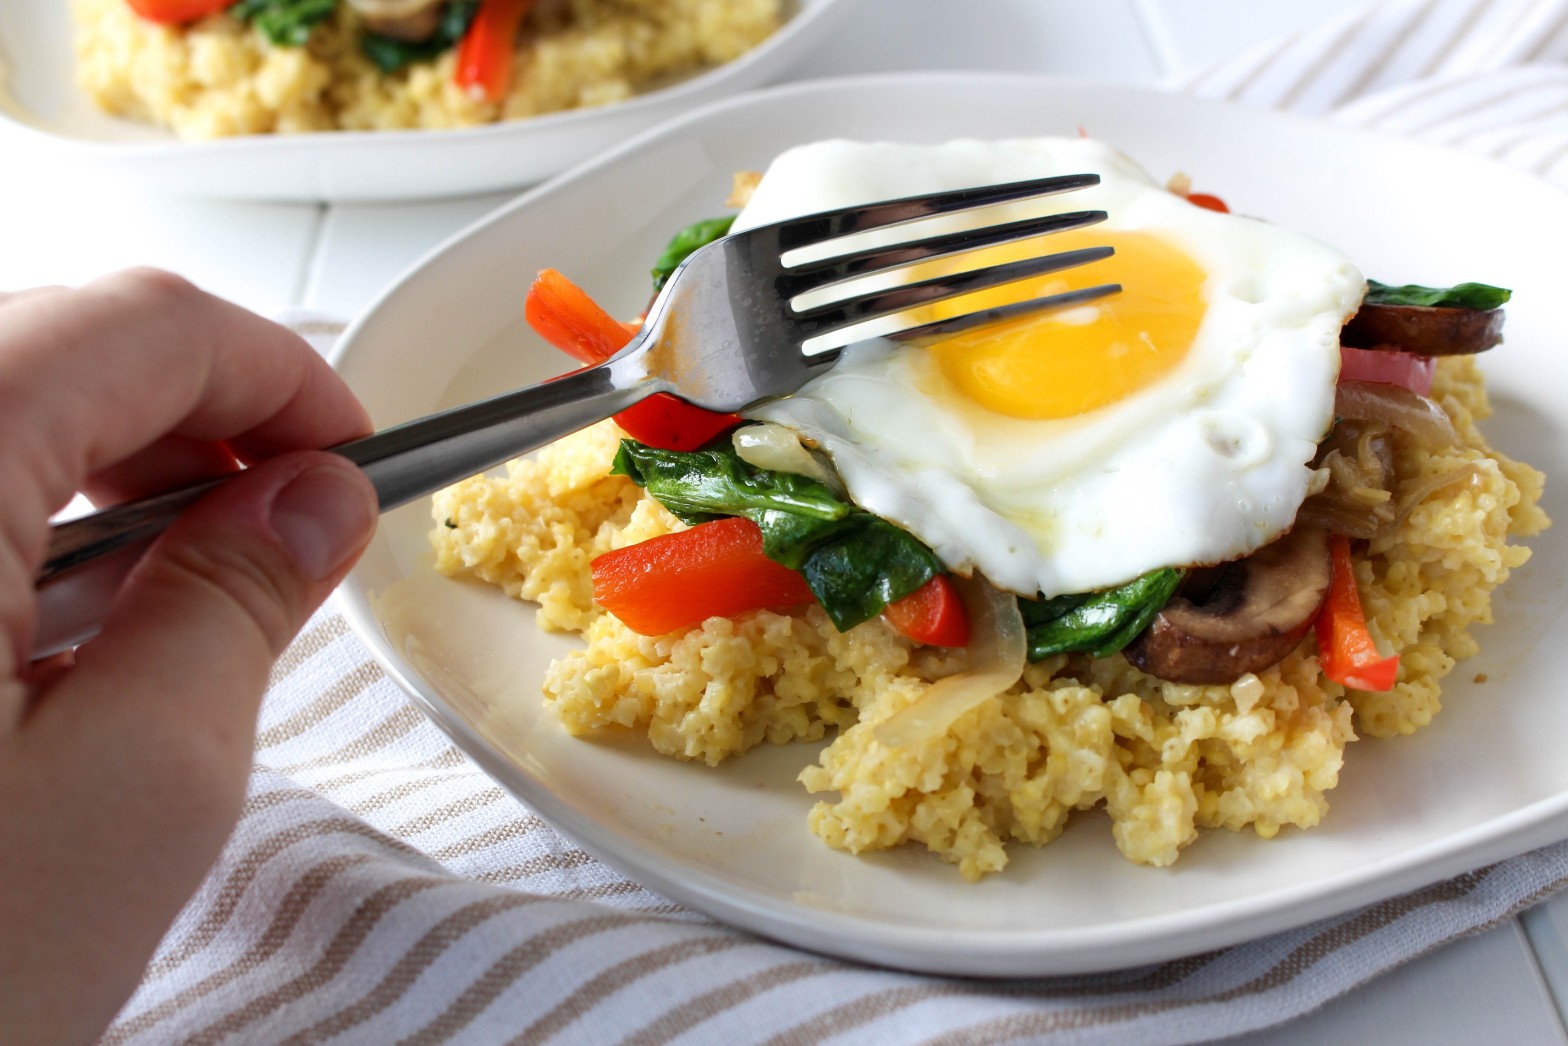
Eggs are so versatile, and so is this whole meal. It can be enjoyed as a breakfast, lunch, or dinner!
Runny egg for the win! Are you pro runny yolk or go for fully cooked?

Cheesy Millet with Sautéed Vegetables and Fried Egg via RDelicious Kitchen @rdkitchen

Print
clock clock iconcutlery cutlery iconflag flag iconfolder folder iconinstagram instagram iconpinterest pinterest iconfacebook facebook iconprint print iconsquares squares iconheart heart iconheart solid heart solid icon
Cheesy Millet with Sautéed Vegetables and Fried Egg

Cheesy Millet with Sautéed Vegetables and Fried Egg

  • Author: Julie @ RDelicious Kitchen
  • Yield: 4

Description

Perfect for breakfast, lunch, or dinner! A mix of whole grains, vegetables, and protein will keep you satisfied!


Ingredients

Scale
  • 1 cup millet
  • 2 cups water
  • 3/4 cup of your favorite Cabot cheddar cheese, shredded
  • 2 tbsp olive oil
  • 1 small red onion, sliced
  • 2 cloves garlic, minced
  • 1 red bell pepper, sliced
  • 1 cup mushrooms, sliced
  • 3 cups baby spinach
  • 4 eggs
  • salt and pepper

Instructions

  1. Bring water to a boil in a medium sized pot. Add millet; cover, reduce heat to low and simmer until water is dissolved, about 20 minutes. Stir in cheddar cheese while hot.
  2. As the millet is cooking, in a large saute pan, heat olive oil over medium heat. Add onion and garlic, saute until onions are translucent. Add peppers and mushrooms, saute for another 2-3 minutes. Add spinach and cook until wilted. Remove vegetables from the pan into a bowl and set aside.
  3. Coat the bottom of the same pan with cooking spray or additional olive oil (if needed). Crack eggs into the pan and cook until edges begin to brown, or until desired doneness.
  4. Layer each plate with cheesy millet, sauteed vegetables, and top with a fried egg. Season with salt and pepper.

Recipe Card powered byTasty Recipes

Signature

S’mores Smoothie

Power up your blender for a twist of a campfire favorite – s’mores!

S'mores Smoothie - Power up your blender for a twist of a campfire favorite - s'mores! via Chef Julie Harrington, RD @ChefJulie_RD #EasyAsBreeze #ad #smoothie #dessert #smores #summer #classic #recipe

This “Easy as Breeze” post is sponsored by Almond Breeze Almondmilk. Thank you for supporting brands who help make this website possible!

S'mores Smoothie - Power up your blender for a twist of a campfire favorite - s'mores! via Chef Julie Harrington, RD @ChefJulie_RD #EasyAsBreeze #ad #smoothie #dessert #smores #summer #classic #recipe

S’mores – it’s a summer time favorite. Summer is not complete without a perfect s’more over a campfire. S’mores creations have really gotten creative lately. Adding a reese pb cup instead of a chocolate square, adding in a brûlée banana slice, or even using chocolate chip cookies instead of graham crackers. I’m thinking a little more out of the box today with a drinkable form.

S'mores Smoothie - Power up your blender for a twist of a campfire favorite - s'mores! via Chef Julie Harrington, RD @ChefJulie_RD #EasyAsBreeze #ad #smoothie #dessert #smores #summer #classic #recipe

As crazy as this sounds, my uncle didn’t know what a s’more was. Uhhhh.. what! How do you not know what a s’more is?! And even after my cousins and I explained it to him, he never says it correctly. He pronounces it like s’moré.

S'mores Smoothie - Power up your blender for a twist of a campfire favorite - s'mores! via Chef Julie Harrington, RD @ChefJulie_RD #EasyAsBreeze #ad #smoothie #dessert #smores #summer #classic #recipe

With no opportunity being around a campfire or fire pit yet this summer, I had to improvise to enjoy my s’more craving. Simply toast marshmallows by broiling them. NOTE: keep an eye on them! I burned the first batch, oops!

Learn the history of s’mores.

S'mores Smoothie #EasyAsBreeze via RDelicious Kitchen @rdkitchen

The chocolate almond milk was the perfect addition to make it taste rich and indulgent. It literally tastes like a drinkable s’more. If you have s’mores ingredients at home, it’s time to make a s’more smoothie .. now! You can thank me later.

Print
clock clock iconcutlery cutlery iconflag flag iconfolder folder iconinstagram instagram iconpinterest pinterest iconfacebook facebook iconprint print iconsquares squares iconheart heart iconheart solid heart solid icon
s'mores smoothie in a mason jar with a green straw

S’mores Smoothie

  • Author: Chef Julie Harrington, RD
  • Prep Time: 10 mins
  • Total Time: 10 mins
  • Yield: 2-4 1x
  • Category: Smoothie
  • Method: Blender
  • Cuisine: American

Ingredients

Scale
  • 1 1/2 cups chocolate almond milk
  • 2 cups vanilla Greek yogurt
  • 6 large marshmallows
  • 4 chocolate squares
  • 2 sheets honey graham crackers

Instructions

  1. Line a baking sheet with parchment paper. Place marshmallows on baking sheet and place under broiler on low for 2-3 minutes. (note: keep a close eye on the marshmallows as they can burn quickly)
  2. In a blender, combine the chocolate almond milk, vanilla Greek yogurt, toasted marshmallows, chocolate squares, and graham crackers. Blend until smooth.
  3. (optional) Melt additional chocolate and rim the glasses with chocolate and crushed graham crackers. Add additional toasted marshmallows, graham crackers, and chocolate for a garnish.

Notes

Don’t skip toasting the marshmallows or they will not blend up all the way in the smoothie.

Keywords: s’mores, smoothie, almond milk, chocolate

Recipe Card powered byTasty Recipes
Chef Julie Harrington, RD - Culinary Nutrition Consultant of chefjulierd.com
S'mores Smoothie - Power up your blender for a twist of a campfire favorite - s'mores! via Chef Julie Harrington, RD @ChefJulie_RD #EasyAsBreeze #ad #smoothie #dessert #smores #summer #classic #recipe

Gorp (aka Trail Mix)

Skip the packaged trail mix where there are often a laundry list of ingredients and just make it yourself! Try this simple DIY trail mix which is perfect to bring on your next hike or as a grab and go snack!

Gorp (aka Trail Mix) via RDelicious Kitchen
This month has been quite hectic. Work has been busier than ever, Adrain (the bf) is moving, and now I am a day late for the Recipe ReDux monthly recipe. Ahh.. life!
Adrain is moving to south jersey to start Physical Therapy school, so this week has been packing and moving. I am currently sitting on the new couch (that I assembled), sipping on coffee, and writing this post in his new apartment.
Unfortunately, I am not moving here right now. I’m not going to lie, it sucks. From going to seeing each other every day, to only once a week, is going to be a big adjustment. Fortunately, I’m only in north jersey so it’s only about 2+ hours of a trip, which I will finagle getting here as much as I can.

A few weeks ago, we went hiking at the Delaware Water Gap on the Mount Tammany, Dunnfield Creek trail. Adrain is a hiking guru and did a bunch of big hiking trips in college. Also, the website linked is awesome. It has a detailed description and pictures of exactly what your hike will be like and where to go. The guy who writes this blog and his hiking pal (his pup!) have gone on hiking trails nationwide, so definitely check it out for your next hiking trip.
Gorp (aka Trail Mix) via RDelicious Kitchen
Trail mix is one of the most common hiking snacks to bring because it is calorically dense and nourishing for a hike without taking up much space in your pack. I learned some hiking terminology from Adrain. Apparently true hikers call trail mix, “gorp”. Fun fact! 

Gorp (aka Trail Mix) via RDelicious Kitchen
I never buy trail mix from the store. 1) because I enjoy making my own flavor combinations. 2) because in a pre-packaged trail mix there are typically overly salted nuts, sweetened fruit, and other weird ingredients.
Let’s compare my trail mix with a store bought trail mix:

My DIY trail mix:
4 ingredients
Gorp (aka Trail Mix) via RDelicious Kitchen

Pre-packaged trail mix:
laundry list of (and artificial) ingredients, more sugar, less protein

Ingredients: PEANUTS, CHOCOLATE CANDY PIECES [MILK CHOCOLATE (SUGAR, COCOA BUTTER, MILK, CHOCOLATE, LACTOSE, SOY LECITHIN–EMULSIFIER, VANILLIN–ARTIFICIAL FLAVOR), SUGAR, ARTIFICIAL COLOR (INCLUDES YELLOW 5 LAKE, YELLOW 6, BLUE 1 LAKE, RED 40 LAKE), GUM ARABIC, CORN SYRUP, CARNAUBA WAX, BEESWAX, CONFECTIONER’S GLAZE], RAISINS, ALMONDS, COTTONSEED OIL.
Screen Shot 2015-05-23 at 11.05.23 AM

Gorp (aka Trail Mix) via RDelicious Kitchen

Blood Orange & Freekeh Salad

Tired of boring salads? Spruce up your salad with this Blood Orange & Freekeh Salad recipe.

Blood Orange & Freekeh Salad - Recipe by Julie @ RDelicious Kitchen @rdkitchen

Is anyone else as sick of the snow as much as I am? If you live in the northeast like me, you know what I mean..
Move over Winter, bring on Spring. My warm bowls of soup cravings have past and now my cravings have moved on to fresh colorful salads.
Blood Orange & Freekeh Salad - Recipe by Julie @ RDelicious Kitchen @rdkitchen
I typically always pack a salad for lunch. It’s a sure way I will meet my fruit/veggie quota for the day. Someone I work with noticed my salad routine and asked if I ever got bored of salad every day. Honestly, no! But it’s because I don’t pack a plain ole salad. The key is to pumping it up with various colors, textures, and flavors!

Blood Orange & Freekeh Salad - Recipe by Julie @ RDelicious Kitchen @rdkitchen
I always like to make sure I have a balance of protein, carbohydrates, fats, and plenty of fiber for the salad to keep me full through the afternoon.
Get adventurous! Find foods in your grocery store that you may not always pick up week to week. Blood oranges are fantastic and if you like navel oranges, you’ll definitely enjoy these too!

Print

clock clock iconcutlery cutlery iconflag flag iconfolder folder iconinstagram instagram iconpinterest pinterest iconfacebook facebook iconprint print iconsquares squares iconheart heart iconheart solid heart solid icon
Blood Orange & Freekeh Salad with a green napkin

Blood Orange & Freekeh Salad

  • Author: Julie @ RDelicious Kitchen
  • Yield: 4

Description

Tired of boring salads? Spruce up your salad with this Blood Orange & Freekeh Salad recipe.


Ingredients

Scale
  • 1/4 cup freekeh
  • 4 cups arugula
  • 1 (15 oz) can chickpeas, drained and rinsed
  • 1/4 cup unsalted walnuts
  • 1 pint yellow cherry tomatoes, halved
  • 1 blood orange, peeled and segmented
  • 1/4 cup dried pomegranate seeds
  • 2 tbsp olive oil
  • 1 tbsp lemon juice
  • salt and pepper

Instructions

  1. Cook freekeh according to package directions. Let cool.
  2. In a large bowl, add the arugula. Add the chickpeas, walnuts, cherry tomatoes, blood orange, and dried pomegranates.
  3. Whisk together the olive oil and lemon juice. Season with salt and pepper.
  4. Toss to combine.

Recipe Card powered byTasty Recipes

 RDelicious Kitchen

Double Chocolate Zucchini Muffins

What do you do when you have an over abundance of zucchini and don’t know what to do with it all? … Make muffins!! Double chocolate zucchini muffins that is.
double chocolate zucchini muffins 3
Two of my biggest nutrition tips for making healthy choices regarding muffins:

1. Make them yourself from scratch

2. Keep the size in check

double chocolate zucchini muffins 2
1. When you make your own muffins, you know exactly what is going in your recipe. Don’t like how much sugar the recipe calls for, simply trim the amount or use healthier swaps like pure maple syrup.
2. I always opt for the traditional size muffin tin when I am baking. Even though I am always trying to make my baked good recipes a little lighter, they aren’t a substitute for a whole meal.
For example, many grab breakfast on the go going to work in the morning. Maybe they pick up a coffee and a reduced fat blueberry muffin. One may think deciding on the reduced fat is a healthier choice, but let’s see how that measures out. Below is an example of a reduced fat blueberry muffin from a popular chain restaurant:

Just by looking at the nutrition facts, it looks like a cupcake in disguise. 410 calories!? 40 grams of sugar !? 26% of the daily value of sodium!? 10 grams of total fat!?

Scroll down a little and look at the ingredients from the muffins I made. Now scroll back up and look at the ingredients in that muffin? Have you even heard of half of those ingredients before? I’m thinking my muffins win!

double chocolate zucchini muffins 1

Real food. Real ingredients. (while sneaking in some vegetables!)
Pair one of these muffins with a glass of milk and a piece of fruit for a balance way to start your day! (instead of a giant sugar bomb!)

Print

clock clock iconcutlery cutlery iconflag flag iconfolder folder iconinstagram instagram iconpinterest pinterest iconfacebook facebook iconprint print iconsquares squares iconheart heart iconheart solid heart solid icon
double chocolate zucchini muffins in a muffin tin

Double Chocolate Zucchini Muffins

  • Author: Julie @ RDelicious Kitchen
  • Yield: 12 1x

Ingredients

Scale
  • 1 cup oat flour
  • 1/2 cup unsweetened cocoa powder
  • 1/2 tsp salt
  • 1 tsp baking soda
  • 1/4 tsp baking powder
  • 1/3 cup coconut oil (melted then cooled – make sure it’s not hot!)
  • 1/3 cup maple syrup
  • 4 egg whites
  • 1 tsp vanilla
  • 2 cups grated zucchini
  • 3/4 cup chocolate chips

Instructions

  1. Preheat the oven to 350 degrees. Line a 12-cup muffin tin with muffin liners or grease with cooking spray.
  2. In a bowl combine the oat flour, cocoa, salt, baking soda, and baking powder. Set aside.
  3. In another bowl, whisk together the coconut oil, maple syrup, eggs and vanilla.
  4. Slowly incorporate the dry ingredients into the wet ingredients.
  5. Using a few paper towels or a cloth wring out excess moisture from the zucchini. Fold in the zucchini and chocolate chips (save some to add on top) until just combined.
  6. Fill each muffin tin and sprinkle a few chocolate chips on top.
  7. Bake for 18-20 minutes. Let cool for at least 5 minutes before removing from the pan. Store in an airtight container.

Recipe Card powered byTasty Recipes

PB&J Bites

Looking for a healthy snack to power you through the afternoon? You’ve come to the right place. These full of flavor homemade PB & J Bites are similar to the store bought Larabars. Careful, they are addicting ;)
fruit-and-nut-bites-rd

When I was younger a peanut butter & jelly sandwich was frequently found in my lunch box for school. Now, I am a working gal in my 20’s and I still pack a peanut butter & jelly sandwich for lunch sometimes. I must say though, I am much more selective of the type of bread, peanut butter, and jelly I use.

Print

clock clock iconcutlery cutlery iconflag flag iconfolder folder iconinstagram instagram iconpinterest pinterest iconfacebook facebook iconprint print iconsquares squares iconheart heart iconheart solid heart solid icon
peanut butter and jelly energy bites in mini muffin liners

PB & J Bites

  • Author: Julie @ RDelicious Kitchen
  • Prep Time: 5 mins
  • Total Time: 5 mins
  • Category: snack

Description

Homemade larabars turned into little bites. Perfect for on the go and healthy snacking.


Ingredients

Scale
  • 1/3 cup roasted peanuts (unsalted)
  • 1/3 cup dried cherries (unsweetened)
  • 2 cups pitted dates
  • 1 tbsp cinnamon

Instructions

  1. Place nuts in food processor and pulse until finely ground.
  2. Add in dates, cherries and cinnamon. Pulse until a clump forms in the processor.
  3. Take out the mixture and either wrap in plastic wrap and refrigerate for 30 min to harden, or you can start making your bites right out of the food processor.
  4. Form into 30 small balls. Wrap them with plastic wrap and put in fridge for later snacking.

Recipe Card powered byTasty Recipes

I determined a theory in college if snacks were good on-the-go kind of snacks. It was called the “backpack test”. If my snack managed to be still okay by the afternoon getting jostled around my backpack all morning and getting smushed between books then it passed. I’ve made these plenty of times in college because these PB&J Bites passed the “backpack test” with flying colors. Now it’s not so much the “backpack test” but more of a “giant professional bag turned into everyday bag turned into everything I ever need” kind of bag! haha 🙂