Homemade Ranch Dressing

Love eating veggies dunked in ranch? Learn to make a homemade ranch dressing and feel okay with using raw eggs when using Davidson’s Safest Choice Eggs, a great option for all your recipes using raw or gently cooked eggs.

Homemade Ranch Dressing via RDelicious Kitchen @rdkitchenDisclosure: I received coupons for free samples of Davidson’s Safest Choice Eggs mentioned in this post. By posting this recipe I am entering a recipe contest and am eligible to win prizes associated with the contest. I was not compensated for my time. 

Homemade Ranch Dressing via RDelicious Kitchen @rdkitchenI recently taught a nutrition class about label reading and brought along various food items to evaluate.  As we went through the class learning about the different aspects of the nutrition facts panel, comparing labels, and discussing each item, people were astounded when we got to the ingredient list of their favorite items and couldn’t believe that in the every day foods they are consuming, they can’t even pronounce the ingredients! One of these items I brought to review was ranch dressing, that came along with a laundry list of ingredients. One person noticed that there were eggs in it, but the dressing is not cooked. To make a nice creamy buttermilk ranch, raw eggs are used. The bottle version is safe to eat, because it has added preservatives making it shelf stable.
But what if you want to make it at home? Can you use any eggs. No. You run the risk of salmonella.
Use Davidson’s Safest Choice Eggs because of their natural pasteurization process that uses a warm water bath that eliminates the the risk of Salmonella in eggs, but does not change the taste or nutritional value. Now you can have a peace of mind making a homemade ranch dressing to dunk your vegetables in!
Homemade Ranch Dressing via RDelicious Kitchen @rdkitchenThis recipe was one of those third times a charm kind of recipes. The first time I tried making it my measurements were off and it was a watery mess. The second time, my measurements were on point but the dressing broke and didn’t keep its creamy consistency. The third time.. well that’s where we are today! .. Delicious and ready to be eaten (& posted)!
The key for this recipe is patience.
Homemade Ranch Dressing via RDelicious Kitchen @rdkitchenFirst, we are starting off with a mayonnaise base of egg yolk, lemon juice (or an acid like vinegar), and oil. I made mine with good ole elbow grease. You can use a blender or food processor, but you are less in control and your mayonnaise may break more easily.
Start by whisking your egg yolk (and dijon mustard for a pop of flavor) creating a thick creamy consistency.
This is where patience is key.  The next step is where many (myself included during my second attempt of this recipe) make the mistake of adding the oil too quickly, causing the base to split. The egg yolk and mustard are going to grab hold of the oil and not letting it become thick and fluffy preventing the emulsification process. Add a few drops of oil at a time as you continuously whisk, then gradually progress to a steady stream as you remain whisking.
Don’t be alarmed as you whisk the color becomes a bright yellow. Once you add the lemon juice (acid) the color instantly lightens up. Then whisk in the buttermilk, yogurt, and seasonings to create the rest of the ranch dressing!

Print
clock clock iconcutlery cutlery iconflag flag iconfolder folder iconinstagram instagram iconpinterest pinterest iconfacebook facebook iconprint print iconsquares squares iconheart heart iconheart solid heart solid icon
homemade ranch dressing in a glass jar with vegetables

Homemade Ranch Dressing

  • Author: Julie @ RDelicious Kitchen
  • Yield: 16 1x

Ingredients

Scale
  • 1 Davidson’s Safest Choice Pasteurized Egg yolk
  • 1 tsp dijon mustard
  • 1/2 cup canola oil
  • 1 tsp lemon juice
  • 1/4 cup reduced-fat buttermilk
  • 1/2 cup plain Greek yogurt
  • 1/2 tsp salt
  • 1/8 tsp pepper
  • 1 1/2 tsp dried parsley
  • 1 tsp dried chives
  • 1 tsp dried dill

Instructions

  1. In a large bowl, whisk together the Davidson’s Safe Egg yolk and mustard.
  2. Slowly, in a light steady stream, vigorously whisk in the canola oil until thickens. This is creating a mayonnaise base. Whisk until thick and creamy. (see blog post for detailed instructions of this step)
  3. Continue to whisk, add lemon juice, then buttermilk and yogurt.
  4. Whisk in salt, pepper, dried parsley, dried chives, and dried dill. Adjust seasonings to your flavor preference.

Recipe Card powered byTasty Recipes

Signature


Gorp (aka Trail Mix)

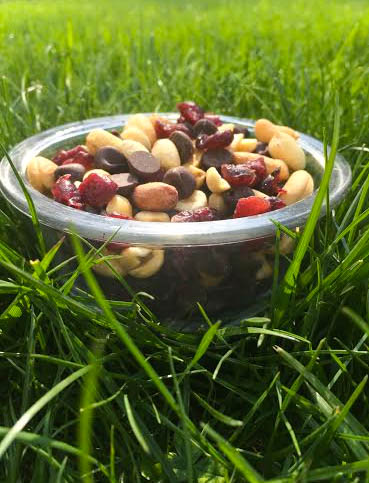
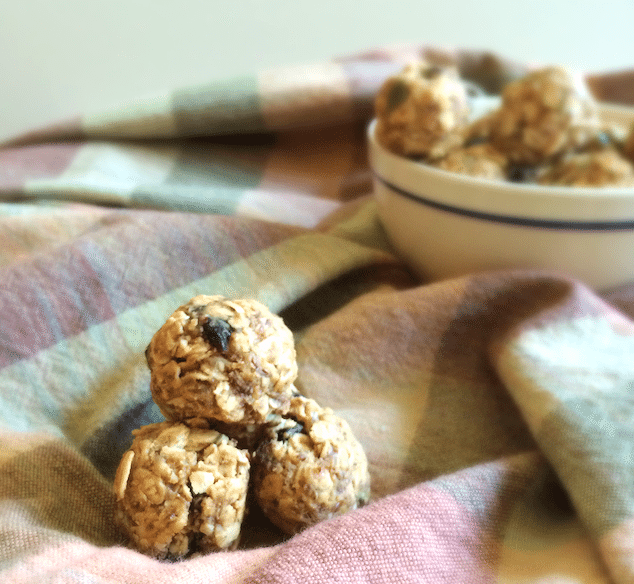
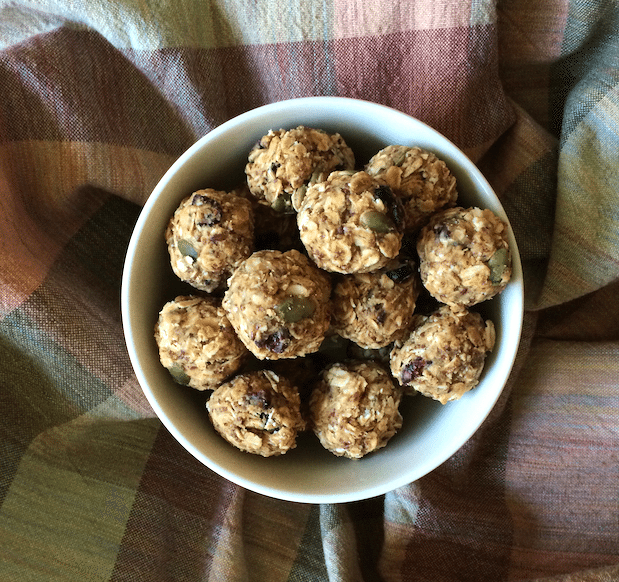
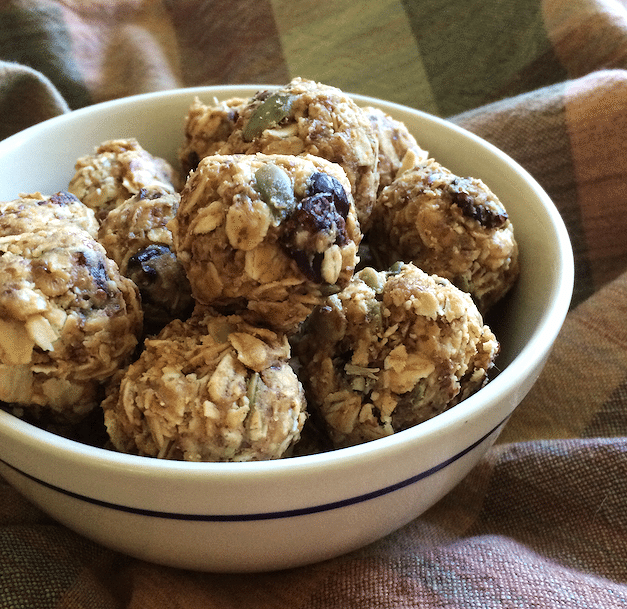
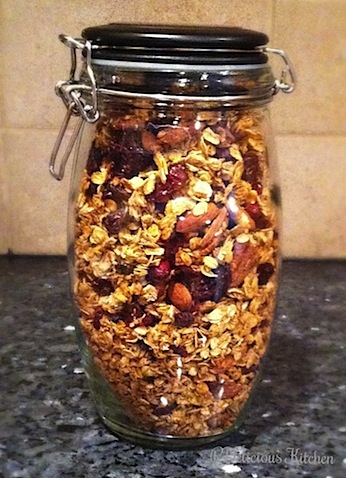
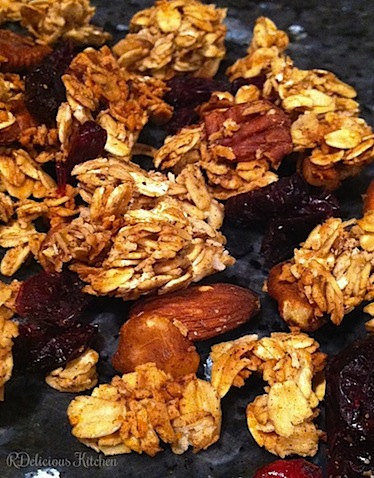
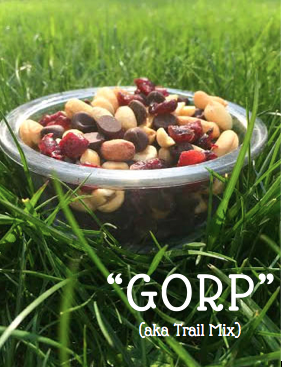
Skip the packaged trail mix where there are often a laundry list of ingredients and just make it yourself! Try this simple DIY trail mix which is perfect to bring on your next hike or as a grab and go snack!

Gorp (aka Trail Mix) via RDelicious Kitchen
This month has been quite hectic. Work has been busier than ever, Adrain (the bf) is moving, and now I am a day late for the Recipe ReDux monthly recipe. Ahh.. life!
Adrain is moving to south jersey to start Physical Therapy school, so this week has been packing and moving. I am currently sitting on the new couch (that I assembled), sipping on coffee, and writing this post in his new apartment.
Unfortunately, I am not moving here right now. I’m not going to lie, it sucks. From going to seeing each other every day, to only once a week, is going to be a big adjustment. Fortunately, I’m only in north jersey so it’s only about 2+ hours of a trip, which I will finagle getting here as much as I can.
Gorp (aka Trail Mix) via RDelicious Kitchen
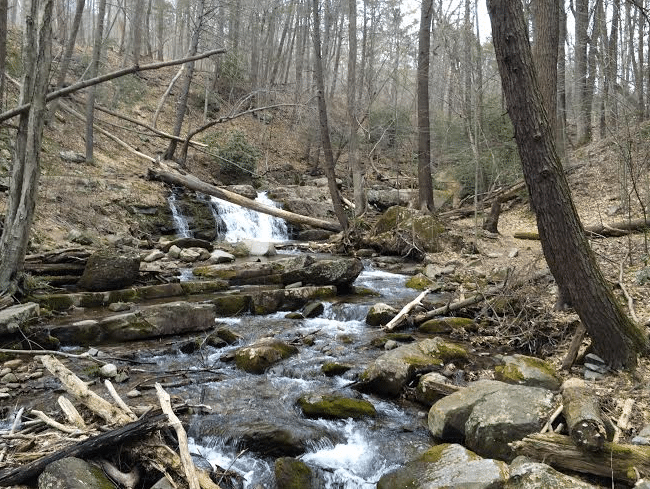
A few weeks ago, we went hiking at the Delaware Water Gap on the Mount Tammany, Dunnfield Creek trail. Adrain is a hiking guru and did a bunch of big hiking trips in college. Also, the website linked is awesome. It has a detailed description and pictures of exactly what your hike will be like and where to go. The guy who writes this blog and his hiking pal (his pup!) have gone on hiking trails nationwide, so definitely check it out for your next hiking trip.
Gorp (aka Trail Mix) via RDelicious Kitchen
Trail mix is one of the most common hiking snacks to bring because it is calorically dense and nourishing for a hike without taking up much space in your pack. I learned some hiking terminology from Adrain. Apparently true hikers call trail mix, “gorp”. Fun fact! 

Gorp (aka Trail Mix) via RDelicious Kitchen
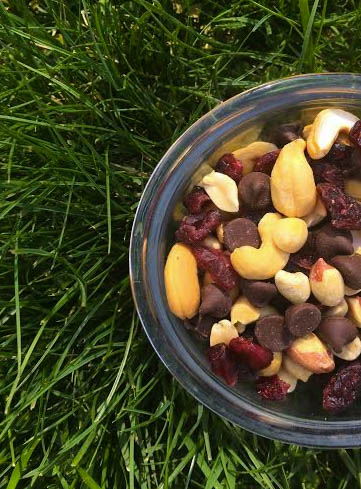
I never buy trail mix from the store. 1) because I enjoy making my own flavor combinations. 2) because in a pre-packaged trail mix there are typically overly salted nuts, sweetened fruit, and other weird ingredients.
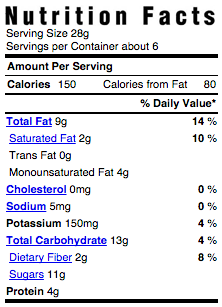
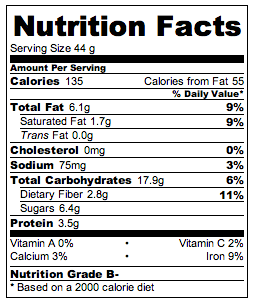
Let’s compare my trail mix with a store bought trail mix:

My DIY trail mix:
4 ingredients
Gorp (aka Trail Mix) via RDelicious Kitchen

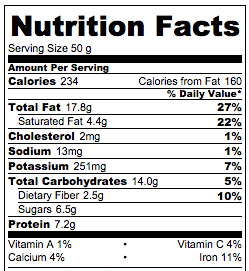
Pre-packaged trail mix:
laundry list of (and artificial) ingredients, more sugar, less protein

Ingredients: PEANUTS, CHOCOLATE CANDY PIECES [MILK CHOCOLATE (SUGAR, COCOA BUTTER, MILK, CHOCOLATE, LACTOSE, SOY LECITHIN–EMULSIFIER, VANILLIN–ARTIFICIAL FLAVOR), SUGAR, ARTIFICIAL COLOR (INCLUDES YELLOW 5 LAKE, YELLOW 6, BLUE 1 LAKE, RED 40 LAKE), GUM ARABIC, CORN SYRUP, CARNAUBA WAX, BEESWAX, CONFECTIONER’S GLAZE], RAISINS, ALMONDS, COTTONSEED OIL.
Screen Shot 2015-05-23 at 11.05.23 AM

Gorp (aka Trail Mix) via RDelicious Kitchen

Print
clock clock iconcutlery cutlery iconflag flag iconfolder folder iconinstagram instagram iconpinterest pinterest iconfacebook facebook iconprint print iconsquares squares iconheart heart iconheart solid heart solid icon
trail mix in a glass jar placed in the grass

Gorp (aka Trail Mix)

  • Author: Julie @ RDelicious Kitchen
  • Yield: 6-8 1x

Ingredients

Scale
  • 1 cup unsalted peanuts
  • 1 cup unsalted cashews
  • 3/4 cup dried cranberries
  • 1/2 cup chocolate chips

Instructions

  1. Simply mix everything in a bowl and pre-portion about 1/4-1/2 cup into individual bags.

Recipe Card powered byTasty Recipes

RDelicious Kitchen


Cheesy Deviled Eggs with a Cheese Crisp

Family and friends will love this cheesy version of classic deviled eggs.  

Cheesy Deviled Eggs with a Cheese Crisp
Growing up, I really never liked deviled eggs. I think because the traditional way is heavy with mayonnaise and I just absolutely do not like mayo.  It is just one of those foods that gives me the heebie jeebies. I don’t mind that I dislike mayo, because as a dietitian, I always encourage others to cut back on condiments like mayo and to use other substitutes like yogurt instead.
Don’t even get me started about cilantro. I think it tastes like soap. We can talk about that another day. Let’s get back to these deviled eggs. I wanted to make them cheesy, but also pop with flavor. That’s why I chose the horseradish variety for this recipe. Of course, you can always substitute with any kind of cheddar you would like. #cheddaisbetta
Cheesy Deviled Eggs with a Cheese Crisp
What’s that delicious crispy garish? Keep scrolling.. you won’t be sorry.

By posting this recipe I am entering a recipe challenge sponsored by Cabot Creamery and am eligible to win prizes associated with the contest. I was not compensated for my time. 

Print
clock clock iconcutlery cutlery iconflag flag iconfolder folder iconinstagram instagram iconpinterest pinterest iconfacebook facebook iconprint print iconsquares squares iconheart heart iconheart solid heart solid icon
cheesy deviled eggs on a tan board

Cheesy Deviled Eggs with a Cheese Crisp

  • Author: Julie @ RDelicious Kitchen
  • Yield: 12 1x

Ingredients

Scale

Instructions

  1. Place 6 eggs in a pot and fill with cold water, covering the eggs by an inch. Bring the water to a boil, uncovered. Turn off the heat and cover the pot. As soon as the water comes to a boil, remove the pot from heat and cover. Leave the eggs in the covered pan for 10-12 minutes. Remove from water, Chill, and peel.
  2. Cut each egg in half and scoop out the yolk into a bowl. Add the horseradish cheddar cheese, yogurt, dijon mustard, and chives. Mix well.
  3. Stuff the egg whites with the yolk mixture. Garnish with chives, a sprinkle of paprika, and a cheesy chip.

Recipe Card powered byTasty Recipes

Let’s talk about these cheesy crisps. It will change your life. Okay, maybe a little dramatic, but if you are a cheese lover you understand. 😉
cabot horseradish cheese
Confession: I had to make extra cheesy crisps for the pictures because I may have snacked on the first batch a little too much.
horseradish cheese garnish

Print
clock clock iconcutlery cutlery iconflag flag iconfolder folder iconinstagram instagram iconpinterest pinterest iconfacebook facebook iconprint print iconsquares squares iconheart heart iconheart solid heart solid icon
cheesy deviled egg with cheese crisp

Cheese Crisp

  • Author: Julie @ RDelicious Kitchen
  • Yield: 12 cheese crisps 1x

Ingredients

Scale
  • 1/4 cup your favorite cheddar cheese

Instructions

  1. Preheat oven to 350 degrees.
  2. Finely grate cheddar cheese.
  3. Using a teaspoon, make 12 small piles of cheese about an inch apart on a baking sheet. (if using an aluminum baking sheet, use parchment paper)
  4. Bake in the oven for 5-7 minutes until cheese has full melted and golden brown.
  5. Remove pan from oven and let cool for cheese to harden before removing from the pan.
  6. Use as a garnish, or to simply munch on!

Recipe Card powered byTasty Recipes

Don’t know what to make this weekend for Super Bowl Sunday? Welp, I think you know what you’re making now!
RDelicious Kitchen


Pumpkin Peanut Butter Bites

It’s pumpkin everything this time of year. When I saw Wild Friends create a new seasonal pumpkin spice peanut butter, I was so excited! I am a big fan of wild friends nut butters.
Screen Shot 2014-10-23 at 10.19.17 PM
I’m not going to lie, I’ve been eating it straight from the jar with a spoon. I made energy bites with wild friends vanilla espresso flavor, so I created another energy bite recipe using this new nut butter!

pumpkin pb bites 1Perfect little bite size snacks for on the go easy snacking.
pumpkin pb bites 3
Play around with the ingredients to create the perfect flavor for you!
pumpkin pb bites 2

Print
clock clock iconcutlery cutlery iconflag flag iconfolder folder iconinstagram instagram iconpinterest pinterest iconfacebook facebook iconprint print iconsquares squares iconheart heart iconheart solid heart solid icon
pumpkin peanut butter bites in a bowl with checkered napkin

Pumpkin Peanut Butter Bites

  • Author: Julie @ RDelicious Kitchen

Ingredients

Scale

Instructions

  1. Add oats, flax seed, dried cranberries and pumpkin seeds in a large bowl. Toss to combine.
  2. Put pumpkin spice peanut butter and maple syrup in a small bowl and microwave for 30 seconds or until softened.
  3. Combine the peanut butter mixture with the oat mixture until combine. The mixture will be thick. Shape into tablespoon-sized balls. Store in refrigerator.

Notes

Use certified gluten free oats to guarantee gluten free recipe.

Recipe Card powered byTasty Recipes


Signature

Easiest Deviled Eggs

This is by far the easiest deviled eggs recipe. It only has two ingredients and takes only a few minutes to make.
deviled eggs 3
I came up with this recipe when I just staring in my fridge looking for a snack to eat. I always make a batch of hard boiled eggs for the week, to add in salads, have as a snack, or in the morning for breakfast.
deviled eggs 2
That day I was staring in the fridge, I didn’t want just a plain hard boiled egg, so I got a little creative. I just added one ingredient, and then it became the easiest hard boiled egg recipe.
deviled eggs 1
I used this as a snack, but it can easily be multiplied to serve more.
 

Print
clock clock iconcutlery cutlery iconflag flag iconfolder folder iconinstagram instagram iconpinterest pinterest iconfacebook facebook iconprint print iconsquares squares iconheart heart iconheart solid heart solid icon
shortcut deviled eggs

Easiest Deviled Eggs

  • Author: Julie @ RDelicious Kitchen
  • Prep Time: 3 mins
  • Total Time: 3 mins
  • Yield: 1

Description

This is by far the easiest deviled eggs recipe. It only has two ingredients and takes only a few minutes to make.


Ingredients

Scale
  • 1 hard boiled egg
  • 1 light garlic and herb laughing cow cheese wedge

Instructions

  1. Peel hard boiled egg. Cut in half and scoop out the yolk.
  2. In a small bowl, mash together the egg yolk and laughing cow cheese wedge.
  3. Spoon the mixture into the egg white centers.

Recipe Card powered byTasty Recipes


In good health,
Signature

Pumpkin Pie Chia Mousse

Screen Shot 2014-09-28 at 7.15.24 PM
Whenever a recipe that is labeled “healthy” many assume that it won’t taste good. At work when I sample out a new recipe or a new product I always get different reactions when I label things “healthy”. Try this new “healthy (insert recipe name)” – some run over and are intrigue and some scrunch up their noses and walk away.
Let me tell you about this “healthy” recipe I made today. The ingredients and nutrition facts of this recipe scream healthy, but the flavors and richness scream dessert! If you LOVE pumpkin pie, you’re going to LOVE this recipe.
Yesterday, on instagram I posted the picture below asking “Can you guess what I’m making?”
IMG_3919A few guessed pumpkin chia pudding. Meme actually made a really funny comment that her head was racing with pumpkin thoughts. I’m turning that into a hashtag #pumpkinthoughts
Pumpkin pie chia pudding was actually my original idea but I changed it to Pumpkin Pie Chia Mousse because the cottage cheese whipped in with the rest of the ingredients created a smooth fluffy texture just like regular mousse.
IMG_3923 2
You can enjoy this as a breakfast, snack, or dessert! I sprinkled a little cinnamon granola and a few cranberries on top.
IMG_3920 2

Print
clock clock iconcutlery cutlery iconflag flag iconfolder folder iconinstagram instagram iconpinterest pinterest iconfacebook facebook iconprint print iconsquares squares iconheart heart iconheart solid heart solid icon
pumpkin pie chia pudding

Pumpkin Pie Chia Mousse

  • Author: Julie @ RDelicious Kitchen
  • Yield: 4

Description

A healthy recipe with decadent flavors. This Pumpkin Chia Mousse is like having dessert for breakfast!


Ingredients

Scale
  • 1/4 cup chia seeds
  • 1 cup water
  • 1 cup pumpkin puree*
  • 3/4 cup cottage cheese
  • 1.5 tbsp pumpkin pie spice
  • 2 tbsp maple syrup

Instructions

  1. In a small bowl combine the chia seeds and water. Set aside for at least 20 minutes until it becomes thick. Stir occasionally to avoid clumps.
  2. Simply combine the chia seed mixture, pumpkin puree, pumpkin pie spice, and maple syrup in a blender and blend until smooth.

Notes

Make sure to use pure pumpkin puree which is simply pumpkin. Don’t be fooled and purchase pumpkin pie puree which is loaded with added sugars.


Nutrition

  • Calories: 121
  • Sugar: 8.3
  • Fat: 3.8
  • Saturated Fat: 1
  • Carbohydrates: 17.7
  • Fiber: 4.6
  • Protein: 8.1
Recipe Card powered byTasty Recipes


In Good Health,
Signature

PB&J Bites

Looking for a healthy snack to power you through the afternoon? You’ve come to the right place. These full of flavor homemade PB & J Bites are similar to the store bought Larabars. Careful, they are addicting ;)
fruit-and-nut-bites-rd

When I was younger a peanut butter & jelly sandwich was frequently found in my lunch box for school. Now, I am a working gal in my 20’s and I still pack a peanut butter & jelly sandwich for lunch sometimes. I must say though, I am much more selective of the type of bread, peanut butter, and jelly I use.

Print
clock clock iconcutlery cutlery iconflag flag iconfolder folder iconinstagram instagram iconpinterest pinterest iconfacebook facebook iconprint print iconsquares squares iconheart heart iconheart solid heart solid icon
peanut butter and jelly energy bites in mini muffin liners

PB & J Bites

  • Author: Julie @ RDelicious Kitchen
  • Prep Time: 5 mins
  • Total Time: 5 mins
  • Category: snack

Description

Homemade larabars turned into little bites. Perfect for on the go and healthy snacking.


Ingredients

Scale
  • 1/3 cup roasted peanuts (unsalted)
  • 1/3 cup dried cherries (unsweetened)
  • 2 cups pitted dates
  • 1 tbsp cinnamon

Instructions

  1. Place nuts in food processor and pulse until finely ground.
  2. Add in dates, cherries and cinnamon. Pulse until a clump forms in the processor.
  3. Take out the mixture and either wrap in plastic wrap and refrigerate for 30 min to harden, or you can start making your bites right out of the food processor.
  4. Form into 30 small balls. Wrap them with plastic wrap and put in fridge for later snacking.

Recipe Card powered byTasty Recipes

I determined a theory in college if snacks were good on-the-go kind of snacks. It was called the “backpack test”. If my snack managed to be still okay by the afternoon getting jostled around my backpack all morning and getting smushed between books then it passed. I’ve made these plenty of times in college because these PB&J Bites passed the “backpack test” with flying colors. Now it’s not so much the “backpack test” but more of a “giant professional bag turned into everyday bag turned into everything I ever need” kind of bag! haha 🙂

In Good Health,
Screen Shot 2014-07-12 at 12.35.16 PM

Enjoy the rest of the bites and bars recipes other Recipe ReDuxers have made 🙂


Feta & Mint Watermelon Salad

I know there are many variations of this recipe. I like to keep it really simple – let the minimal ingredients develop powerful flavors that marinate together. The ingredients of this recipe contribute 3 out of the 5 taste sensations.

 So what are the 5 tastes you experience everyday when eating?

fajb_digital_taster_02_nov2013

There are five known tastes that are detected by taste buds: sweet, salty, sour, bitter, and umami. Although these tastes are detected by all taste buds, some regions of the tongue have a slightly higher sensitivity to some tastes than others.

  1. The sweet taste is created by carbohydrates such as sucrose and fructose, as well as artificial sweeteners such as aspartame and saccharine.
  2. The salty taste is generally created by salts containing sodium ions, such as sodium chloride (table salt) and sodium bicarbonate (baking soda). Salts containing potassium, lithium, and other alkali metal ions also produce a mildly salty flavor.
  3. Acidic compounds, such as citric acid and vinegar, produce sour flavors.
  4. Bitter flavors are produced by a variety of organic compounds and are generally considered an undesirable or unpalatable flavor. Many toxic chemicals produced by poisonous plants have a bitter taste, thus leading to the negative reaction to bitter foods.
  5. Umami, or savoriness, is the most recently discovered taste, found in foods that have a “meaty” taste due to the presence of the chemical glutamate. Meat, cheese, mushrooms, and the chemical monosodium glutamate (MSG) all contain glutamate.
    (source)

Feta & Mint Watermelon Salad

Print
clock clock iconcutlery cutlery iconflag flag iconfolder folder iconinstagram instagram iconpinterest pinterest iconfacebook facebook iconprint print iconsquares squares iconheart heart iconheart solid heart solid icon
Feta Mint Watermelon Salad

Feta & Mint Watermelon Salad

  • Author: Julie @ RDelicious Kitchen
  • Prep Time: 5 mins
  • Total Time: 5 mins
  • Yield: 6-8 1x
  • Category: Fruit, Salad, Fruit Salad

Description

Light and Refreshing Summer Salad. This salty and sweet combo adds a new twist to watermelon. Bring it to your next BBQ!


Ingredients

Scale
  • 6 cups watermelon, cubed
  • 1 cup feta cheese, crumbled
  • 1/4 cup fresh mint, minced
  • 1/4 cup fresh lime juice

Instructions

  1. Combine watermelon, feta cheese, and mint in a large bowl.
  2. Pour in lime juice and gently toss together.
  3. Serve immediately.

Recipe Card powered byTasty Recipes


Watermelon – Sweet

Feta Cheese – Salty

Lime juice – Sour

Feta & Mint Watermelon Salad 2

In Good Health,
Screen Shot 2014-07-12 at 12.35.16 PM

Secrets to making perfect granola

I don’t know about you, but my favorite part of granola are those big chunks. I prefer making my own granola versus buying it. A lot of the store bought granolas are packed with a ton of sugar. A lot of recipes I tried to make at home left me with just little pieces of oats and nuts with anything barely sticking together. With a little research I discovered a way to make the perfect granola.

Tips to making chunky granola:

1. Add egg whites. – By adding beaten egg whites, it works as a binding agent to help the granola clump together.
2. Don’t stir. – A lot of recipe say to stir the granola mixture a couple times when it is baking in the oven. By not stirring, it will let the ingredients stay together in larger clumps.
3. Let the granola cool completely. – By letting it cool completely will ensure clumps stay put. You can then break them into whatever size pieces you prefer.

granola RD 2.jpg
 

granola RD 1.jpg


Granola
Makes 18 servings
(1/3 cup = 1 serving)


Ingredients:
3 cups oats
1/3 cup almonds
1/3 cup pecans
1/3 cup walnuts
1 cup unsweetened coconut
1 tbsp cinnamon
1/2 tsp salt

1/2 cup maple syrup
2 egg whites, beaten until frothy
1/2 cup dried cranberries
1/2 cup dried blueberries

 
Directions:

1. Preheat oven to 300 degrees F. Line a large baking sheet with parchment paper or cooking spray.

2. In a large bowl, combine the oats, nuts, coconut, cinnamon, and salt. Toss to combine.

3. Add in the maple syrup and syrup. Toss to combine until all the dry ingredients are coated.

4. Spread out on a large baking sheet and pat down. Bake for about 40 minutes. Check to see if granola is evenly browned. (May need a few more minutes)

5. Take out of the oven and let granola completely cool in the pan. This will help the large chunks stay together. Then break up granola to whatever size chunks you like. Toss in the dried cranberries and dried blueberries.

* This recipe is very versatile and ingredients can be substituted with different nuts, seeds, and dried fruit.

granola RD 3.jpg

Screen shot 2013-12-11 at 4.43.41 PM.png

(Nutrition Facts based on Calorie Count)


Enjoy!

Blueberry Quinoa Bars

July 2013 Recipe Redux submission is here!


screen-shot-2013-06-21-at-8-38-03-am.png

What is Recipe Redux? Click here to learn all about it!

July 2013 Theme: Have Snacks, Will Travel!

Sometimes, the food is the best part of the journey. Be it business travel or a road trip for pleasure, share your favorite travel snacks/mini meals. Do you pack a special treat for the road to eat in the car or at rest stops? Or do you have a tried & true snack that makes it safely through airport security? Share your healthy recipe for road trip nourishment.

This was a perfect theme for me because I am currently on vacation right now and I needed to pack snacks for my travel time yesterday. I always like to pack snacks with me when I am traveling. It ensures that I will have a healthy snack and plus saves money from buying snacks that are way over priced at the airport.

I love these bars because they are super filling and easy to carry in your bag.


quinoa bars RD1.jpg

Blueberry Quinoa Bars
Makes 8 servings


Ingredients:
1/2 cup whole wheat flour
1/2 tsp salt
1/4 tsp baking soda
1/4 tsp baking powder
1/3 cup unsweetened applesauce
2 tbsp brown sugar
2 tbsp maple syrup
2 egg whites
1 tsp vanilla extract
3/4 cup cooked quinoa
1/2 cup rolled oats
1/2 cup dried blueberries
1/2 cup pecans, chopped

Directions:
1. Preheat the oven to 375 degrees. Spray an 8×8 baking dish with cooking spray.
2. In a small bowl combine the flour, salt, baking soda and baking powder.
3. In a large bowl, mix together the applesauce, brown sugar, maple syrup, egg whites, and vanilla until combined.
4. Slowly add in the flour mixture until combined. Do not over mix.
5. Gently fold in the quinoa, oats, blueberries and pecans.
6. Pour into the prepared baking dish and bake for 12-14 minute, until golden brown.
7. Remove from oven and let cool. Cut into 8 even bars and wrap individually for a perfect traveling snack!

quinoa bars RD2.jpg

Screen shot 2013-07-18 at 4.42.07 PM.png

Enjoy!

Click on the link below to look at all the other submissions