Almond Pear Crisp for Two

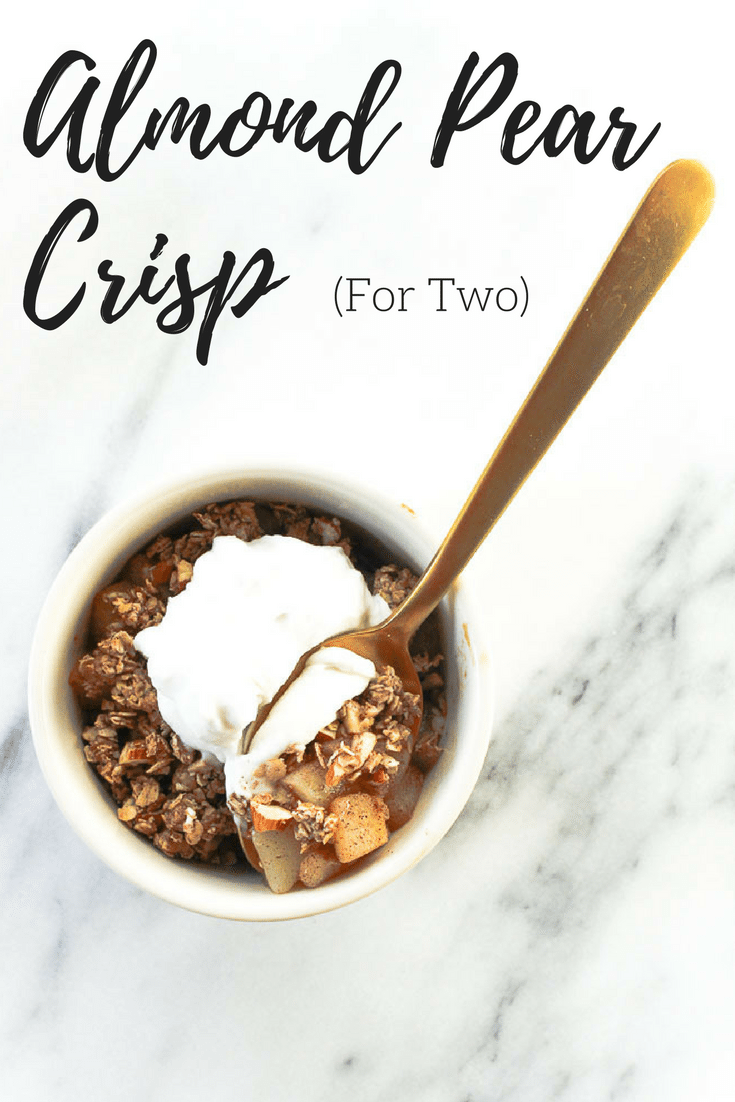
A perfectly portioned dessert, these Almond Pear Crisps take less than 15 minutes to make!
Pear Crisp for Two via RDelicious Kitchen @RD_Kitchen

By posting this recipe I am entering a recipe contest sponsored by Libby’s Fruits & Vegetables and am eligible to win prizes associated with the contest. I was not compensated for my time.
My boyfriend and I created the term “hankering” when we were in the mood for something sweet. At first, it meant chocolate chip cookies, but now it has transformed into any type of dessert. He supports my sweet tooth cravings.
Pear Crisp for Two via RDelicious Kitchen @RD_Kitchen
One of my absolute favorite kinds of desserts is fruit crisps. I love the soft sweet fruit under a sweet crunchy crumble.
When our hankering kicked in, having a can of Libby’s pear halves came in handy. Libby’s wide variety of shelf-stable, conveniently packed, nutritious and delicious fruit and vegetable products, help busy families get fast, wholesome meals on the table without sacrificing flavor or nutrition, but in our case dessert ready in under 15 minutes.
Pear Crisp for Two via RDelicious Kitchen @RD_Kitchen
Keeping canned fruits and vegetables come in handy since they are shelf stable. They have saved dinner time and time again.

Pear Crisp for Two via RDelicious Kitchen @RD_Kitchen

According to the Canned Food Alliance, from a nutrition and sensory standpoint, recipes prepared with canned ingredients and those prepared using cooked fresh and/or frozen ingredients rate comparable. Canned fruits and vegetables are packed at their peak of harvest, which means they are packed at their peak nutrient value.
Pear Crisp for Two via RDelicious Kitchen @RD_Kitchen

These canned pears can even be paired with the trendiest ingredients – coconut milk. In 2016’s Google trends report, coconut milk was on the list of ingredient trends. Instead of topping these Almond Pear Crisps with ice cream, try making coconut whipped cream!
Pear Crisp for Two via RDelicious Kitchen @RD_Kitchen

Print
clock clock iconcutlery cutlery iconflag flag iconfolder folder iconinstagram instagram iconpinterest pinterest iconfacebook facebook iconprint print iconsquares squares iconheart heart iconheart solid heart solid icon
pear crisp in a small white dish with a gold spoon

Almond Pear Crisp for Two

  • Author: Julie @ RDelicious Kitchen
  • Yield: 2

Ingredients

Scale
  • 1 can Libby’s Pear Halves
  • 1 teaspoon cinnamon, divided
  • 1/4 cup oats
  • 2 teaspoons maple syrup
  • 1 tablespoon almond butter
  • 2 tablespoons almonds, chopped
  • 1/4 cup full-fat coconut milk, chilled
  • 1 tablespoon powdered sugar

Instructions

  1. Preheat oven to 375 degrees F.
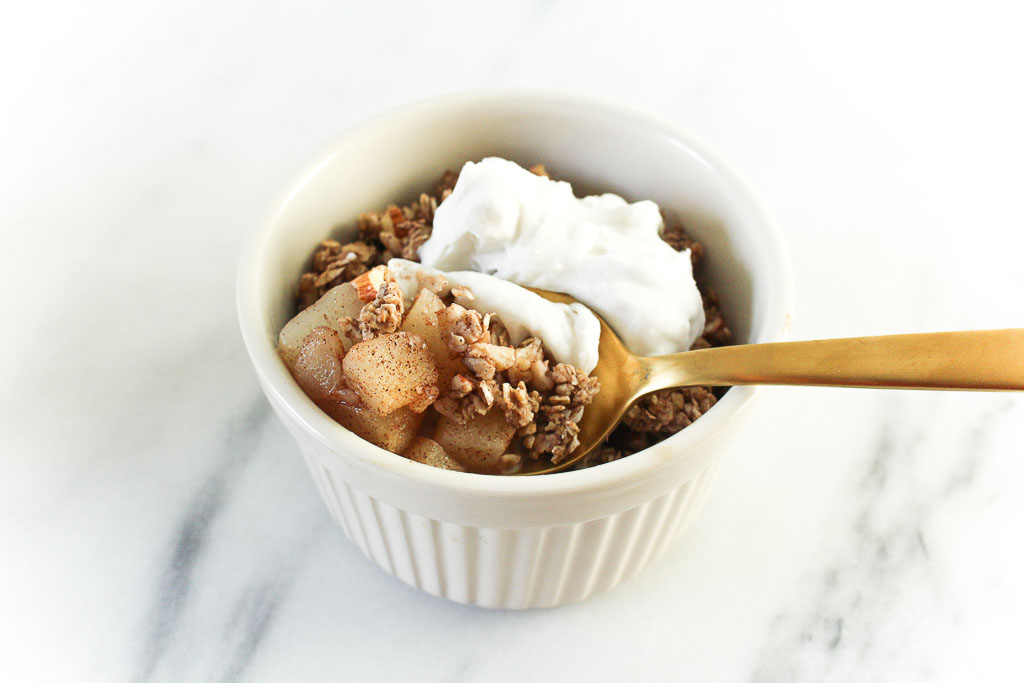
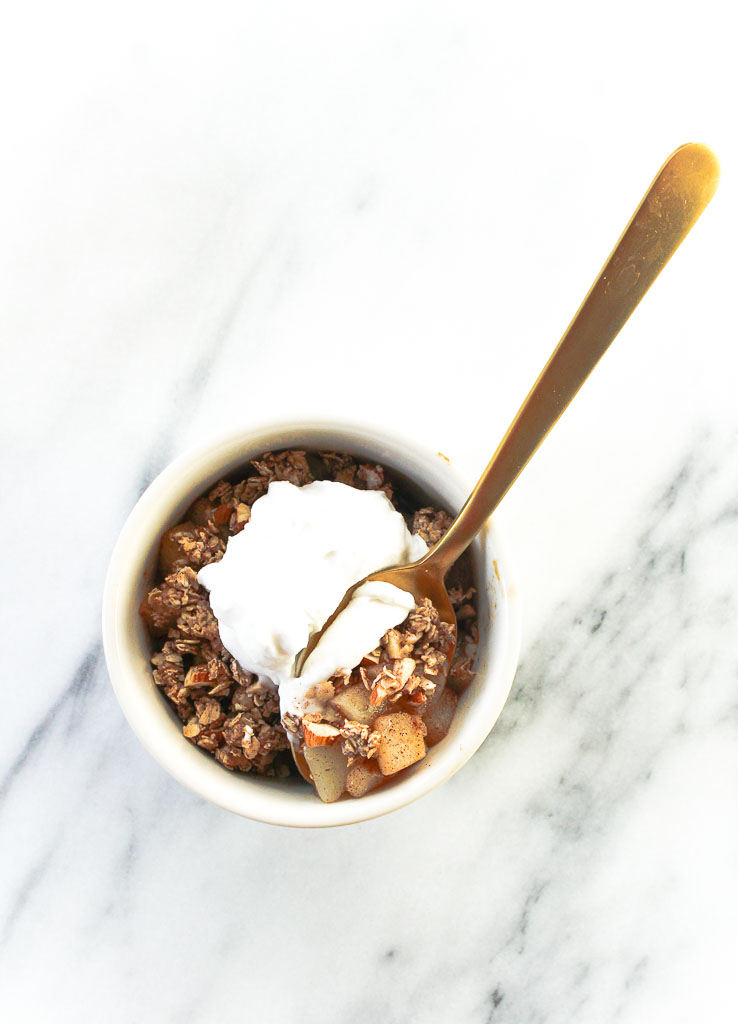
  2. Drain and dice pears. In a small bowl, toss pears with 1/2 teaspoon cinnamon. Evenly distribute pears into two oven-safe ramekins.
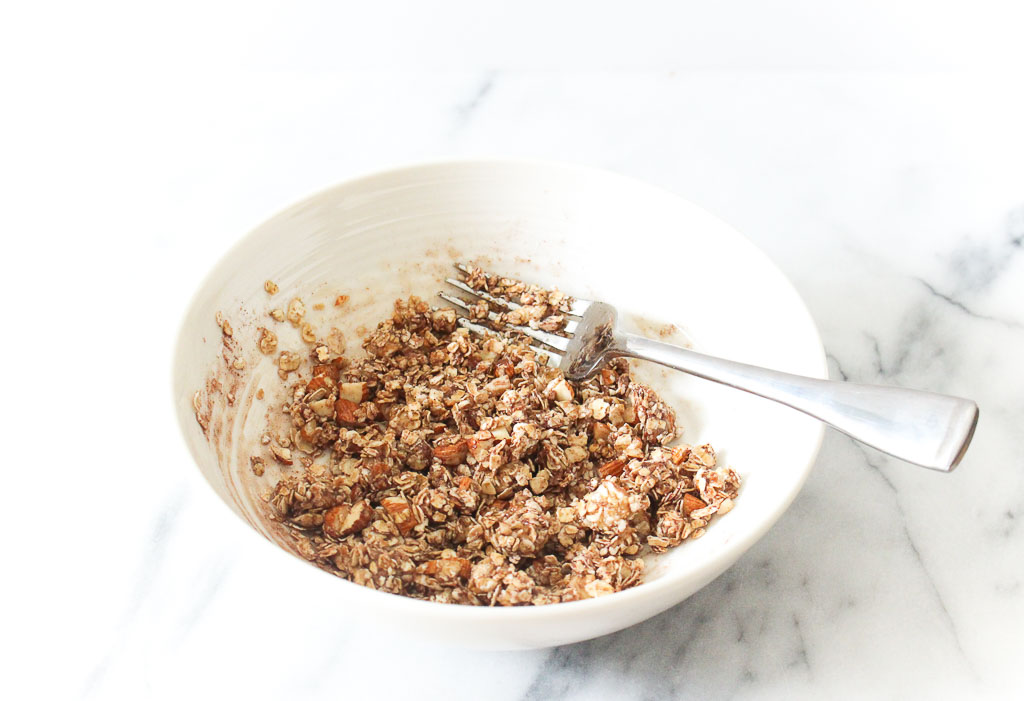
  3. In a small bowl, combine remaining 1/2 teaspoon cinnamon, oats, maple syrup, almond butter, and almonds. Mix until combined, creating a crumbly texture. Add crumble on top of pears in the ramekins.
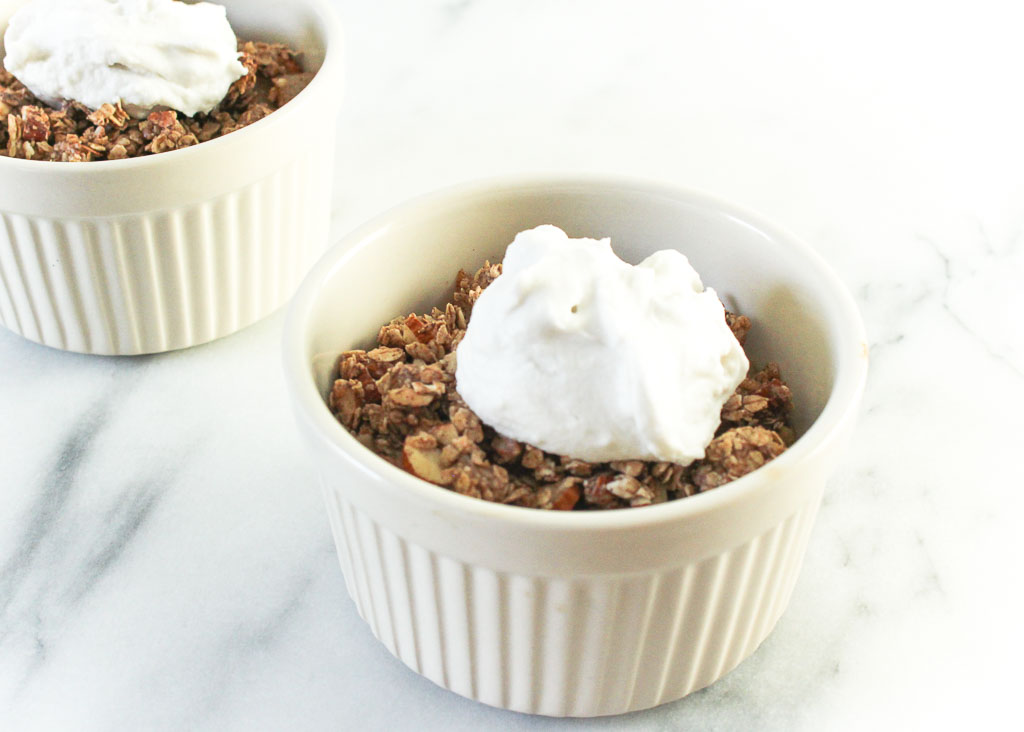
  4. Bake in the oven for 10 minutes, until crumble begins to brown.
  5. As the pear crisps are baking, beat coconut milk and powdered sugar until fluffy.
  6. Remove pear crisps from the oven and top with coconut whipped cream. Serve warm.

Recipe Card powered byTasty Recipes

Did you make this recipe? Tag @rdeliciouskitchen on Instagram or send me a picture, I’d love to see!

RDelicious Kitchen @RD_Kitchen

 Pin this recipe for later!

Almond Pear Crisp for Two via RDelicious Kitchen @RD_Kitchen

Strawberry Lemon Ricotta Filled Crepes

Traveling always inspires me to create my favorite travel eats at home. My recent France trip inspired me to make these Strawberry Lemon Ricotta Filled Crepes.

Strawberry Lemon Ricotta Filled Crepes - Even if you prefer sweet or savory crepes, this crepe recipe is the perfect base for any filling. Recipe via Chef Julie Harrington, RD @ChefJulie_RD #crepes #french #france #lemon #strawberry #ricotta #breakfast

If you have been following my Instagram stories, you know last week I was traveling all around France with my sisters. Read my travel recap here: Part One & Part Two.

I love traveling because I always become inspired to develop new recipes for my blog. The first thing that I recreated the day after I came home was crepes! We had plenty of delicious crepes throughout our travels through France. The little crepe stands that we ordered crepes from, had their crepe making down to a science.

Strawberry Lemon Ricotta Filled Crepes - Even if you prefer sweet or savory crepes, this crepe recipe is the perfect base for any filling. Recipe via Chef Julie Harrington, RD @ChefJulie_RD #crepes #french #france #lemon #strawberry #ricotta #breakfast

It was amazing to see how fast and seamless they worked. Their flipping skills are far more superior to mine. You guys know I even struggle with flipping pancakes, so I tend to make waffles instead!

Don’t worry, you don’t need any fancy crepe pans and tools to create delicious crepes in your own kitchen. You’ll just need a large nonstick pan, rubber spatula, and a little patience. It’s best to make the batter the night before and let it rest overnight in the refrigerator, allowing the flour to fully absorb into the liquid and give the gluten a chance to relax.

Strawberry Lemon Ricotta Filled Crepes - Even if you prefer sweet or savory crepes, this crepe recipe is the perfect base for any filling. Recipe via Chef Julie Harrington, RD @ChefJulie_RD #crepes #french #france #lemon #strawberry #ricotta #breakfast

While it was tempting stuff my crepe with Nutella that I enjoyed in France, I wanted to try something new and a little lighter. The strawberries I picked up from the farmer’s market were perfect, so they definitely had to make an appearance in these crepes.

Strawberry Lemon Ricotta Filled Crepes - Even if you prefer sweet or savory crepes, this crepe recipe is the perfect base for any filling. Recipe via Chef Julie Harrington, RD @ChefJulie_RD #crepes #french #france #lemon #strawberry #ricotta #breakfast

Crepes are a great blank canvas to be creative with fillings. Next time I will recreate a savory crepe that I enjoyed with Kelly when we were traveling at a conference.

Strawberry Lemon Ricotta Filled Crepes - Even if you prefer sweet or savory crepes, this crepe recipe is the perfect base for any filling. Recipe via Chef Julie Harrington, RD @ChefJulie_RD #crepes #french #france #lemon #strawberry #ricotta #breakfast

Do you prefer sweet or savory crepes? Comment below of your preferred favorite filling.

Print
clock clock iconcutlery cutlery iconflag flag iconfolder folder iconinstagram instagram iconpinterest pinterest iconfacebook facebook iconprint print iconsquares squares iconheart heart iconheart solid heart solid icon
crepes with strawberry lemon ricotta filling in a white plate with gold fork

Crepes with Strawberry Lemon Ricotta Filling

  • Author: Chef Julie Harrington, RD
  • Prep Time: 15
  • Cook Time: 15
  • Total Time: 30 minutes
  • Yield: 6
  • Category: Breakfast
  • Method: Stovetop
  • Cuisine: French

Description

Traveling inspires new recipes. With a recent trip to France, make these delicious crepes with a strawberry lemon ricotta filling in the comfort of your own home. 


Ingredients

Scale
  • 1/2 cup white whole wheat flour
  • 1/2 cup oat flour
  • 1 teaspoon sugar (optional)
  • 1/4 teaspoon salt
  • 3 eggs
  • 1/2 cup milk
  • 2 tablespoons canola oil
  • 1/2 cup seltzer
  • Filling:
  • 2 cups ricotta cheese
  • 1 lemon, zested
  • 2 tablespoons fresh lemon juice
  • 2 tablespoons seedless strawberry jam
  • 6 strawberries, finely chopped

Instructions

  1. In a blender combine white whole wheat flour, oat flour, sugar (if using), eggs, milk, and canola oil. Blend until smooth. Transfer to a bowl and cover with a lid. Refrigerate overnight.
  2. For the filling: Combine ricotta cheese, lemon zest, lemon juice, and strawberry jam. Stir to combine. Fold in chopped strawberries.
  3. Slowly whisk in the seltzer into the batter. Coat a large nonstick pan with generously cooking spray. Heat over medium-high heat. Ladle 1/3 cup of batter into the center of the pan. Immediately tilt and rotate pan to spread evenly over the whole pan.
  4. Cook until the bottom has slightly browned. Using a rubber spatula quickly flip the crepe and cook until the other side has browned. Remove from pan. Coat pan with cooking spray again and repeat with remaining batter.
  5. To assemble, place the crepe on a plate and spread filling over half of the crepe. Fold opposite side over the filling to create a half-moon shape, then fold again into a triangle.
  6. Top with additional ricotta cheese, strawberries, and lemon zest, if desired.
  7. See notes for storage of crepes.

Notes

Refrigerate crepes between sheets of wax paper and wrapped in plastic for up to 2 days.

Keywords: crepes, France, lemon, strawberry, ricotta, travel

Recipe Card powered byTasty Recipes
Chef Julie Harrington, RD - Culinary Nutrition Consultant of chefjulierd.com

 Pin this recipe for later!

Strawberry Lemon Ricotta Filled Crepes - Even if you prefer sweet or savory crepes, this crepe recipe is the perfect base for any filling. Recipe via Chef Julie Harrington, RD @ChefJulie_RD #crepes #french #france #lemon #strawberry #ricotta #breakfast

Chocolate Raspberry Cake Bites

Celebrate with cake! Chocolate Raspberry Cake Bites to be exact! They are like cake pops without the sticks and with a healthy twist.
Chocolate Raspberry Cake Bites via Chef Julie Harrington @ChefJulie_RD #raspberry #cake #chocolate #cakebites #bitesize #dessertI’ve been celebrating a lot lately. My sister’s birthday, Father’s Day, and my birthday all within a few days of each other. Let’s celebrate with CAKE! .. Cake Bites to be exact.
Chocolate Raspberry Cake Bites via Chef Julie Harrington @ChefJulie_RD #raspberry #cake #chocolate #cakebites #bitesize #dessert
This recipe idea came to me as I was waiting in line at Starbucks and was looking at the cake pops in the glass case. I wonder who first created the cake pop? It’s such a clever idea, but I always found them way too sweet. Cake plus overload on frosting blended into the cake to make the cake pop shape. I was curious if it would work with yogurt. Guess what – it did! (or I wouldn’t have posted this recipe)
Chocolate Raspberry Cake Bites via Chef Julie Harrington @ChefJulie_RD #raspberry #cake #chocolate #cakebites #bitesize #dessert
I know my typical dessert combo is chocolate and peanut butter (like here, here, and here), but I also love the chocolate raspberry combination. Okay, let’s be real.. chocolate and anything. Hi my name is Julie and I’m a chocoholic.

Chocolate Raspberry Cake Bites via Chef Julie Harrington @ChefJulie_RD #raspberry #cake #chocolate #cakebites #bitesize #dessert

Print

clock clock iconcutlery cutlery iconflag flag iconfolder folder iconinstagram instagram iconpinterest pinterest iconfacebook facebook iconprint print iconsquares squares iconheart heart iconheart solid heart solid icon
Chocolate Raspberry Cake Bites

Chocolate Raspberry Cake Bites

  • Author: Chef Julie Harrington, RD
  • Prep Time: 20 minutes
  • Cook Time: 3 hours
  • Total Time: 3 hours 20 minutes
  • Yield: 20 1x
  • Category: Dessert

Ingredients

Scale
  • 1 (18.5 oz) chocolate cake box mix (+ ingredients according to the package directions)
  • 1/3 cup vanilla Greek yogurt (I used 4% vanilla Siggi’s)
  • 1/3 cup seedless raspberry jam, melted
  • 2 cups dark chocolate chips
  • 1 teaspoon coconut oil
  • 6 tablespoons raspberry jam
  • 1/4 cup raspberries

Instructions

  1. Bake 9-inch chocolate cake according to package directions. Let cool completely.
  2. Crumble cake into a large bowl. Add the yogurt and melted jam; mix well. Shape into 1-in. squares. Place on baking sheets. Freeze for at least 2 hours or refrigerate for at least 3 hours or until cake balls are firm.
  3. Melt dark chocolate chips with coconut oil over a double boiler or in the microwave. Spread a teaspoon of raspberry jam. Dip each cake bite in melted chocolate; allow excess to drip off. Top with raspberry pieces.
  4. Refrigerate until chocolate has set. Store in refrigerator until ready to serve.

Keywords: #raspberry #chocolate #cakebite #cake #dessert #bitesize #bitesizedessert

Recipe Card powered byTasty Recipes

Chef Julie Harrington, RD - Culinary Nutrition Consultant of chefjulierd.com


Chocolate Raspberry Cake Bites via Chef Julie Harrington @ChefJulie_RD #raspberry #cake #chocolate #cakebites #bitesize #dessert

Vanilla Espresso Energy Bites

Need a little afternoon pick-me-up? These Vanilla Espresso Energy Bites are a perfect energy boosting snack.

Vanilla Espresso Energy Bites via RDelicious Kitchen @RD_Kitchen
I originally posted this recipe back in 2014 on my travels to Blog Brulee in Vermont. Boy, a lot has changed since that conference. That conference hands down was the most amazing experience and I contribute a lot of my blogging success from that conference. It gave me the confidence to turn my hobby into my business.
One of my biggest goals was to focus on my food photography. When you are sharing a recipe online, it has to look visually appealing. While some of my old recipes taste delicious, they are not very photogenic. I am working on updating old recipes this summer. This is one of my favorite energy bite recipes, but the photo definitely needed an upgrade.
Then vs. Now - Improving Food PhotographyEvery time I take food pictures, I am constantly learning and improving. It is a constant learning process.

Vanilla Espresso Energy Bites via RDelicious Kitchen @RD_Kitchen
If you are a coffee lover, you’ll love the addition of the espresso powder. It will give you that little jolt to power you through the afternoon. Find espresso powder in the coffee aisle of the grocery store.
Make these ahead and enjoy all week (if they even last that long). Just remember to store in the refrigerator, or they dry out and get very crumbly.
Vanilla Espresso Energy Bites via RDelicious Kitchen @RD_Kitchen

Print

clock clock iconcutlery cutlery iconflag flag iconfolder folder iconinstagram instagram iconpinterest pinterest iconfacebook facebook iconprint print iconsquares squares iconheart heart iconheart solid heart solid icon
espresso energy bites

Vanilla Espresso Energy Bites

  • Author: Julie @ RDelicious Kitchen
  • Yield: 16 balls 1x

Ingredients

Scale
  • 1½ cup rolled oats
  • ¾ cup ground flax seed
  • ½ cup chocolate chips
  • 1 cup vanilla almond butter (I used Justin’s)
  • 2 tbsp pure maple syrup
  • 1 tablespoon espresso powder

Instructions

  1. Add oats, flax seed, and chocolate chips in a large bowl. Toss to combine.
  2. Add almond butter, maple syrup, and espresso in a small bowl and microwave for 30 seconds or until softened.
  3. Combine the almond butter mixture with the oat mixture until combined. The mixture will be thick. Shape into tablespoon-sized balls. Store in refrigerator.

Recipe Card powered byTasty Recipes

Did you make this recipe? Tag @rdeliciouskitchen on Instagram or send me a pic, I’d love to see!RDelicious Kitchen @RD_Kitchen

Pin this recipe for later!

Vanilla Espresso Energy Bites via RDelicious Kitchen @RD_Kitchen

Green Goddess Smoothie Bowl

Start your morning with this Green Goddess Smoothie Bowl. 
Green Goddess Smoothie Bowl
I haven’t had the best luck lately. When I was bringing groceries into my apartment, my canvas bag strap broke and the eggs in my bag ended up all over the floor of my kitchen. Back to the store I went because I was shooting a video for my Flourless Peanut Butter Chocolate Muffins that day.

Then, you may have seen on Instagram that I ended up with 3 stitches on my finger this week.
@RDeliciousKitchen InstagramThursday, I was at Living Plate getting ready for a cooking class and washing a mandolin and accidentally sliced my finger. I headed to urgent care while two interns continued to prep for the class. These dietetic interns just started working with me and with my little accident, they saved the day! I got stitched up, headed back and the class was ready to go. The interns were rock stars! The class was ready to go and the class was a success!
Green Goddess Smoothie BowlSo maybe it really wasn’t a bad luck week, more like a clumsy week. Yes, I may have had my kerfuffle moments, but one thing that was consistently great this week, was breakfast. This Green Goddess Smoothie Bowl was enjoyed all week. I’ve been on a total smoothie kick lately and have been making this exact combo daily. I really do enjoy the act of eating smoothie bowls with a spoon. It helps practice mindful eating and you get to enjoy it for so much longer.
After every storm is a rainbow because I am now sitting on Lake Champlain with my bff’s in Vermont for the weekend. Girls weekend!
Lake Champlain, Vermont
What is everyone doing this weekend? 

Print

clock clock iconcutlery cutlery iconflag flag iconfolder folder iconinstagram instagram iconpinterest pinterest iconfacebook facebook iconprint print iconsquares squares iconheart heart iconheart solid heart solid icon
green smoothie in a white bowl with strawberries and coconut

Green Goddess Smoothie Bowl

  • Author: Julie @ RDelicious Kitchen

Ingredients

Scale
  • 1/4 cup mango, frozen
  • 1/2 avocado
  • 1/2 small banana [frozen is best for creaminess]
  • 1 cup spinach
  • 3 strawberries
  • 2 tablespoons chia seeds
  • 1 teaspoon cinnamon
  • 1 cup unsweetened almond milk
  • (optional toppings): hemp hearts, sliced strawberries, unsweetened coconut

Instructions

  1. Add all ingredients into a blender and blend until smooth.
  2. Pour into a bowl and top with your favorite toppings.

Recipe Card powered byTasty Recipes

Did you make this recipe? Tag @rdeliciouskitchen on Instagram or send me a pic, I’d love to see!RDelicious Kitchen @RD_KitchenPin this recipe for later!

Green Goddess Smoothie Bowl

Spring Salad with Raspberry Vinaigrette

Serve up this fresh Spring Salad with Raspberry Vinaigrette. Spring Salad with Raspberry Vinaigrette via RDelicious Kitchen @RD_KitchenThe big debate: Are you for fruit on a salad or against it? I am ALL about adding fruit to salad. I love that little sweet bite. While I know some others who are completely against it, arguing otherwise.
Spring Salad with Raspberry Vinaigrette via RDelicious Kitchen @RD_Kitchen
Why not get fruits and vegetables in all in one shot? Salads don’t have to be boring. Someone recently said to me, “Since you are a Registered Dietitian, you’re probably going to tell me to eat more salads right”? As a Registered Dietitian, I’ll encourage you to eat more fruits and vegetables, that may be in the form of salad, but in other ways as well. The problem is “salad” sounds so boring. Unfortunately, most often the first thought of salad is the boring romaine lettuce, tomatoes, and maybe a few slices of cucumber.
Spring Salad with Raspberry Vinaigrette via RDelicious Kitchen @RD_Kitchen
The key to building a delicious salad is variety. Don’t get stuck with the same combination. Try adding different textures. I like to add roasted vegetables on top of a bed of greens to add an extra pop of flavor. Every week I roast a large tray of vegetables. Throughout the week they get tossed on salads, mixed into a stir fry or scrambled with eggs. That one meal prep solution has been a weekly staple for me.
Spring Salad with Raspberry Vinaigrette via RDelicious Kitchen @RD_Kitchen
I had the most delicious raspberry vinaigrette at a restaurant and I recreated my version for this salad. The sweetness naturally comes from fresh raspberries and balanced with white wine vinegar. Salad dressings are surprisingly very easy to make. This dressing can last for about a week in the refrigerator. Just give it a gentle shake before using.

Spring Salad with Raspberry Vinaigrette via RDelicious Kitchen @RD_Kitchen

Print

clock clock iconcutlery cutlery iconflag flag iconfolder folder iconinstagram instagram iconpinterest pinterest iconfacebook facebook iconprint print iconsquares squares iconheart heart iconheart solid heart solid icon
Spring Salad with Raspberry Vinaigrette on a white plate

Spring Salad with Raspberry Vinaigrette

  • Author: Julie @ RDelicious Kitchen
  • Yield: 2

Ingredients

Scale
  • 4 cups arugula
  • 1/2 cup roasted asparagus, chopped
  • 1/2 cup raspberries
  • 1/4 cup red onion, thinly sliced
  • 2 ounces almonds, chopped
  • 2 ounces goat (or feta cheese), crumbled
  • For the dressing: (makes about 3/4 cup)
  • 1/4 cup fresh raspberries
  • 1/4 cup white wine vinegar
  • 1 small shallot, finely chopped
  • 1/2 cup olive oil
  • Salt and ground pepper, to taste

Instructions

  1. On two plates, layer the arugula, asparagus, raspberries, red onion, almonds, and goat cheese.
  2. For the dressing: Combine all ingredients in a blender or food processor and blend until smooth. Season to taste with salt and pepper. Store extra dressing the in the refrigerator for up to a week.
  3. Drizzle salads with dressing.

Recipe Card powered byTasty Recipes

Did you make this recipe? Tag @rdeliciouskitchen on Instagram or send me a pic, I’d love to see!
RDelicious Kitchen @RD_Kitchen

Pin this recipe for later!Spring Salad with Raspberry Vinaigrette via RDelicious Kitchen @RD_Kitchen


Blackberry Lime Fizz

Sip on a refreshing beverage to cool off this summer.
Blackberry Lime Fizz via RDelicious Kitchen @RD_Kitchen
With plenty of graduation parties, BBQ’s, and other outdoor activities coming up, this Blackberry Lime Fizz is definitely a refreshing crowd pleaser.

It’s important to stay hydrated in the summer heat, but why not add a flair of flavor into your glass.
Blackberry Lime Fizz via RDelicious Kitchen @RD_Kitchen
Tips to stay hydrated this summer:

1. Always carry a water bottle with you. You will most likely never see me without one! When you have a water always on hand, you are more likely to mindlessly sip throughout the day. Want your water to stay nice and chilled all day? Try one of these water bottles: Camelbak, S’well, or Corkcicle.
2. Sip on a mug of herbal tea or unsweetened ice tea in the evening. Making this a habit will add an extra cup of fluid to your day. Plus, it can help curb mindless late night snacking.
3. Eat whole foods. Eating water-rich foods like fruits and vegetable will automatically increase your fluid intake.
Blackberry Lime Fizz via RDelicious Kitchen @RD_Kitchen
I’ve been loving sipping on La Croix lately. La Croix is a sparkling water. The main difference between sparkling water and seltzer water is the bubbles. Sparkling water has smaller bubbles that are naturally-occurring from the carbonation due to gasses while seltzer water has larger bubbles due to added carbon dioxide.

Print

clock clock iconcutlery cutlery iconflag flag iconfolder folder iconinstagram instagram iconpinterest pinterest iconfacebook facebook iconprint print iconsquares squares iconheart heart iconheart solid heart solid icon
Blackberry Lime Fizz in a tall glass with gold bottom

Blackberry Lime Fizz

  • Author: Julie @ RDelicious Kitchen
  • Yield: 1

Ingredients

Scale
  • 5 blackberries
  • 1/2 lime, juiced
  • ice
  • 1 can LaCroix Curaté Muré Pepino (blackberry cucumber)
  • fresh blackberries and thin slices of lime, for garnish
  • (optional) to make it a cocktail 1.5 oz vodka

Instructions

  1. In a small bowl, add the blackberries and lime juice. Muddle blackberries in the lime juice. Strain juice to remove the seeds. Pour blackberry lime juice in a tall glass.
  2. Fill the glass most of the way with ice. Top with LaCroix.
  3. Garnish with slices of lime and blackberries.

Recipe Card powered byTasty Recipes

Did you make this recipe? Tag @rdeliciouskitchen on Instagram or send me a pic, I’d love to see!

RDelicious Kitchen @RD_Kitchen

Pin now and save for later!

Blackberry Lime Fizz via RDelicious Kitchen @RD_Kitchen

Grilled Caesar Salad with Lemon Tahini Dressing

Have you ever tried grilling leafy greens? Try this Grilled Caesar Salad with Creamy Lemon Tahini Dressing this grilling season. 

Grilled Caesar Salad with Creamy Lemon Tahini Dressing - try grilling greens for a whole new salad experience via Chef Julie Harrington @ChefJulie_RD #salad #caesarsalad #vegan #vegetarian #caesar #plantbased #dressing #tahini #glutenfree

Memorial Day weekend is just around the corner, but it’s never too early to start firing up the grill. I’ve been all about the grilling scene in the blog world lately.

I started contributing to Luvo’s Fresh Blog and my first article was recently published – A Dietitian’s Guide to Building a Healthier Burger. Check out some nutritious tips for grilling burgers this summer.

Grilled Caesar Salad with Creamy Lemon Tahini Dressing - try grilling greens for a whole new salad experience via Chef Julie Harrington @ChefJulie_RD #salad #caesarsalad #vegan #vegetarian #caesar #plantbased #dressing #tahini #glutenfree

Then, to my surprise, I was nominated for the Wayfair Healthy Gas Griller Recipe Award, featuring my Chipotle Lime Shrimp Tacos.

While both articles are more about the traditional grilling fare, I tried something a little different – grilling romaine lettuce. I was pleasantly surprised with the results. If you want to try grilling leafy greens, use sturdier greens like romaine, cabbage, etc.

Grilled Caesar Salad with Creamy Lemon Tahini Dressing - try grilling greens for a whole new salad experience via Chef Julie Harrington @ChefJulie_RD #salad #caesarsalad #vegan #vegetarian #caesar #plantbased #dressing #tahini #glutenfree

The key to this Caesar salad is the toppings. Skip the croutons and top with plant-based fiber packed roasted chickpeas and add creaminess with avocado.

The real star is the dressing! This combination of lemon, hummus, tahini, and the secret ingredient cashews combines to create a thick and creamy dressing, minus the unwanted saturated fats and replacing them with heart-healthy unsaturated fats. 

Grilled Caesar Salad with Creamy Lemon Tahini Dressing - try grilling greens for a whole new salad experience via Chef Julie Harrington @ChefJulie_RD #salad #caesarsalad #vegan #vegetarian #caesar #plantbased #dressing #tahini #glutenfree

Have you ever tried grilling leafy greens?

Print
clock clock iconcutlery cutlery iconflag flag iconfolder folder iconinstagram instagram iconpinterest pinterest iconfacebook facebook iconprint print iconsquares squares iconheart heart iconheart solid heart solid icon
Grilled Caesar Salad with Lemon Tahini Dressing on a white platter

Grilled Caesar Salad with Creamy Lemon Tahini Dressing

  • Author: Chef Julie Harrington, RD
  • Prep Time: 15
  • Cook Time: 5
  • Total Time: 20 minutes
  • Yield: 2-4 1x
  • Category: Salad
  • Method: Grilling
  • Cuisine: American

Description

Have you ever tried grilling leafy greens? Try this Grilled Caesar Salad with Creamy Lemon Tahini Dressing this grilling season. 


Ingredients

Scale
  • 1 large romaine heart, cut in half lengthwise
  • Olive oil spray
  • 1 avocado, diced
  • 1/2 cup chickpeas, drained and rinsed
  • 1 teaspoon olive oil
  • 1/2 teaspoon garlic powder


For the dressing:

  • 1/4 cup lemon juice
  • 2 tablespoons garlic hummus
  • 1 tablespoon tahini paste
  • 2 tablespoons water
  • 1 teaspoon Worcestershire
  • 1/4 cup raw cashews, soaked in water
  • Salt, to taste

Instructions

  1. Preheat oven to 400 degrees F. In a small bowl, combine chickpeas, olive oil, and garlic powder. Line a baking sheet with parchment paper. Place chickpeas on baking sheet and roast in the oven for 20 minutes, turning occasionally.
  2. As chickpeas are roasting, preheat grill to high. Spray cut, flat side of romaine hearts and place cut-side down on the grill. Grill for about 1-2 minutes until grill marks appear on lettuce. Flip and grill for an additional minute, to sear. Remove hearts to platter cut sides up.
  3. For dressing, place all ingredients in a food processor and pulse until smooth and creamy.
  4. Drizzle romaine hearts with dressing and top with roasted chickpeas and avocado.
  5. Store extra dressing in an airtight container.

Keywords: Salad, Caesar Salad, Grilling, Romaine, Tahini, Dressing, side dish

Recipe Card powered byTasty Recipes
Chef Julie Harrington, RD - Culinary Nutrition Consultant of chefjulierd.com
Grilled Caesar Salad with Creamy Lemon Tahini Dressing - try grilling greens for a whole new salad experience via Chef Julie Harrington @ChefJulie_RD #salad #caesarsalad #vegan #vegetarian #caesar #plantbased #dressing #tahini #glutenfree

Cheesy Cauliflower Waffles

Take out your waffle maker and whip up a batch of these Cheesy Cauliflower Waffles (aka. “Cauli-Waffles”) for a fun new breakfast!

close up image of a cheesy cauliflower waffle

As a food blogger and recipe developer, I always have recipe ideas running through my mind. This “cauli-waffle” idea was inspired when I was organizing my kitchen gadgets and found my waffle maker buried in the back of one of my cabinets. I honestly forget what kitchen gadgets that I have sometimes. Hi, my name is Julie and I am a kitchen gadget hoarder.

cauliflower waffle with a fried egg, tomato, and avocado

I set my waffle maker on my counter and was planning on making waffles for a fun weekend breakfast, but when I woke up Saturday morning, I was craving savory rather than sweet. The plan for the cauliflower rice that was sitting in my fridge was to make my Hawaiian Chicken Cauliflower Fried Rice for dinner that night, was used for my breakfast instead.

Cheesy Cauliflower Waffles

This is going to become one of my brunch staples. I topped my waffle with a fried egg, avocado, and tomato slices. Now that is what I call a savory breakfast.

Cheesy Cauliflower Waffles topped with a fried egg, tomato, and avocado

I am going to assume they freeze well. I really can’t say since they were all devoured that morning.. oops! I would recommend warming them in the oven if you do have leftovers. 

cauliflower waffles on a marble slab

Have you ever made a savory dish using your waffle iron?

Print
clock clock iconcutlery cutlery iconflag flag iconfolder folder iconinstagram instagram iconpinterest pinterest iconfacebook facebook iconprint print iconsquares squares iconheart heart iconheart solid heart solid icon
Cheesy Cauliflower Waffles with fried egg, tomato, and avocado

Cheesy Cauliflower Waffles

  • Author: Chef Julie Harrington, RD
  • Prep Time: 15
  • Cook Time: 20
  • Total Time: 35 minutes
  • Yield: 4
  • Category: Breakfast
  • Method: Waffle Maker
  • Cuisine: American

Description

Take out your waffle maker and whip up a batch of these Cheesy Cauliflower Waffles (aka. “Cauli-Waffles”) for a fun new breakfast!


Ingredients

Scale
  • 3 cups cauliflower rice
  • 3 scallions, chopped
  • 1/2 cup cheddar cheese, shredded (I used Cabot!)
  • 2 cloves garlic, minced
  • 1 egg, whisked
  • salt and pepper, to taste

Instructions

  1. Place your cauliflower rice into a microwave-safe dish. Add a teaspoon of water, (which will help to steam the cauliflower). Cover the dish with a damp paper towel. Cook for 2-3 minutes.
  2. Leave your cauliflower rice covered, to stand for 5 minutes. Transfer to a clean towel or paper towel and press to remove any excess moisture, which can make your dish soggy.
  3. Add cauliflower, scallions, cheddar cheese, and garlic in a bowl. Toss to combine. Fold in whisked egg until all ingredients are coated. Season with salt and pepper.
  4. Heat waffle iron. Spray waffle iron well with cooking spray. Add 3/4 cup of the cauli-waffle mixture to the waffle iron and cook 3-4 minutes until the desired doneness. (I like them extra crispy!)
  5. Remove cauli-waffle from waffle iron and spray again before making your next waffle. Repeat process until 4 waffles are made.
  6. Enjoy as is or top with a fried egg, tomato slices, and avocado.

Keywords: Waffle, cauliflower, low carb, savory, cheesy

Recipe Card powered byTasty Recipes

other recipes you may enjoy

Parsley Stem Pesto over Roasted Asparagus

Happy Earth Day! There are so many food scraps that are often thrown out but can be repurposed into something new, just like this Parsley Stem Pesto.Parsley Stem Pesto over Roasted Asparagus via RDelicious Kitchen @RD_kitchenWith today being Earth Day, The Recipe ReDux members were challenged to show how to reduce food waste. Whatever you would normally toss, use it up! I use a lot of fresh herbs in my kitchen, but the stems usually end up in the trash, which is crazy because the stems actually have more of an intense flavor.Parsley Stem Pesto over Roasted Asparagus via RDelicious Kitchen @RD_kitchen
I loved this month’s theme because it got me thinking of the amount of food waste that tends to happen in my kitchen. So instead of tossing my parsley stems, I created a parsley stem pesto.Parsley Stem Pesto over Roasted Asparagus via RDelicious Kitchen @RD_kitchenThe typical herb to use in pesto is basil, but really any herb will do. Boy, do those stems have great flavor! The pesto is this intense green color with a fresh and flavorful zing to it.Parsley Stem Pesto over Roasted Asparagus via RDelicious Kitchen @RD_kitchenI also subbed pine nuts for walnuts. I tend to like my pesto a little thicker, so the walnuts are great for that. Plus, walnuts were what I had on hand and a great source of polyunsaturated fats!

Print

clock clock iconcutlery cutlery iconflag flag iconfolder folder iconinstagram instagram iconpinterest pinterest iconfacebook facebook iconprint print iconsquares squares iconheart heart iconheart solid heart solid icon
Parsley Stem Pesto over Roasted Asparagus on a white plate

Parsley Stem Pesto over Roasted Asparagus

  • Author: Julie @ RDelicious Kitchen
  • Yield: 6

Ingredients

Scale
  • 1/2 cup walnuts
  • 1 cup parsley stems, roughly chopped
  • 1/4 cup parmesan cheese
  • 2 garlic cloves, roughly chopped
  • 1 tablespoon lemon juice
  • 1/2 teaspoon salt
  • 1/2 cup + 1 tablespoon olive oil, divided
  • 1 bunch asparagus, ends trimmed

Instructions

  1. Preheat an oven to 425 degrees F.
  2. Place the asparagus into a mixing bowl, and drizzle with the olive oil. Season with salt and pepper. Toss to coat.
  3. Bake in the preheated oven until just tender, 12 to 15 minutes depending on thickness.
  4. While the asparagus is cooking, add walnuts, parsley, parmesan cheese, garlic, lemon juice, and salt in a food processor and pulse for a few seconds to combine. Scrape down the sides of the bowl and pulse again.
  5. Slowly drizzle in the olive oil while the food processor is running just long enough to incorporate the oil, about 20-30 seconds.
  6. Spread pesto over asparagus and serve.

Notes

Reserve extra pesto in an airtight container in the refrigerator.

Recipe Card powered byTasty Recipes

RDelicious Kitchen @RD_Kitchen
Parsley Stem Pesto over Roasted Asparagus via RDelicious Kitchen @RD_kitchen